
You are using an out of date browser. It may not display this or other websites correctly.
You should upgrade or use an alternative browser.
You should upgrade or use an alternative browser.
What's on the Bench? 2021
- Thread starter Graeme C.
- Start date

Thank you Tim. That's my next area of investigation: I changed the cartridge two weeks ago, before reactivating the system after almost 40 years, and maybe I made some damage. Hope to find an easy-to-fix problem; nowadays HiFi maintenance shops are rarer than the correct Dunkelgelb :smiling:.Interesting shot of the Teac part. Have you checked the cartridge end connections? Those wires are so very fine it’s easy to knock them off if the tonearm is accidentally handled badly….
I feel your pain. Ive got a Pioneer receiver that I'd love to get back to operational. Maybe an easy fix... for the right guy. I am not the right guy. Shipping for service would be cost-prohibitive. Fortunately I found a local shop listed online that works on vintage Hi-Fi. Almost seems too good to be true.... will see after Christmas holidays are past.....Thank you Tim. That's my next area of investigation: I changed the cartridge two weeks ago, before reactivating the system after almost 40 years, and maybe I made some damage. Hope to find an easy-to-fix problem; nowadays HiFi maintenance shops are rarer than the correct Dunkelgelb :smiling:.
1/3
Probably more out there than you think Andy. Vinyl playback gear and parts is far easier to source than CD playback stuff these days…..not sure you’ll find a bricks and mortar shop though. What is the issue? Complete output failure or is it just one channel down?
Afternoon all
So because things at work are so manic to the point it's been unsustainable for months and I've been working quite a few extra hours as a result, my very good boss told me to take to day off to give me a break....before I myself break.......not out of my leave or anything....just a day off to relax.
So I decided to get all of my unused 1/72 resin and metal stowage primed. It' will save having to do it as an when I need it. Nothing flashy just Halford rattle can grey primer.....around 110 pieces in all......this shot is after I turned them over and gave the undersides a quick spray., so they just need to dry.

I was also thinking of putting some tarps on my Cromwell and remembered Paul's (aka Scottie) tarp made from PVA glue and paint he'd stumbled across (link HERE). It really doesn't take much to do it. I just used some old Humbrol acrylics. I'm just waiting for it to dry. At 1/72 this should last while - scaled up it's the equivalent of 99.5 sqm..... :smiling5: :smiling5:

So because things at work are so manic to the point it's been unsustainable for months and I've been working quite a few extra hours as a result, my very good boss told me to take to day off to give me a break....before I myself break.......not out of my leave or anything....just a day off to relax.
So I decided to get all of my unused 1/72 resin and metal stowage primed. It' will save having to do it as an when I need it. Nothing flashy just Halford rattle can grey primer.....around 110 pieces in all......this shot is after I turned them over and gave the undersides a quick spray., so they just need to dry.
I was also thinking of putting some tarps on my Cromwell and remembered Paul's (aka Scottie) tarp made from PVA glue and paint he'd stumbled across (link HERE). It really doesn't take much to do it. I just used some old Humbrol acrylics. I'm just waiting for it to dry. At 1/72 this should last while - scaled up it's the equivalent of 99.5 sqm..... :smiling5: :smiling5:
Deleted as I made a mess with the text. Sorry.
Probably more out there than you think Andy. Vinyl playback gear and parts is far easier to source than CD playback stuff these days…..not sure you’ll find a bricks and mortar shop though. What is the issue? Complete output failure or is it just one channel down?
It's just one channel down, Tim. Cross checked with another amplifier and again, output only on the left channel. As I think highly improbable that both ampli have the same issue, I'm pretty sure that the problem lies between the cartridge head and the turntable output jacks.
Thank you for your kind interest but may I suggest to continue our chit chat in "conversation mode" before any of the moderators get uneasy for "Thread topic infringing"?:fearful: :smiling3:
1/3
Your cartridge may have gone open circuit on one channel only. I had that happen to me once. Have you tried swapping the channel output wires to see if the issue moves to the other channel? if it moves channels when you do this it’s a cartridge issue…..It's just one channel down, Tim. Cross checked with another amplifier and again, output only on the left channel. As I think highly improbable that both ampli have the same issue, I'm pretty sure that the problem lies between the cartridge head and the turntable output jacks.
Thank you for your kind interest but may I suggest to continue our chit chat in "conversation mode" before any of the moderators get uneasy for "Thread topic infringing"?:fearful: :smiling3:
At the moment loads of tools.... But I now once again a hobby room. Pretty much how it used to be but with the addition of a rather large desk with my computer.
Quite chuffed, so far I have spent a tenner on flexi pipe for the extractor. Next step service the compressor, tidy up and dig out the stash!!!
Watch this space.
Quite chuffed, so far I have spent a tenner on flexi pipe for the extractor. Next step service the compressor, tidy up and dig out the stash!!!
Watch this space.
1/3
You might find this site useful Andy
https://www.henleyaudio.co.uk/cartridge-installation
https://www.henleyaudio.co.uk/cartridge-installation
Got some primer on it this morning so ploding along, got a feeling its busy till Christmas so it could just be a plod were see.The152 currently on hold as other half sent home to work ,seven cases of covid in the office so have lost the spray booth/work bench (dining room table) . Have squeezed on one end and managed to start a future build won't say what it is I'll keep you guessing ,1/72 of course made by PST so not surprised nothing fits ,no glazing for the cab ,if you've got some brass rod you can supply your own axels all pretty par for the course but a great little subject and not too bad if your prepared to put the time in. All the little sub assembly's I find it easier to build on the sprue saves having loads of little bits floating about.......at this point I to ran in to pic probs .........so sorry for wasting your time. Dave
Well sat on the throne this am dont know what I did but reduced the pic to eighty per cent and it worked(hope it hasent done my whole album in )but any way you can see what I meant about building on the sprue the little bogey assembly's ,the brick shaped pieces on same spru are the track links for the link and length assembly.
So on to the track assembly's Mmmmmm not the best set of mouldings but I'm not moaning you know what your in for before you even take the lid off of a PST kit you just have to put your head down keep the toys in the pram so without hurling abuse at the dog or kitten keeping it to myself ended up with these
Not too bad ,always nice to sit back and give yourself a pat on the back for the effort put in. Seem to have photo thing sorted wasn't to bothered John says once the shop site is completed and running this part will get sorted ,I've semi sussed it so let's hope people stay off of his back he has to put his bissiness first. Dave


Stay safe all looks like this covid crap is trying to make a comeback. Dave


G
Guest
Guest
Looking good Dave .Got some primer on it this morning so ploding along, got a feeling its busy till Christmas so it could just be a plod were see.
Stay safe all looks like this covid crap is trying to make a comeback. Dave
Wondered what you were building Rick , tarp looks good , esp like the foil straps .Making slow progress on this........cargo bed interior paint and tissue paper tarp. Rolled up the flap and secured in place with foil. Should be getting some paint on this later on in the week.
Rick H.
1/3
That's looking most excellent Rick,Making slow progress on this........cargo bed interior paint and tissue paper tarp. Rolled up the flap and secured in place with foil. Should be getting some paint on this later on in the week.
Rick H.
Looks like a real tarp
")
Nice one mate!
Andy
1/3
Afternoon all
So because things at work are so manic to the point it's been unsustainable for months and I've been working quite a few extra hours as a result, my very good boss told me to take to day off to give me a break....before I myself break.......not out of my leave or anything....just a day off to relax.
So I decided to get all of my unused 1/72 resin and metal stowage primed. It' will save having to do it as an when I need it. Nothing flashy just Halford rattle can grey primer.....around 110 pieces in all......this shot is after I turned them over and gave the undersides a quick spray., so they just need to dry.
I was also thinking of putting some tarps on my Cromwell and remembered Paul's (aka Scottie) tarp made from PVA glue and paint he'd stumbled across (link HERE). It really doesn't take much to do it. I just used some old Humbrol acrylics. I'm just waiting for it to dry. At 1/72 this should last while - scaled up it's the equivalent of 99.5 sqm..... :smiling5: :smiling5:
Good idea getting a "go to ready" stock of stowage/extras all sorted AndrewAfternoon all
So because things at work are so manic to the point it's been unsustainable for months and I've been working quite a few extra hours as a result, my very good boss told me to take to day off to give me a break....before I myself break.......not out of my leave or anything....just a day off to relax.
So I decided to get all of my unused 1/72 resin and metal stowage primed. It' will save having to do it as an when I need it. Nothing flashy just Halford rattle can grey primer.....around 110 pieces in all......this shot is after I turned them over and gave the undersides a quick spray., so they just need to dry.
I was also thinking of putting some tarps on my Cromwell and remembered Paul's (aka Scottie) tarp made from PVA glue and paint he'd stumbled across (link HERE). It really doesn't take much to do it. I just used some old Humbrol acrylics. I'm just waiting for it to dry. At 1/72 this should last while - scaled up it's the equivalent of 99.5 sqm..... :smiling5: :smiling5:
I'm interested to see how the tarpaulin cover works out too !
Cheers,
Andy
AndyGood idea getting a "go to ready" stock of stowage/extras all sorted Andrew :smiling3:
I'm interested to see how the tarpaulin cover works out too !
Cheers,
Andy
I had to have a few goes at the tarp.....
First attempt paint was too thin..... 2nd attempt - speeding up the drying process in the oven, even at very low 30c does NOT work.....3rd go was not perfect but got some useable pieces...it dries surprisingly matt on the open side and slightly darker on the glass side... Also surprising how much volume is lost as it dries out.
I used super glue to fix it to the model.
Keep an eye on my Cromwell thread in the next few days so you can see what it looks like in situ.
ATB.
Andrew
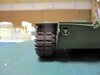
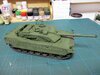
Ariete is slowly growing: now it has its feet.
View attachment 439718View attachment 439719
Tracks are vinyl (OOB) and were painted with Dave's recipe followed by a track wash and some rust and dark steel pigments.
I like the result, considering it's vinyl; the fit was very tight and if I had chosen an AM set of tracks, metal or resin, I would have had serious problems in sliding them between the sponson and the return rollers.
The tank is, as always, only dry fitted.
My time at the bench was expiring (I'm still a commuting modeller :disappointed2 so those ugly glue traces on the track will be duly treated next time.
Andrea
View attachment 439718View attachment 439719
Tracks are vinyl (OOB) and were painted with Dave's recipe followed by a track wash and some rust and dark steel pigments.
I like the result, considering it's vinyl; the fit was very tight and if I had chosen an AM set of tracks, metal or resin, I would have had serious problems in sliding them between the sponson and the return rollers.
The tank is, as always, only dry fitted.
My time at the bench was expiring (I'm still a commuting modeller :disappointed2
so those ugly glue traces on the track will be duly treated next time.Andrea
Attachments


G
Guest
Guest
Not on my modelling bench, but a pretty involved job anyway:
View attachment 439877
The hard drive on my iMac began to fail last Sunday, after which I decided to replace it with an SSD. Getting to it is quite a job and pretty delicate too. Now it’s in, I will still need to re-install the OS and put all my data back onto it — which may be complicated because my backup hard drive is also failing, says the program that diagnosed the internal drive problems Neither had actually failed yet, though, so I can still copy things off both the old internal drive and the backup, so fingers crossed …
View attachment 439877
The hard drive on my iMac began to fail last Sunday, after which I decided to replace it with an SSD. Getting to it is quite a job and pretty delicate too. Now it’s in, I will still need to re-install the OS and put all my data back onto it — which may be complicated because my backup hard drive is also failing, says the program that diagnosed the internal drive problems
Neither had actually failed yet, though, so I can still copy things off both the old internal drive and the backup, so fingers crossed …Legal Notice
scalemodelling.co.uk is a privately operated online discussion forum. All content posted by members reflects their own views and opinions and does not necessarily represent those of the forum owners or administrators. While reasonable efforts are made to moderate content, no responsibility is accepted for user-generated material. By using this site, you agree to comply with UK law and the forum rules.