
You are using an out of date browser. It may not display this or other websites correctly.
You should upgrade or use an alternative browser.
You should upgrade or use an alternative browser.
Airfix 1/12 4.5 Litre Bentley Blower
- Thread starter Bigfoot57
- Start date
Bigfoot57
Active member
- Joined
- Jun 24, 2015
- Messages
- 1,216
- Location
- Weston Super Mare
- First Name
- Colin
- Location
- Originally a small village outside of Reading Berkshire called Burghfield Common
1/3
Airfix 1/12 4.5 Litre Bentley Blower Part 6
Steering wheel Spare Wheel and more linkages
Hello good afternoon from sunny Weston it is sunshine here at the moment quite pleasant
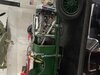
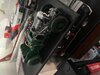
So what have I been up to this time well I’ve added some more linkages on the chassis from the handbrake to the front wheel drum and similarly add a small linkage from the rear of the handbrake assembled towards another fixing point on the chassis about an inch away
View attachment 438140View attachment 438141
View attachment 438142View attachment 438143View attachment 438144View attachment 438145View attachment 438146
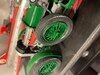
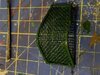
As you can see I also added the steering wheel suitably wrapped in cord to represent another modification used on the racing Bentleys namely to stop their hands from slipping on the polished wheels especially in wet weather I’ve also assembled the spare wheel took about 2 hours to wrap the cord around the steering wheel and 5 minutes to assemble the spare wheel
Still to be done are the windscreens the fly / bug guard the stone chip protectors for the headlamps horns and something completely missing from the kit is another stone guard over the left hand side front by the supercharger then the final piece will be to see if the bonnet panels fit along with the bonnet straps
Regards
Colin
Steering wheel Spare Wheel and more linkages
Hello good afternoon from sunny Weston it is sunshine here at the moment quite pleasant
So what have I been up to this time well I’ve added some more linkages on the chassis from the handbrake to the front wheel drum and similarly add a small linkage from the rear of the handbrake assembled towards another fixing point on the chassis about an inch away
View attachment 438140View attachment 438141
View attachment 438142View attachment 438143View attachment 438144View attachment 438145View attachment 438146
As you can see I also added the steering wheel suitably wrapped in cord to represent another modification used on the racing Bentleys namely to stop their hands from slipping on the polished wheels especially in wet weather I’ve also assembled the spare wheel took about 2 hours to wrap the cord around the steering wheel and 5 minutes to assemble the spare wheel
Still to be done are the windscreens the fly / bug guard the stone chip protectors for the headlamps horns and something completely missing from the kit is another stone guard over the left hand side front by the supercharger then the final piece will be to see if the bonnet panels fit along with the bonnet straps
Regards
Colin
Attachments
-
 F7EC92FB-DB3C-424E-91FF-5E72118CD43B.jpeg2.9 KB · Views: 0
 -
 D3B77D64-3A26-457F-8713-C325ADE263A1.jpeg2.7 KB · Views: 0
 -
 C7CC311F-857E-4413-86DF-B7466DA7EA31.jpeg3.8 KB · Views: 0
 -
 5B95C278-1A80-44E8-95C3-316F362ADFCF.jpeg3.5 KB · Views: 0
 -
 8D26AD50-5D03-4CEE-A3CD-496B459F903A.jpeg3.5 KB · Views: 0
 -
 013FB516-1D05-4D00-9672-8C2BC4B6B453.jpeg3.1 KB · Views: 0
 -
 38EB2EAF-BD4D-4592-AF5F-D32347CC7016.jpeg2.6 KB · Views: 0
Bigfoot57
Active member
- Joined
- Jun 24, 2015
- Messages
- 1,216
- Location
- Weston Super Mare
- First Name
- Colin
- Location
- Originally a small village outside of Reading Berkshire called Burghfield Common
1/3
Airfix 1/12 4.5 Litre Bentley Blower Part 7
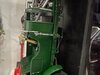
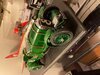
I was hoping this would be the last build entry for this model sadly it cannot be I’ve had some issues namely the complete missing front offside Midgard stays so they had to be fashioned out of thick coated wire in fixing them to the chassis the front wheel parted company with the axle forcing another repair this is a warning to anyone building this kit this is one made from green black and aluminium coloured plastic the parts are extremely brittle unlike todays modern stuff and snaps at the mearest wrong pressure point when assembling if you are not very careful I also had to fashion the offside rear stays as well as they snapped attaching them to the chassis if I were advising anyone building this I would ignore the instructions on fixing the mudguards and preassemble them and the stays let them dry throughly probably overnight and the attach them to the chassis as one of the last jobs you do and make wedge from a piece of scrap wood or plastic nothing fancy just a piece like a wooden coffee stirrer is ideal make it the length of the height you want your stays to sit at then just wedge it in there this gives the stays the support they need whilst the glue sets and will prevent them from sagging during the glue setting time as they are only very thin pieces and with the weight of the mudguards on them causes them to bend somewhat it not supported during the glue setting phase well mine did that’s why I resorted to the wedges on top of the tyres as my lousy sketch shows
View attachment 438340
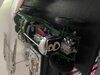
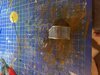
Next came the spare wheel another pia as you cannot see where the supporting arms are going mines on just but it’s not perfect by any means and remains a weak spot on the model and I see a piece of it has snapped off the right hand side see what I mean about brittleness
View attachment 438341
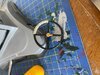
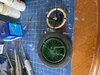
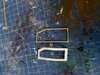
Finally I added the windscreen supports and started work on the stone guards for the lights I’m not using their supplied plastic discs as the look utter garbage I’m trying to fashion
something out of 1mm diameter steel mesh which has now arrived via eBay you can see my starting point for this in the photo showing the brass ring I’ve made I’ve also glued the horns to their respective supports ready to be mounted on the chassis
View attachment 438342View attachment 438344
Regards
Colin
I was hoping this would be the last build entry for this model sadly it cannot be I’ve had some issues namely the complete missing front offside Midgard stays so they had to be fashioned out of thick coated wire in fixing them to the chassis the front wheel parted company with the axle forcing another repair this is a warning to anyone building this kit this is one made from green black and aluminium coloured plastic the parts are extremely brittle unlike todays modern stuff and snaps at the mearest wrong pressure point when assembling if you are not very careful I also had to fashion the offside rear stays as well as they snapped attaching them to the chassis if I were advising anyone building this I would ignore the instructions on fixing the mudguards and preassemble them and the stays let them dry throughly probably overnight and the attach them to the chassis as one of the last jobs you do and make wedge from a piece of scrap wood or plastic nothing fancy just a piece like a wooden coffee stirrer is ideal make it the length of the height you want your stays to sit at then just wedge it in there this gives the stays the support they need whilst the glue sets and will prevent them from sagging during the glue setting time as they are only very thin pieces and with the weight of the mudguards on them causes them to bend somewhat it not supported during the glue setting phase well mine did that’s why I resorted to the wedges on top of the tyres as my lousy sketch shows
View attachment 438340
Next came the spare wheel another pia as you cannot see where the supporting arms are going mines on just but it’s not perfect by any means and remains a weak spot on the model and I see a piece of it has snapped off the right hand side see what I mean about brittleness
View attachment 438341
Finally I added the windscreen supports and started work on the stone guards for the lights I’m not using their supplied plastic discs as the look utter garbage I’m trying to fashion
something out of 1mm diameter steel mesh which has now arrived via eBay you can see my starting point for this in the photo showing the brass ring I’ve made I’ve also glued the horns to their respective supports ready to be mounted on the chassis
View attachment 438342View attachment 438344
Regards
Colin
Attachments


Bigfoot57
Active member
- Joined
- Jun 24, 2015
- Messages
- 1,216
- Location
- Weston Super Mare
- First Name
- Colin
- Location
- Originally a small village outside of Reading Berkshire called Burghfield Common
1/3
Airfix 1/12 4.5 Litre Bentley Blower Part 8 Nearly Finished
Well I was hoping to be able to say yes it’s finished but it’s not due to a delay on some mesh cutters not yet delivered apart from that it’s finished and I must say the fit between the bodywork and the bonnet covers is appalling but there’s nothing I can do now so will have to live with it
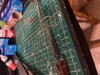
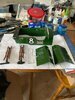
Anyway here’s what I have done added a scratch built stone guard for the supercharger on the left hand side couldn’t believe they missed that out
Next assembled the windscreen flyscreen I left it as it was as I couldn’t come up with anything better
Added the decals onto the sides using good old microsol to make them conform to the surface and when dry hand painted over the No 8 as with the front and rear I left the union jacks as they were but they are wrong ones a mirror image of the other which means the broad red stripe part of the flag is correct on one side and wrong on the other oh well
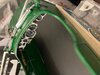
Next I painted the bonnet straps a deep Burgundy Red/Brown and highlighted the buckles in chrome using one of those liquid chrome pens but I just siphoned off a small amount onto a piece of plastic then painted it on using a brush
Afterwards the straps were attached to the bonnet covers ready for final fitting like I said previously my bonnet hinges were useless so I glued both sections together and joined them to each other by way of the straps and that’s it just the lights to add when the cutters arrive
I will the do a all round set of photos in the completed models forum after the lights have been added
I hope you have enjoyed this build with me and maybe some of my tricks and bodges will help somebody on their next build
Next project HMS Hood Amati 1/200 scale wooden frame and plank what have let myself in for 140 issues
Regards
ColinView attachment 438564View attachment 438565View attachment 438566View attachment 438567View attachment 438568View attachment 438569View attachment 438571View attachment 438572View attachment 438570
Well I was hoping to be able to say yes it’s finished but it’s not due to a delay on some mesh cutters not yet delivered apart from that it’s finished and I must say the fit between the bodywork and the bonnet covers is appalling but there’s nothing I can do now so will have to live with it
Anyway here’s what I have done added a scratch built stone guard for the supercharger on the left hand side couldn’t believe they missed that out
Next assembled the windscreen flyscreen I left it as it was as I couldn’t come up with anything better
Added the decals onto the sides using good old microsol to make them conform to the surface and when dry hand painted over the No 8 as with the front and rear I left the union jacks as they were but they are wrong ones a mirror image of the other which means the broad red stripe part of the flag is correct on one side and wrong on the other oh well
Next I painted the bonnet straps a deep Burgundy Red/Brown and highlighted the buckles in chrome using one of those liquid chrome pens but I just siphoned off a small amount onto a piece of plastic then painted it on using a brush
Afterwards the straps were attached to the bonnet covers ready for final fitting like I said previously my bonnet hinges were useless so I glued both sections together and joined them to each other by way of the straps and that’s it just the lights to add when the cutters arrive
I will the do a all round set of photos in the completed models forum after the lights have been added
I hope you have enjoyed this build with me and maybe some of my tricks and bodges will help somebody on their next build
Next project HMS Hood Amati 1/200 scale wooden frame and plank what have let myself in for 140 issues
Regards
ColinView attachment 438564View attachment 438565View attachment 438566View attachment 438567View attachment 438568View attachment 438569View attachment 438571View attachment 438572View attachment 438570
Attachments
-
 96532A60-F3B9-4D05-9D87-775DDB4C8C8A.jpeg3.1 KB · Views: 0
 -
 048CCC3C-5E45-40DA-B336-F4861563E157.jpeg3.5 KB · Views: 0
 -
 8B5C1855-68E5-4525-98BD-7094B20A7C3E.jpeg3.7 KB · Views: 0
 -
 13CEEE8A-36A7-4D9F-B41D-2E7DDC8AF006.jpeg3.1 KB · Views: 0
 -
 8A0A9B14-A2B7-4F88-88E6-B8E509F79F81.jpeg32.5 KB · Views: 0
 -
 CFA91728-5BDF-4BCE-B28F-3C8ADD4337E8.jpeg32.7 KB · Views: 0
 -
 AF53169B-64DD-4F67-8CBF-B41CEEE2D2FD.jpeg3.5 KB · Views: 0
 -
 3CCEF24C-DD52-4144-80FD-4A6BB952CD0B.jpeg2.9 KB · Views: 0
 -
 3B47F547-17E0-414A-BC53-1A4BF9CE3551.jpeg33.2 KB · Views: 0
Bigfoot57
Active member
- Joined
- Jun 24, 2015
- Messages
- 1,216
- Location
- Weston Super Mare
- First Name
- Colin
- Location
- Originally a small village outside of Reading Berkshire called Burghfield Common
1/3
Thanks for all the comments I appreciate them all my favourite bit is the bonnet straps they actually look like they are made out of leather
This quite elderly kit is showing its age now as it was first produced in 1972 (I think) when compared to modern kits. Airfix have re released it a few times down the years. The older kits had a number of flat aluminium plated parts that are now just non-plated plastic in the latest re release. Airfix changed the number plate to one that is on a restored blower that now belongs to Bentley Motors, but did not correct the badge position on the radiator shell.
Having said that, the kit is capable of being detailed up to a much higher standard by the more dedicated modeller like the poster of this thread. Shapeless make 3D printed Hartford shock absorbers for this kit, but they are not really too difficult to replicate with plastic card.
The brilliant news is that Nick Edwards who has a website named Unobtainium is about to make 3D printed replacement engine and wire wheel kits for this kit. Look at his thread over on the Britmodeller website to see what he is up to.
Another few errors spotted. Shapeless should read Shapeways. Unloaded should read unplated. Highest should read higher.
My tablet changes words and I don't always spot them immediately.
It is really frustrating not to be able to go back into a post and edit it directly by having an exit feature built into the box!
My tablet changes words and I don't always spot them immediately.
It is really frustrating not to be able to go back into a post and edit it directly by having an exit feature built into the box!
- Joined
- Apr 27, 2018
- Messages
- 15,122
1/3
Colin,
That is a cracking result.
That is a cracking result.
1/3
Hi Noel
There is an edit feature. It appears at the bottom of the post text window between “Report” and “Bookmark” ?
There is an edit feature. It appears at the bottom of the post text window between “Report” and “Bookmark” ?
Misko ModelsAnybody looking for reference material for the Bentley blower be it Airfix or Revell should check out this video from you tube from Misko Models of Germany
Regards
Colin
1931 Bentley Blower 4.5L
Model Value: 36,000€
www.drmischko.com
36,000 !!!!
G
Guest
Guest
Looking very good noel
Just got the re-election issue 2022 of this kit. My first build... I know but looking at your build ,which has inspired me no end.
I feel that even if it does not come out as well as yours i will still learn.
We thankyou for posting the build online
. I'm sure there are many more of us 1st timers who are grateful for your help. John
I feel that even if it does not come out as well as yours i will still learn.
We thankyou for posting the build online
. I'm sure there are many more of us 1st timers who are grateful for your help. John
1/3
Sorry Noel, I missed this when you posted it. Yes, to edit posts I think you have to be a supporter of the forum.Tim, unfortunately on my tablet I looked between report and bookmark. There is a space between them but no edit feature appears to be there.
Maybe it becomes a feature only if one has full forum access?
Legal Notice
scalemodelling.co.uk is a privately operated online discussion forum. All content posted by members reflects their own views and opinions and does not necessarily represent those of the forum owners or administrators. While reasonable efforts are made to moderate content, no responsibility is accepted for user-generated material. By using this site, you agree to comply with UK law and the forum rules.