
You are using an out of date browser. It may not display this or other websites correctly.
You should upgrade or use an alternative browser.
You should upgrade or use an alternative browser.
Airfix 1/48 TSR2
- Thread starter Dave W
- Start date
- Status
- Not open for further replies.
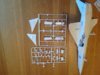
Well so far Ive sprayed two coats of white primer,Two coats of Vallejo White and finally a coat of Revell enamel matt white on the model .I think Ive finally managed to cover all the green filler.With hindsight,I should have used white filler but didn't have any at the time.Because the engraved detail is quite prominent,I think you could put ten coats on the model without filling them in.Just noticed a tiny hole in the filler on one of the intakes.So that will have to be delt with.There are 'T' shaped slots on the sides of both intakes.These are for plastic blobs that represent cameras fitted to XR220.As I'm finishing it as XR219, which didn't have them and was the Only TSR2 to go supersonic,these have to be filled in.For some unknown reason the nose radome has come out a different shade of white.So I will have to paint it again.
Ive glossed the model this morning and am now putting the Decals on.They don't need to be in water very long and are not too fragile.So no problems so far .Lots of separate lines make up the walkway areas.So it's quite time consuming putting them all on.
")
G
Guest
Guest
Excellent job with painting Dave
Francesco
Francesco
View attachment 77012
View attachment 77013
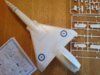
That's all the decals put on.There are a lot of small stencils a couple of which are numbered wrong on the decal sheet.For anyone building this kit note that the decal placement guide calls out two no.29's.These are the canopy operating handles and there is only one 29 on the sheet.The other handle is numbered as no.21.Now I'm going to wash the model carefully and put another gloss coat on.Then I will fit the Undercarriage doors and wheels,followed by some light weathering and a final matt coat.
View attachment 190035
View attachment 190036
View attachment 77013
That's all the decals put on.There are a lot of small stencils a couple of which are numbered wrong on the decal sheet.For anyone building this kit note that the decal placement guide calls out two no.29's.These are the canopy operating handles and there is only one 29 on the sheet.The other handle is numbered as no.21.Now I'm going to wash the model carefully and put another gloss coat on.Then I will fit the Undercarriage doors and wheels,followed by some light weathering and a final matt coat.
View attachment 190035
View attachment 190036
Attachments
G
Guest
Guest
She's coming along nicely Dave, you've done a good job with the white paint, I hear white can be a bit of a bitch. I'm looking forward to seeing how you tint the canopy.
I'm going to leave mine until I have a bit more experience behind me, I don't want to mess it up.
I'm going to leave mine until I have a bit more experience behind me, I don't want to mess it up.
Looking fantastic Dave , I bet those walkway decals caused a few swear words! looking forward to seeing it up on its feet , chers tony
The white took six coats before I was happy with it.Mainly because I used green filler when I should have used white.I used Vallejo white primer again for the final two coats.It seemed to cover better than the normal Vallejo white.\ said:She's coming along nicely Dave, you've done a good job with the white paint, I hear white can be a bit of a bitch. I'm looking forward to seeing how you tint the canopy.I'm going to leave mine until I have a bit more experience behind me, I don't want to mess it up.
They were not too bad as Airfix supply them in small pieces instead of one big one.The wing walkway lines are made up of 16 separate lines.The line at the base of the fin came in two parts.\ said:Looking fantastic Dave , I bet those walkway decals caused a few swear words! looking forward to seeing it up on its feet , chers tony
Last night I fitted the undercarriage doors and wheels.The main wheel assemblies look like they could be a weak point on the model.In the future I may have to drill and pin them.On the real aircraft there was an actuator mounted between the top of the main gear leg and the back of the wheel bogie.You can see it clearly in the photo below.These actuators are included in the kit.But there are no instructions where to fit them.So I'm going to have to work that out.Next job is a bit of restrained weathering.
G
Guest
Guest
That is llooking great dave the u/c bays look good
I glued the main gears onto the pins on the legs.But the wheels are canted at an angle when I think they should be vertical.Most photos I have seen show the wheels mounted vertical.Although in one pic the tyre is badly worn on the inside.Either way the model doesn't look right to me.So I'm going to remove the wheel assemblies,drill the legs and put them back on vertical with metal pins.
I said in the previous post that I wasn't happy that the main wheels were not sitting vertical.Infact they looked like a BF109 undercarriage.So I've removed them,drilled holes and used cut down panel pins as axles.They look much better now,plus the undercarriage is stronger.Ive done a bit more research and found out that the struts/actuators mounted between the top of the main gear leg and the rear wheel were only fitted to XR220.They were fitted to cure undercarriage problems experienced on XR219.So I don't need them on my model.Also,The gold finish is only on the canopy transparencies and not the windscreen.So I could have fitted the windscreen before I painted the model.Thats typical of me.Doing the research when the models nearly finished.The Gunze clear gold paint my wife ordered came yesterday.£3.89p inc postage all the way from Taiwan!.So I should finish the model soon.
- Status
- Not open for further replies.
Legal Notice
scalemodelling.co.uk is a privately operated online discussion forum. All content posted by members reflects their own views and opinions and does not necessarily represent those of the forum owners or administrators. While reasonable efforts are made to moderate content, no responsibility is accepted for user-generated material. By using this site, you agree to comply with UK law and the forum rules.