Theme editor

Scale Model Shop

Colin M's Bristol F.2b Fighter. 1/32 wingnut wings

Status
Not open for further replies.
Thread owner
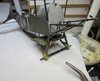
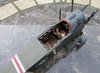
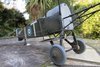
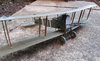
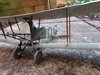
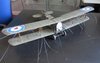
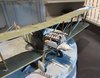
Time to start the rigging. I know what you're thinking, he's lost the plot, he's got no wings. Well yes, but there's enough rigging up front to deal with first, and flipping great big wings will only get in the way.
View attachment 313389
 

Attachments

  • Start rigging.JPG
    Start rigging.JPG
    3 KB · Views: 0
Terrific work on the oil dots Colin. It really has taken the build to the next level. Did the rigging come with the kit or are you using something of your own?
 
Thread owner
Terrific work on the oil dots Colin. It really has taken the build to the next level. Did the rigging come with the kit or are you using something of your own?
Thanks Steve. Oil is still a bit new to me but I like its flexibility. As for the rigging, you provide your own. I'll be using two types of fishing line and maybe some EZ line.
 
Looking great Colin, love the oil work on the fuselage very subtle.:smiling:
Nice rigging work too.:thumb2:
 
Thread owner
Thanks everyone for stoping by. Finally a bit of an update. The fuselage control lines are complete. Main rigging is attached to the upper wing. This is not how I would normally rig an aircraft, but for this build each line will be individual, hence this method.


Engine bay rigging completed, just one loose one to tighten up a bit later.

View attachment 315006

View attachment 315007

The interior. I haven't seen this in ages.
View attachment 315007

Port side double control lines all in place.
View attachment 315008

Stbd all done.
View attachment 315009

Main rigging attached to the upper wing. What a job that was.
View attachment 315010
 

Attachments

  • Upper wing rigging.JPG
    Upper wing rigging.JPG
    2.4 KB · Views: 0
  • STBD control lines.JPG
    STBD control lines.JPG
    3 KB · Views: 0
  • Port control lines.JPG
    Port control lines.JPG
    3.1 KB · Views: 0
  • Interior.JPG
    Interior.JPG
    2.9 KB · Views: 0
  • Front rigging.JPG
    Front rigging.JPG
    3.4 KB · Views: 0
This is going great, really nice work. Loving the rigging and build pictures. It’s almost like your building a real one...
 
Hi Colin
I seem to have missed a bit so just caught up. Stunning stuff in every respect. The build itself, the painting, the oil weathering and now the rigging - all exceptionally well done. Even Wingnut Wings are only as good as the modeller.
 
That is looking very good Colin, and fantastic work with the eyelets and rigging.
 
Thread owner
Thanks for looking in Gentlemen.

Standby to Rig.

View attachment 315565

All the main rigging wires were attached to the upper wing before the wing was attached to the struts. Alignment wasn't bad. The struts fit very positively to the lower wing. However, lining these up and the cabane struts at the same time proved a bit too much. Not being Mr Octopus man, I pushed the cabane struts out of the way, fixing them later once a lot of the rigging had been completed.
I tried to rig the model evenly. Whatever line was connected on the port side was then repeated on the stbd side, just to make sure the alignment wasn't upset. At this stage, things are very wobbly.
Then after far more hours than I can remember, finally all rigging was finished. Well, except for two which will be secured after the engine has been fitted.
View attachment 315566

View attachment 315567

View attachment 315568

I can see one wire is a bit loose, I'll adjust that later, but apart from a couple of small control wires, rigging complete. And thank heavens for that ! I think I'll be a jet next.
 

Attachments

  • Rigging 3.JPG
    Rigging 3.JPG
    2.7 KB · Views: 0
  • Rigging 2.JPG
    Rigging 2.JPG
    2.8 KB · Views: 0
  • Rigging 1.JPG
    Rigging 1.JPG
    3.4 KB · Views: 0
  • Stand by to rig.JPG
    Stand by to rig.JPG
    2.2 KB · Views: 0
Superb work colin , the rigging looks amazing! Its looking beautiful , cheers tony
 
Thread owner
the rigging looks amazing!
Thanks Tony, I think I'm all rigged out....

It has an engine. It looks a bit more aircraft like now. I've reached quite a nice part of the build now. The part were you just keep adding bits and sub assemblies, then all of a sudden, you're done.

View attachment 315633
 

Attachments

  • Engine fitted.JPG
    Engine fitted.JPG
    3.3 KB · Views: 0
Thread owner
you deserve a drink after that rigging.
Well it is Friday. No work tomorrow (yet) so maybe. The hard bit was, every wire is individual, no doubling up through a rigging eye, each piece separately cut, tensioned, glued. To restore sanity, I think I'll build a Bell x-15 next.
 
Great work Colin. You should enter it into a competition when it’s finished.Looks like a show winner to me.
 
That's cool work Colin. Well impressed with that rigging, you brave man!

Cheers
 
Status
Not open for further replies.
Back
Top