I like the grime in the cockpit around the panels.

You are using an out of date browser. It may not display this or other websites correctly.
You should upgrade or use an alternative browser.
You should upgrade or use an alternative browser.
Colin M's Sea Harrier FRS1
- Thread starter colin m
- Start date
- Status
- Not open for further replies.
Thanks for looking in everyone. Now time for major surgery. Airfix do give some guide to cutting the GR3 nose off, but nevertheless, it's not to precise. So, a glass or two and go for it. That gives us this.
View attachment 96881
GR3 below, removed. SHAR above, to be fitted.
View attachment 209904
View attachment 96881
GR3 below, removed. SHAR above, to be fitted.
View attachment 209904
Attachments
G
Guest
Guest
I thought you were joking! You actually have to cut the nose off?!?! They didn't have two noses to mount to the same section of the fuselage?!?!?!?!?!?
G
Guest
Guest
Very clean cut, colin
Yes Mike, and it's not a straight cut either. On top of the fuselage, behind the seat, the cut curves backwards. It's all a bit of a guess really.
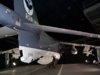
And the real good news is, after spraying a bit of primer on the fuselage, those Bl@#dy rivets are still visible. Even more filling to do.
And the real good news is, after spraying a bit of primer on the fuselage, those Bl@#dy rivets are still visible. Even more filling to do.
Such fun. The Sea Harrier nose is now well and truly fixed in place. Talk about filler, and more filler. There seems to be a light dusting of green all around the house at the moment. The rivets have had another going over, third time in some places, will they ever vanish ?
View attachment 97977
I'm currently sticking other bits together ready for installation on the model. Lots of parts don't quite fit. Just a bit out, but every piece that doesn't fit has to be persuaded, which of course all takes time. Next job is to fit the air intakes properly, again, which don't quite fit. However, a major plus point is that, all these bits that don't fit means more filling and sanding - thus causing more rivets to die !
The engine is just fitted loosely at the moment. I'm not dressing the engine up for display as the wing is such a bad fit, and anyway, I want this in flight, just like on the box art.
View attachment 211000
Attachments
")
")
Hi Colin
The Airfix Harrier looks a bit of a challenge but you're making progress with this older generation kit.
Can I ask, are you going to re rivet the fuselage with smaller more discrete rivets or have the fuselage smooth?
I think this is a really interesting build Colin and I'm looking forward to the progress.
It's good to see a jet or two amongst all the props in the SSIG too!
Cheers
Paul
Work continues, just sanding pieces, adding them, filling around the edges and sanding them again.
View attachment 98710
Look how smooth it is. I believe the sea going version of the Harrier was riveted flush, so very few, if any would be visible.
View attachment 211733
Ideally, once they are gone, there will be no sight of them at all. In reality, I think a number will still be visible to the camera, but hopefully not the eye, at a distance anyway. Why are they going, well because of this:\ said:Can I ask, are you going to re rivet the fuselage with smaller more discrete rivets or have the fuselage smooth?
View attachment 98710
Look how smooth it is. I believe the sea going version of the Harrier was riveted flush, so very few, if any would be visible.
View attachment 211733
Attachments
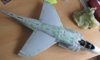
Wings - it has wings. Ok so the don't fit very well and like everything will need lots of sanding and filler, but at least they are attached. Speaking of sanding, see the 'Tack rag' in the picture ? This build is generating so much dust, I've resorted to industrial solutions.
View attachment 99379
View attachment 99380
Looks like I'll be using a bit of plastic card to fill the gaps this time, well makes a change from 'Squadron' !!
Colin M...
View attachment 212402
View attachment 212403
View attachment 99379
View attachment 99380
Looks like I'll be using a bit of plastic card to fill the gaps this time, well makes a change from 'Squadron' !!
Colin M...
View attachment 212402
View attachment 212403
Attachments
- Status
- Not open for further replies.
Legal Notice
scalemodelling.co.uk is a privately operated online discussion forum. All content posted by members reflects their own views and opinions and does not necessarily represent those of the forum owners or administrators. While reasonable efforts are made to moderate content, no responsibility is accepted for user-generated material. By using this site, you agree to comply with UK law and the forum rules.