Theme editor

Scale Model Shop

Dave Ward's 1/48 Heller Alouette

Status
Not open for further replies.

Dave Ward

New member
Joined
Apr 27, 2018
Messages
10,549
Reaction score
43
Points
0
1/3
Thread owner

Attachments

  • box.jpg
    box.jpg
    3.4 KB · Views: 0
  • tail boom.jpg
    tail boom.jpg
    3.1 KB · Views: 0
  • skids.jpg
    skids.jpg
    3.5 KB · Views: 0
  • instr.jpg
    instr.jpg
    2.8 KB · Views: 0
  • heller alouette.jpg
    heller alouette.jpg
    2.1 KB · Views: 0
  • bubble.jpg
    bubble.jpg
    3.8 KB · Views: 0
Looks a good kit Dave , the cabin looks fine to me , a set of belts and i reckon it should be ok , the cabin on the real thing was very simple too , looking forward to this one , cheers tony
 
View attachment 305971

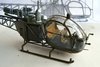
This is a simple model of a simple helicopter
View attachment 305969

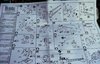
Instructions are old school Heller:View attachment 305972
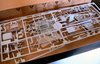
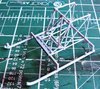
Some parts are delicate
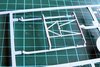
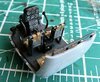
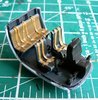
View attachment 305974View attachment 305973

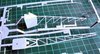
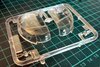
The cabin is a little too simple, I'll have to try and make it a little busier - all things should be pretty visible through the 'bubble'
View attachment 305970
Anyway, construction will start shortly, in between sessions on my Henschel
Dave
Thank goodness it's not by MiniArt ! That thin section looks tricky .
 
Thread owner
I did look at the MiniArt Flettner Kolibri, when it first came out, but a glance at the sprues put me off, - really thin parts!
Dave
 
Thread owner
Construction started. The Alouette can be built in 3 sections, the bubble, the skids, and the tail boom
3 parts.........View attachment 306058

................and four parts:View attachment 306057
The parts needed a bit of clean up, a lot of fine parting lines, scraped with a scalpel blade, but nothing major (yet!)
Dave
 

Attachments

  • tail assy.jpg
    tail assy.jpg
    1.8 KB · Views: 0
  • skids.jpg
    skids.jpg
    5 KB · Views: 0
Thread owner
After 2 sessions, the skids and the tail boom are ready for priming - I've left the engine off, as that will be completely different colours.......
View attachment 306127

All this is dry fitted together, 3 sections. The overall colour is 'green', I'll have to find the nearest match, from my box
Dave
 

Attachments

  • sans engine.jpg
    sans engine.jpg
    2.6 KB · Views: 0
Thread owner
Primed, and basecoated the boom & skids - Vert OTAN, or Nato green.................
View attachment 306247
The engine makes it's first appearance, with the gearbox. I had forgotten how small gas turbines were, naked, it's going to need a little dressing up...........
Dave
 

Attachments

  • engine first.JPG
    engine first.JPG
    3 KB · Views: 0
Thread owner
The moulds date from 1989, and they have stood up well to the years. The fit is quite good, and minimal mould lines/flash. Their age shows in the rather heavy details - particularly around the engine - and a decal for the instrument panel would have been nice
Dave
 
Hi Dave
You're off to a great start. After the 'fun' you had with the wing struts on you Condor Legion Recon plane I thought you might go for something nice and solid :smirk: That tail boom looks tricky.
Jim
 
Thread owner
After finishing the Hs 126, I've returned to the Alouette........................
View attachment 307947View attachment 307948
Seat belts from masking tape, instrument panel drybrushed.

I dry fitted the bubble - absolutely perfect fit! The plastic is a little thick and not too clear - I'll dip it in Kleer before painting the frames.
View attachment 307946
This bubble can be fully finished before final assembly onto the airframe
Dave
 

Attachments

  • cabin 02.jpg
    cabin 02.jpg
    4.2 KB · Views: 0
  • cabin 01.jpg
    cabin 01.jpg
    5.2 KB · Views: 0
  • bubble dry fit.jpg
    bubble dry fit.jpg
    4.3 KB · Views: 0
All looking very nice Dave. I think I've only built two helicopters. I must make more of an effort.
 
Thread owner
Coming together, engine added, and basecoated - the 'bubble' is just about finished.....................
View attachment 308070

I was curious about the scale of this model - some of the Heller Alouette III models are quoted at 1/48 and 1/50. Just by the rotor diameter of the model, and the real dimension from Wikipedia, it comes to exactly 1/50! I would defy anyone to spot the difference between 1/48 & 1/50 in a stand alone model!
Dave
 

Attachments

  • getting there.jpg
    getting there.jpg
    2.4 KB · Views: 0
Thread owner
John,
nope, painted freehand with a hairy stick, then any overpaint removed using a sharpened wooden cocktail stick. This works with acrylics - I wouldn't like to try it with enamels!
Dave
 
Thread owner
The 'bubble' is fitted to the skids and boom - missing are the aerials, they're fragile, and will be the last to be fittedView attachment 308217View attachment 308218
Engine detail painting next, then adding the engine bracing struts will complete the body, with just the rotors left
Dave
 

Attachments

  • closer 01.jpg
    closer 01.jpg
    2.9 KB · Views: 0
  • closer 02.jpg
    closer 02.jpg
    1.7 KB · Views: 0
Status
Not open for further replies.
Back
Top