
You are using an out of date browser. It may not display this or other websites correctly.
You should upgrade or use an alternative browser.
You should upgrade or use an alternative browser.
Eduard 1:48 Airco DH2
- Thread starter colin m
- Start date
- Status
- Not open for further replies.
Just caught up with this one Colin, some fantastic work going on. I don't envy you with the rigging my only experience was when I did the Arado float rigging which in no way compares to what your achieving. Looking forward to more updates.
G
Guest
Guest
Colin
Impressed so far!
Colin
")
Impressed so far!
Colin
G
Guest
Guest
Very nice build, can't wait to see more
Francesco
Francesco
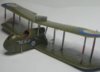
Again thanks Gentlemen for keeping 'down' to my slow pace. Well now, as the following pic's show, the rigging is just about done, there are a couple more lines to add when the booms are attached.
View attachment 71642
View attachment 71643
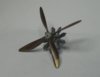
And the engine with propeller. The prop centre needs a 'dirty' wash, otherwise, it's done.
View attachment 71644
However, I now have all the control lines to do. So see you all in a week or two !!
Colin M..
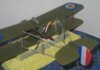
View attachment 184665
View attachment 184666
View attachment 184667
View attachment 71642
View attachment 71643
And the engine with propeller. The prop centre needs a 'dirty' wash, otherwise, it's done.
View attachment 71644
However, I now have all the control lines to do. So see you all in a week or two !!
Colin M..
View attachment 184665
View attachment 184666
View attachment 184667
Attachments
That's very nice Colin the rigging must have been a nightmare to do you must have some incredible patience. The prop and engine look very realistic, how did you achieve the wood effect? Looking forward to further progress
Lads, the wood 'look' has to be the biggest modelling cheat I know. I've got a feeling this cheat, sorry tip, came from our own Bunkerbarge. If it was somebody else, i apologise for the lack of credit. Just paint the prop in a light brown colour. I didn't have to as the plastic is a light tan colour. So, I just applied plain old simple wood dye to the plastic using a rough old small brush. The first coat will be light, so when all dry, apply another coat, which will darken things a touch more. Let this dry, if you like what you see, stop, if not, let it dry and go for another coat. It's that easy.
The brass, well I can take no credit for that. Its all down to Vallejo 'Bright Brass' nice stuff.
The brass, well I can take no credit for that. Its all down to Vallejo 'Bright Brass' nice stuff.
G
Guest
Guest
That prop looks great. Nice work on the rigging. don't think I could do that. So much time involved. Looking great mate.
Thanks for the input Gentlemen. Wood dye - brilliant stuff.
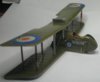
Anyway, a little update. The booms and tail are attached. I fixed the booms to the wings and then the tail to the booms. This was a right pain as the tail assembley is held on by only 4 very small points of contact. Maybe it would have been better doing it all the other way around.
So, I'm now left with a really delicate and very flexible boom / tail assembley. There is a chance that the rigging (yet to be installed) might actually provide some strength here, just like in the real thing.
Top tip for anyone else building one of these. Leave the engine off. You can easily fit it in later and right now it just gets in the way.
View attachment 71806
Cheers
Colin M...
View attachment 184829
Attachments
- Status
- Not open for further replies.
Legal Notice
scalemodelling.co.uk is a privately operated online discussion forum. All content posted by members reflects their own views and opinions and does not necessarily represent those of the forum owners or administrators. While reasonable efforts are made to moderate content, no responsibility is accepted for user-generated material. By using this site, you agree to comply with UK law and the forum rules.