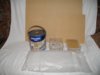
Theme editor

Scale Model Shop

Gern's bug

Status
Not open for further replies.
Thread owner

Attachments

  • Groundwork1.JPG
    Groundwork1.JPG
    2.5 KB · Views: 0
  • Plants.JPG
    Plants.JPG
    2.1 KB · Views: 0
  • Groundwork2.JPG
    Groundwork2.JPG
    2 KB · Views: 0
Thread owner
Don't think they're roses Polux - just common brambles. I may be wrong though 'cos the only thing I know about gardening is that the green bits should stick out of the ground and the brown bits go under it!

I only picked them for the thorns.

Gern
 
Thread owner
Made a start on this today but not much progress.

Whoever had this before me didn't clean up any of the mould lines or casting holes - maybe he didn't realise they weren't supposed to be there. Some of the mould lines were 2mm thick and the same depth and, being resin which is tough, it's taken me all day with my Dremel and files to clean them up. I did most of the casting holes but I'm not worried about filling everything until I've got it all together.

I got the 'lower jaw' fixed in place, one of the 'arms' repaired and I've drilled out and fixed the reinforcement for the legs and body. I also had to remove two 'horns' which stuck out of the jaw piece as they stopped the front legs fitting correctly.

View attachment 70270

View attachment 70271


Gern

PS I wish I knew what sort of paint the guy used. My painting is always kinda fragile and I have to be careful in case it rubs off. I couldn't shift his with the wire brush attachment on my Dremel! I had to use a file.

View attachment 183294

View attachment 183295
 

Attachments

  • Reinforcement.JPG
    Reinforcement.JPG
    1.8 KB · Views: 0
  • Lower jaw.JPG
    Lower jaw.JPG
    2.1 KB · Views: 0
Top refurb work dave , and i like the big pile of dio materials , the bug looks big too ! cheers tony
 
Thread owner
Got the Bug done apart from cleaning up the joints and painting. I'll add eyes after painting.

View attachment 70673

View attachment 70675

View attachment 70676


I have to say I don't like working with resin so I'll definitely be thinking twice about it next time. I find it hard to drill and shape, yet it's so brittle I managed to break two of the legs and one of the arms. I also broke 3 of my drills while drilling holes for the support wires for the bits I'd broken! (That might be more to do with me being a naturally clumsy oaf though).

I thought I remembered seeing spiky bits on these bugs which is why I got hold of the thorns. I've looked at lots of images and no spiky bits so I won't be using them.

I'm also a bit disappointed that the 'flower' things I found have all dried up and shrivelled - despite being sprayed with varnish - so I won't be able to use them on my dio.

Looks like I'll be spending most of tomorrow slaving away at the kitchen sink cleaning up the joints and adding some detail to them.

Gern

View attachment 183697

View attachment 183699

View attachment 183700
 

Attachments

  • Bug3.JPG
    Bug3.JPG
    1.9 KB · Views: 0
  • Bug2.JPG
    Bug2.JPG
    2.6 KB · Views: 0
  • Bug1.JPG
    Bug1.JPG
    1.9 KB · Views: 0
Thread owner
A little bit more done.

I just added a few grooves to the joints for detail. I used Halfords Plastic Filler Primer as an undercoat. It covers very well and makes the filler the same colour as the rest - which some primers don't do.

Four brushed coats of Vallejo Flames of War Deep Yellow (I swear I can TASTE yellow while I'm using it!) and some blobs of white tack for masking, then a sprayed top coat of Model Air Matt Black. I used rattle can Humbrol Matt Varnish to help dull it down a little more and then a coat of Klear on the upper shell to add a bit of shine.

View attachment 71025


I'll be doing the body using the same paints and techniques.

Gern

View attachment 184049
 

Attachments

  • Legs.JPG
    Legs.JPG
    2.1 KB · Views: 0
Thread owner
I've only just noticed the guy had painted the markings on the wrong side of the rear nearside leg! Shows just how observant I am.

Gern
 
This is looking one mean beasty Dave....Nice work.

I couldn't help notice the post you sent on my Marines build was sent around 1.00am this morning and one on here at 4.02am........You stay up all night?!
 
Seems like Dave's a member of the insomniacs society like me Ron :)

Looking good Dave, I must admit I didn't see the error with the leg either.

Looking forward to the next update.
 
Thread owner
\ said:
This is looking one mean beasty Dave....Nice work.I couldn't help notice the post you sent on my Marines build was sent around 1.00am this morning and one on here at 4.02am........You stay up all night?!
I don't got nothin' better to do Ron - verbal abuse aside of course! :)

I'm still looking for gainful employment so if the fancy takes I stay up late. The world is apparently made up of larks and owls. I'm a natural owl.

Gern
 
Thread owner
Hey Ian/John! What are the chances of a clicky button for a groan? Seems to me we get LOTS of chances to use one!

Gern
 
Thread owner
OK. I got the painting done on my Bug.

I'm pleased with the way it's turned out - and how quickly! I'll be starting on the dio next. If that works out OK, I'll need to make a few changes to this so I'm not calling it finished just yet.

View attachment 71070

View attachment 71071

View attachment 71072


Gern

PS I have to grip this tight when I pick it up 'cos it's heavy and that's causing some of the paint to rub off. I'll do the touching up when I'm finally ready to set it on the dio.

View attachment 184094

View attachment 184095

View attachment 184096
 

Attachments

  • Painted bug2.JPG
    Painted bug2.JPG
    2.3 KB · Views: 0
  • Painted bug1.JPG
    Painted bug1.JPG
    2.2 KB · Views: 0
  • Painted bug3.JPG
    Painted bug3.JPG
    2.3 KB · Views: 0
Status
Not open for further replies.
Back
Top