I definitely do think it was a bargain dave , and i will be looking for one i'm sure!!, hopefully at the great price you got that one at!

You are using an out of date browser. It may not display this or other websites correctly.
You should upgrade or use an alternative browser.
You should upgrade or use an alternative browser.
hobby Boss Il-2 Sturmovik
- Thread starter Vaughan
- Start date
- Status
- Not open for further replies.
G
Guest
Guest
[No message]
G
Guest
Guest
wow wow wow,fantastic
mobear
mobear
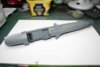
I have fitted the clear engine panels and sprayed them with grey primer and on the interior side grey blue to match the fuselage walls. They look so much better for being painted. I've also made a start on the engine it's very well detailed with over 60 parts.
Vaughan
View attachment 46682
View attachment 46683
View attachment 159708
View attachment 159709
Vaughan
View attachment 46682
View attachment 46683
View attachment 159708
View attachment 159709
Attachments
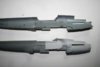

Hi all a small amount of progress, the engine is complete with the exception of the exhaust stacks which I will fit once the fuselage is together. They are going to be a tight fit. I have already enlarged the slots that they fit through. Here's a dry fit, the air intake is also going to be fiddly to line up
Vaughan
View attachment 47395
View attachment 160421
Vaughan
View attachment 47395
View attachment 160421
Attachments

G
Guest
Guest
chuffin fantastic keep this up and you and roman might make me think again modelling (not!!!!!!)lol
mobear
mobear
G
Guest
Guest
so far looks really great
Roman
Roman
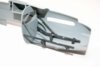
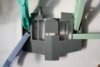
A little progress today with the engine stays and firewall. Hobby Boss seem to have over complicated things when it comes to finishing off the engine. The engine stays need to be located on the sides and at the same time attached to the firewall and into the bargain have the correct angle to fit onto the locating pegs on each side of the fuselage. So I opted to glue the stays to the firewall and slot them straight into the fuselage closing it up temporally until it had set. Once set I removed it and the engine slotted in perfectly. The next problem was the air intake you can't fix it in position as per the instructions until it's in situ as there are two points that need to be lined up accurately. The first being the opening in the fuselage above the engine the other the front of the office floor see photo for the dry fit. I'm also going to leave nothing to chance and fit the exhaust stacks later they are avery tight fit in the fuselage slots. When I'm brave enough I will attempt to glue the lot and close up the fuselage fingers crossed all goes well. The sad thing is none of the engine is going to be visible but hey I know it's in there
Vaughan
View attachment 47804
View attachment 47805
View attachment 47806
View attachment 47807
View attachment 47808
View attachment 47809
View attachment 47810
View attachment 47811
View attachment 160830
View attachment 160831
View attachment 160832
View attachment 160833
View attachment 160834
View attachment 160835
View attachment 160836
View attachment 160837
Attachments


G
Guest
Guest
what a shame about the engine its beautifully done mate as well.(just remebered you did the arado)this is going to be stunning
mobear
mobear
G
Guest
Guest
Great looking Engine ,I'm with Ole shame it will be buttoned up never to be seen. We all know that and still we detail away lol!
G
Guest
Guest
Don't know how i missed this Vaughan,
i can't really say any more than has already been said about your workmanship so far ... it's top quality mate ... just keep the updates coming ok.
i can't really say any more than has already been said about your workmanship so far ... it's top quality mate ... just keep the updates coming ok.
Fuselage is now together a small amount of filler was required. The top engine cowling is a dry fit at the moment as I might leave it open until I fit the individual exhaust stacks, they could be a little fiddly. Next step is to make a start on the wings and the PE parts for the bomb bays.
Vaughan
View attachment 48187
View attachment 48188
View attachment 161213
View attachment 161214
Vaughan
View attachment 48187
View attachment 48188
View attachment 161213
View attachment 161214
Attachments
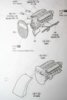
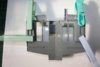
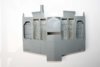
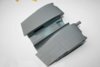
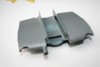
Some more progress last night and this morning. Undercarriage wells are in and I made a start on the bomb bays and PE parts. First a dry run and then glued in position. I used pegs to hold them tight against the walls until the glue had set.
This morning I sprayed the bays with a mix of barley grey and a few drops of RLM65. The next step will be to fix this section to the fuselage.
Vaughan
View attachment 48202
View attachment 48203
View attachment 48204
View attachment 48205
View attachment 48206
View attachment 48207
View attachment 48208
View attachment 48209
View attachment 161228
View attachment 161229
View attachment 161230
View attachment 161231
View attachment 161232
View attachment 161233
View attachment 161234
View attachment 161235
Attachments
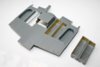


hi there - i might regret asking this rather silly looking question but here goes .... with Vaughan's model he has placed the PE parts in the bomb bays and then painted them ...is the PE parts simply there for the extra rivet detail or there is more to come .... the model looks fantastic but the purpose of the PE parts in the bomb bay has simply escaped me ..... rgds lindsey
Hi Lindsey
No it's not a stupid question to ask but you are correct in that the PE parts provide extra detail in this case rivets that would'nt be possible when the parts are moulded. If you look carefully you can see the rivets prior to painting. To be honest with you there would be very little difference if you didn't use them. But as they provided them I thought I would use them.
Vaughan
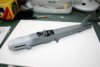
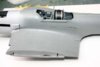
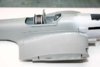
Wing tops are on the central section with no fit problems. But when offered up to the fuselage there are quite large gaps that do close with some considerable pressure. There are still going to be fit issues at the front underside of the wing roots and they will require some filling as there is quite a large step. I think again HobbyBoss have over complicated things which then cause fit problems.
Vaughan
View attachment 48214
View attachment 48215
View attachment 48216
View attachment 48217
View attachment 48218
View attachment 48219
View attachment 48220
View attachment 161240
View attachment 161241
View attachment 161242
View attachment 161243
View attachment 161244
View attachment 161245
View attachment 161246
Attachments


G
Guest
Guest
I know you will solve that my friend... looking good...
I agree about Hobby Boss, to mutch complicated things... Never built one but I have heard many complains about it...
Roman
I agree about Hobby Boss, to mutch complicated things... Never built one but I have heard many complains about it...
Roman
- Status
- Not open for further replies.
Legal Notice
scalemodelling.co.uk is a privately operated online discussion forum. All content posted by members reflects their own views and opinions and does not necessarily represent those of the forum owners or administrators. While reasonable efforts are made to moderate content, no responsibility is accepted for user-generated material. By using this site, you agree to comply with UK law and the forum rules.