
You are using an out of date browser. It may not display this or other websites correctly.
You should upgrade or use an alternative browser.
You should upgrade or use an alternative browser.
Ian M's Lightning
- Thread starter Ian M
- Start date
- Status
- Not open for further replies.
Well the Arado is off the bench and I have had a tidy up  so there is room to dig the frightening out of hiding and make a restart on her.
watch this space.")
Ian M
so there is room to dig the frightening out of hiding and make a restart on her.watch this space.
Ian M
I forgot you were doing the 74sqdn one Ian.I was going to do the kit supplied natural metal scheme at first.Then I saw Papa695 was doing that one so I ordered a different decal set.I will probably do the 23sqdn one now.
G
Guest
Guest
I'm pulling up a chair and getting comfy for this one...
Right then... Lets have a look then.
View attachment 77174
View attachment 77175
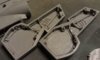
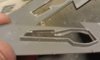
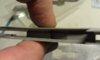
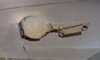
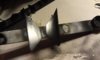
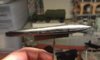
Having gotten the Aires wheel bay set, the first thing to do was to remove the Flightpath parts that I started with. A quick ping with a knife sorted that out, View attachment 77177
Now you see it.. View attachment 77178
Now you don't!
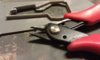
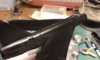
The moulded on walls have to go as well. You could scratch them away with a knife, or do it the quick way. I chose the latterView attachment 77176
View attachment 77180
That took two minutes!
View attachment 77181
View attachment 77182
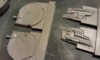
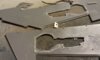
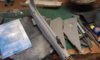
But the resin wells are rather thick. Its the casting process and just one of those things. Sand paper, dust mask and patience.
Once the tops are paper thin and you can see light through them STOP!
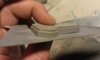
I then fix the new well to the wings bottom half and carefully sand the part and the inside of the top wing part until I can get the wings glue surfaces to meet.
You end up with a wing that is a tiny bit thicker by the wheel end of the wheel bay, but I can live with that....sort of.
When the clamps are off I'll post another picture.
Ian M
View attachment 77179
View attachment 190197
View attachment 190198
View attachment 190199
View attachment 190200
View attachment 190201
View attachment 190202
View attachment 190203
View attachment 190204
View attachment 190205
View attachment 77174
View attachment 77175
Having gotten the Aires wheel bay set, the first thing to do was to remove the Flightpath parts that I started with. A quick ping with a knife sorted that out, View attachment 77177
Now you see it.. View attachment 77178
Now you don't!
The moulded on walls have to go as well. You could scratch them away with a knife, or do it the quick way. I chose the latterView attachment 77176
View attachment 77180
That took two minutes!
View attachment 77181
View attachment 77182
But the resin wells are rather thick. Its the casting process and just one of those things. Sand paper, dust mask and patience.
Once the tops are paper thin and you can see light through them STOP!
I then fix the new well to the wings bottom half and carefully sand the part and the inside of the top wing part until I can get the wings glue surfaces to meet.
You end up with a wing that is a tiny bit thicker by the wheel end of the wheel bay, but I can live with that....sort of.
When the clamps are off I'll post another picture.
Ian M
View attachment 77179
View attachment 190197
View attachment 190198
View attachment 190199
View attachment 190200
View attachment 190201
View attachment 190202
View attachment 190203
View attachment 190204
View attachment 190205
Attachments
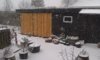
Well while the weather outside was doing this: View attachment 77302
I was in the warm doing this: View attachment 77304
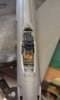
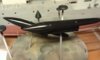
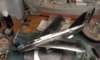
I got the Wheel bays in and the two halves of the wing together, View attachment 77305
as you can see the thinnest of the wing has only minimal thickening. I can live with it.
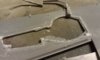
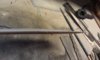
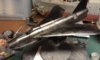
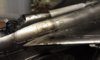
Today, I got the cockpit in and got the Fuselage nailed shut. LOTS of dry fitting and sanding. partly my own fault. I had some lead that had to go in to weep the nose wheel on the deck. That might of gotten in the way and had pushed the rear part of the canopy mount up and to the side !!! View attachment 77306
This old kit (its one of the original boxings) has suffered a bit and the two halves of the fuselage were a bit twisted and were a bugger to get lined up. Filler was involved!View attachment 77307
I thought I would put the tanks on this one. Cant find proof that 74 used them but I thought why not. Something a bit different.View attachment 77303
Thats it for today.
Ian M
View attachment 190325
View attachment 190326
View attachment 190327
View attachment 190328
View attachment 190329
View attachment 190330
I was in the warm doing this: View attachment 77304
I got the Wheel bays in and the two halves of the wing together, View attachment 77305
as you can see the thinnest of the wing has only minimal thickening. I can live with it.
Today, I got the cockpit in and got the Fuselage nailed shut. LOTS of dry fitting and sanding. partly my own fault. I had some lead that had to go in to weep the nose wheel on the deck. That might of gotten in the way and had pushed the rear part of the canopy mount up and to the side !!! View attachment 77306
This old kit (its one of the original boxings) has suffered a bit and the two halves of the fuselage were a bit twisted and were a bugger to get lined up. Filler was involved!View attachment 77307
I thought I would put the tanks on this one. Cant find proof that 74 used them but I thought why not. Something a bit different.View attachment 77303
Thats it for today.
Ian M
View attachment 190325
View attachment 190326
View attachment 190327
View attachment 190328
View attachment 190329
View attachment 190330
Attachments
Oh trust me we got that to. It's just the last week its been falling in solid form. Nearly all gone again now.\ said:Looking very good IanI think I would rather have the weather your getting than the wind and rain here
Been sticking a few covers and vents on, not much to show.
Ian M
Nice one Joe. Great photo...
The Alchemy Begins:
Primed it with Black Alclad primer yesterday, then gave it a rub down with a fine polishing cloth. Today I have given it the first of the coats of gloss black... When its had a day to cure, I'll give it a quick swipe and a second coat if I think it needs it.
View attachment 77453
View attachment 77454
View attachment 77455
View attachment 77456
There are a few bits on a stick that have had gloss on the 'outside' surfaces and will remain flat on the inner surfaces.... Thinking about it, I might just gloss the undersides... Forgot that.... lol
Ian M
View attachment 190476
View attachment 190477
View attachment 190478
View attachment 190479
The Alchemy Begins:
Primed it with Black Alclad primer yesterday, then gave it a rub down with a fine polishing cloth. Today I have given it the first of the coats of gloss black... When its had a day to cure, I'll give it a quick swipe and a second coat if I think it needs it.
View attachment 77453
View attachment 77454
View attachment 77455
View attachment 77456
There are a few bits on a stick that have had gloss on the 'outside' surfaces and will remain flat on the inner surfaces.... Thinking about it, I might just gloss the undersides...
Forgot that.... lolIan M
View attachment 190476
View attachment 190477
View attachment 190478
View attachment 190479
Attachments
You know Ian, the priming is something that I seem to struggle with, especially when it is used as pre-shading. When I then attempt the top colour I tend to bleed out the shading. Nice coating though and as said no loss of detail. A lovely choice of fighter you have done, something really special about the Lightning.
Si")
Si
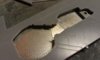
Well it's shiny...
well I have been playing with the Alclad, lets see if I can remember which ones.
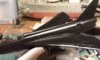
Here are the overwings, first in gloss black, then Airframe Aluminium.View attachment 77613
View attachment 77614
A tad too shiny?
The fuselage and wings have had: Airframe Alu. Dull Alu, White Alu. Polished Alu. Stainless steel and steel.
The nose ring got Stainless steel.
View attachment 77612
View attachment 77615
The vertical stab. and the canopy have had a couple of coats of gloss black.
She is now sitting with a gloss clear coat. When thats dry, I'll do a pin wash on the panel lines and a bit of soot and oil here and there.
Ian M
View attachment 190635
View attachment 190636
View attachment 190637
View attachment 190638
well I have been playing with the Alclad, lets see if I can remember which ones.
Here are the overwings, first in gloss black, then Airframe Aluminium.View attachment 77613
View attachment 77614
A tad too shiny?
The fuselage and wings have had: Airframe Alu. Dull Alu, White Alu. Polished Alu. Stainless steel and steel.
The nose ring got Stainless steel.
View attachment 77612
View attachment 77615
The vertical stab. and the canopy have had a couple of coats of gloss black.
She is now sitting with a gloss clear coat. When thats dry, I'll do a pin wash on the panel lines and a bit of soot and oil here and there.
Ian M
View attachment 190635
View attachment 190636
View attachment 190637
View attachment 190638
Attachments

G
Guest
Guest
Your builds are excellent (and fast) and this is no less.
Looking for more.
Francesco
Looking for more.
Francesco
WARNING the following pictures are NOT pretty !
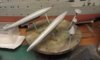
Went to do the pin wash yesterday and it was being very uncooperative. So today I gave it a bath. Black Windsor and Newton oil paint and turps!
I'll leave that until tomorrow and then wipe it over to remove the excess. Well thats the plan.
View attachment 77780
View attachment 77781
Todles!
Ian M
View attachment 190803
View attachment 190804
Attachments
- Status
- Not open for further replies.
Legal Notice
scalemodelling.co.uk is a privately operated online discussion forum. All content posted by members reflects their own views and opinions and does not necessarily represent those of the forum owners or administrators. While reasonable efforts are made to moderate content, no responsibility is accepted for user-generated material. By using this site, you agree to comply with UK law and the forum rules.