Theme editor

Scale Model Shop

ICM 1/32 AH-1G Cobra (early production)

BarryW

SMF Supporters
Joined
Jul 23, 2011
Messages
6,145
Reaction score
457
Points
83
Age
70
1/3
Thread owner
This is just the first introductory post for my next build thread. I don't expect to cut plastic for a couple of days as, Thursday 23rd I am getting shelving installed in my model room for which I want a clear bench.
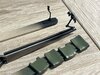
The box
11.jpg

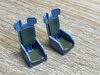
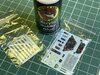
The aftermarket, canopy masks and some beautiful Quinta Studios 3D Decals.

12.jpg


I plan to do this scheme, using the kit decals.
13.jpg
It is the most colourful with the Stars and Bars.

14.jpg

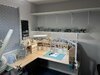
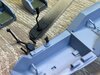
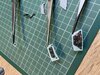
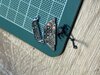
As I usually do a picture of the modelling bench, ready to start but, this time a picture of how it is now and I will do another of it when it has had the finishing touches. A before and after....

15.jpg

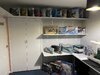
Note that since I last posted a picture of the room I have added extra lighting over the bench. This light has a built in magnifier which is useful but does not replace an optivisor. Other additions include some additional HobbyZone modules to enable me to have more spaces for MRP paint bottles and, while it looks like there is plenty of space available at the moment, in a few weeks I will have over 30 additional bottles of paint delivered which will include a full set of IJN/IJA colours and some extra Italian WW2 shades also. The Hs129 remains sat on the bench simply because have no space to put it until the shelves are in place. When they are done I will have lots of space for displaying large scale aircraft....
 
Interesting topic Barry...

And as always, very jealous of your work area.

ATB.

Andrew
 
Hi Barry
I don't remember you making a helicopter before although my memory isn't up to much :thinking:
Hope the shelving all goes ok. Are the seatbelts 3D decals?
Jim
 
Thread owner
Hi Barry
I don't remember you making a helicopter before although my memory isn't up to much :thinking:
Hope the shelving all goes ok. Are the seatbelts 3D decals?
Jim
Yes, indeed this will be my first helicopter, also yes the seatbelts are 3D decals. I don't think that describing them as decals is helpful as the only similarity to decals is that they are carried on paper and released by warm water. Other than that you use glue to fix them and they have none of the vices of decals.
 
Thread owner
The empty shelves and walls look at bit bare so I decided to put out the stash on one wall to make it a little less bare.

View attachment 441140

I have some ideas for the other walls to make them more interesting but that will be over time.
 

Attachments

  • C2323173-3840-42D7-8C22-B5776C39A20E.jpeg
    C2323173-3840-42D7-8C22-B5776C39A20E.jpeg
    3.5 KB · Views: 0
Thread owner
I think I might get a couple of those Ammo half size instrument panels, a Spitfire and Hurricane perhaps would look great on the walls

Anyway, back to the build. Christmas Eve I grabbed an hour at the bench and started on the cockpit. There was a fair bit of detail to sand away ready for the Quinta set. I then sprayed black primer on the sub-assemblies.

Ready for a Ghost Grey coat
View attachment 441260

The seat backs and cushions ready for Olive Drab
View attachment 441261

And the control columns in need of some detail
View attachment 441259

The plastic is really nice to work with, sands well, mould lines, fine and easy to remove. Why can’t all companies produce kits with plastic this good…..
 

Attachments

  • 4DD38685-939D-4962-B7D3-8025FE21B82C.jpeg
    4DD38685-939D-4962-B7D3-8025FE21B82C.jpeg
    3.3 KB · Views: 0
  • 62317D63-0F96-418C-A70E-F875429900FB.jpeg
    62317D63-0F96-418C-A70E-F875429900FB.jpeg
    3.6 KB · Views: 0
  • FA02B4FC-DB37-4ECD-BFD9-77B7E44346C4.jpeg
    FA02B4FC-DB37-4ECD-BFD9-77B7E44346C4.jpeg
    3.6 KB · Views: 0
Your new workshop layout looks impressive Barry. Gotta question though. Will you be able to avoid your A/Bs when you're facing your work area and push back your chair and swivel round to reach the next sprue for parts?
 
Thread owner
Your new workshop layout looks impressive Barry. Gotta question though. Will you be able to avoid your A/Bs when you're facing your work area and push back your chair and swivel round to reach the next sprue for parts?
Well I have not had a problem so far. Possibly because there is more room than it seems from the photo
 
I think I might get a couple of those Ammo half size instrument panels, a Spitfire and Hurricane perhaps would look great on the walls

Anyway, back to the build. Christmas Eve I grabbed an hour at the bench and started on the cockpit. There was a fair bit of detail to sand away ready for the Quinta set. I then sprayed black primer on the sub-assemblies.

Ready for a Ghost Grey coat


The seat backs and cushions ready for Olive Drab


And the control columns in need of some detail


The plastic is really nice to work with, sands well, mould lines, fine and easy to remove. Why can’t all companies produce kits with plastic this good…..

Not heard of those 1/2 scale instrument panels....are they a kit or do they came complete?

ATB

Andrew
 
Thread owner
Not heard of those 1/2 scale instrument panels....are they a kit or do they came complete?

ATB

Andrew
They have only just been launched Andrew and have not arrived in the shops in the U.K. they are available in 1/1 scale as well. They are not kits as I understand it, arrive easy to hang.
 
Barry

These will make some interesting wall art, but I have to say, what a shame they didn't go one step further and produce them with raised detail. A little like those resin decals you buy for the cockpits. I would have thought that applying a few frames around the dials and raised switches would not have been too difficult.

John
I agree there-- €50 for a painted chunk of MDF is a bit over the top.
 
I moved this to the Helicopter build section for you Barry. Just had to look to see if it was the 'chopper or the airplane! Was not expecting the helicopter! Cool beans.
Those Quinta details look rather nice.
I will look forward to seeing this build.
 
Have a Google for Photo wall or photo wallpaper Barry.
A 3x2 meter picture will be around the £150 mark. And you can have up load your own photo
 
Thread owner
Thanks Ian. I just realised my error, force of habit.

The panels are not entirely flat, the gunsights certainly are but not the panels themselves. They are rather better than painted MDF. I am looking forward to seeing one in the flesh. John, if you see this, will you be stocking them?

Anyway…..

The Cobra

I have been getting on with the pit.

I have sprayed the base coats
View attachment 441427
View attachment 441428
View attachment 441429

Then I checked my 3D decals to identify what detail still needs painting and did that with Vallejo MC. I also cross references to Google cockpit pictures and, while it’s a help, the pictures don’t all agree so clearly there was some variation.

I added the seat cushions.
View attachment 441430

Now for the 3D decals. These really are taking over from etch for cockpit detailing and seat belts and well deservedly so.

The only thing they have in common with decals is in using paper as a carrier and their being released by water. Other than that they are totally different and need to be used in a different way. Now I do want to clear one thing up… on a FB forum someone thought they were ordinary decals printed cleverly to give the appearance of 3D. Absolutely not, they are a plastic material with raised detail, reasonably robust and need to be glued into place.
View attachment 441433

Here are some elements soaked and awaiting use
View attachment 441434

They slide off easily - you cannot treat thin fragile decals like this below!
View attachment 441435

Here these are ready to position
View attachment 441436

PVA ‘white glue’ types are ideal for gluing them. I some situations ca might work better.

I applied Gator Glue to a part
View attachment 441437

And firmly press the element into place cleaning surplus glue with a damp cotton bud.

These elements are done more to go.
View attachment 441438

Several companies now produce these so do give them a try if you have not done so. They really are brilliant.

Tomorrow I will get on and do more.
 

Attachments

  • ED7B7BFA-6A0F-43D7-8539-AB6F00DEE00F.jpeg
    ED7B7BFA-6A0F-43D7-8539-AB6F00DEE00F.jpeg
    3.9 KB · Views: 0
  • 6786B55A-54C1-4071-B31B-4448550C3ECF.jpeg
    6786B55A-54C1-4071-B31B-4448550C3ECF.jpeg
    4 KB · Views: 0
  • F054155C-9E80-4212-9BDA-71B0B97A5C04.jpeg
    F054155C-9E80-4212-9BDA-71B0B97A5C04.jpeg
    3.9 KB · Views: 0
  • 03E5902E-2795-4F4E-B026-29B67706B997.jpeg
    03E5902E-2795-4F4E-B026-29B67706B997.jpeg
    4.5 KB · Views: 0
  • 4C663A35-D493-46E2-9D83-48E9EC283FF8.jpeg
    4C663A35-D493-46E2-9D83-48E9EC283FF8.jpeg
    4.2 KB · Views: 0
  • E8853AF6-F308-43CC-A847-95484A8B391F.jpeg
    E8853AF6-F308-43CC-A847-95484A8B391F.jpeg
    3.8 KB · Views: 0
  • 3EC3E004-A26E-4A3F-B7F3-74AAFB438DF8.jpeg
    3EC3E004-A26E-4A3F-B7F3-74AAFB438DF8.jpeg
    4.7 KB · Views: 0
  • 5EADE4BC-27D5-468C-9F2D-CEEA2DC37A72.jpeg
    5EADE4BC-27D5-468C-9F2D-CEEA2DC37A72.jpeg
    5.1 KB · Views: 0
  • D43E4D1E-A588-43C7-A03E-4AC7601A6DE7.jpeg
    D43E4D1E-A588-43C7-A03E-4AC7601A6DE7.jpeg
    3.2 KB · Views: 0
  • 06234027-AAAE-4B37-869B-7093C8C09820.jpeg
    06234027-AAAE-4B37-869B-7093C8C09820.jpeg
    3.9 KB · Views: 0
Back
Top