
You are using an out of date browser. It may not display this or other websites correctly.
You should upgrade or use an alternative browser.
You should upgrade or use an alternative browser.
Joe's 1/72 Italeri Harrier GR.3
- Thread starter flyjoe180
- Start date
- Status
- Not open for further replies.
Top work Joe and fast too! The intake area is a perennial problem on all Harrier kits , I dont think any manufacturer has successfully solved it, trouble is its such a noticeable aspect of the aircraft ,so if you want even token accuracy it has to be addressed. Keep it up , its coming on great , cheers tony
G
Guest
Guest
Great work on the intakes Joe! Little details like that make a build extra special I always think.
As for the roundel, would it not be easier to apply it as normal & cut it when dry? The gaps would then act as a guide.
Cheers
Patrick
As for the roundel, would it not be easier to apply it as normal & cut it when dry? The gaps would then act as a guide.
Cheers
Patrick
Thanks for the idea Patrick.\ said:Great work on the intakes Joe! Little details like that make a build extra special I always think.As for the roundel, would it not be easier to apply it as normal & cut it when dry? The gaps would then act as a guide.
Cheers
Patrick
Will be away from home and the build for the rest of the week from tomorrow evening so back to it on Saturday. Thanks for looking in and commenting guys.
Build update. In between house renovation and other things I have made some progress.
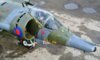
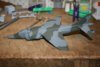
The intakes were fitted and cleaned up and given vent flaps made from thin plastic card.
View attachment 80338
View attachment 80339
As you can see the aircraft has been masked and primed, the grey stuff inside the vent is foam to mask off the engine intake white interior sections in preparation for painting.
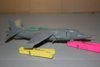
Two coats of Dark Sea Grey was applied. The tape helped me to handle the model and once removed exposes areas which will be dark green. The wrap-around scheme is a first for me, and this will be my first entirely airbrushed model.
View attachment 80340
View attachment 80341
After removal of the tape it's lightly sanded where required and ready for the next stage. In addition I have the landing gear and out riggers ready as well as the SNEB launchers, drop tanks and Aden cannons.
View attachment 193361
View attachment 193362
View attachment 193363
View attachment 193364
The intakes were fitted and cleaned up and given vent flaps made from thin plastic card.
View attachment 80338
View attachment 80339
As you can see the aircraft has been masked and primed, the grey stuff inside the vent is foam to mask off the engine intake white interior sections in preparation for painting.
Two coats of Dark Sea Grey was applied. The tape helped me to handle the model and once removed exposes areas which will be dark green. The wrap-around scheme is a first for me, and this will be my first entirely airbrushed model.
View attachment 80340
View attachment 80341
After removal of the tape it's lightly sanded where required and ready for the next stage. In addition I have the landing gear and out riggers ready as well as the SNEB launchers, drop tanks and Aden cannons.
View attachment 193361
View attachment 193362
View attachment 193363
View attachment 193364
Attachments


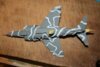
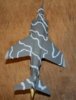
Then begins the puzzle of the green camouflage. Using rolls of Blue tac I marked out the pattern for the camouflage over the grey, ensuring the Blue tac sits inside the grey area slightly. I'm hoping once the grey areas are blanked off that I will get a gentle blend between the colours, aka a soft edge.
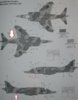
I don't normally have problems with spacial awareness or object rotation in my mind, but this was a real puzzle. Look at the pattern provided and see if you can work out where the green on the starboard rear fuselage goes, when you also check it against the underside of the aircraft:
View attachment 80347
I opted for a continuation of the green for the wrap-around scheme as I couldn't fathom it out, even after looking at photos online and in books.
Three hours later we have a Blue tac sausage roll fest:
View attachment 80348
View attachment 80349
View attachment 80350
View attachment 80351
Next mission is to blank off the grey areas for spraying the dark green. Probably won't happen today as I am operating on three hours sleep after a long shift last night flying freight, and the weather is perfect so I'm off to sand and paint house windows if nothing else. Past experience tells me not to do too much to a model when tired.
View attachment 193370
View attachment 193371
View attachment 193372
View attachment 193373
View attachment 193374
Attachments

Looking good Joe.I occasionally get a kit where the camo scheme doesn't join up if you follow the kit painting guide.My recent Defiant was the same around the nose.I find you just have to alter it a bit so it works.
G
Guest
Guest
Nice surgery on the Intakes Joe. Iv'e never had luck using Blue Tac for masking like that, I always seem to get a very irregulars finish, not obvious until the Blu Tac is removed, probably just me. Cheers Derek
G
Guest
Guest
Ready for painting Joe?
Good work til now, starting to get shape very well.
Francesco
Good work til now, starting to get shape very well.
Francesco
Thanks Francesco. Yep, ready for the green coats of paint. Dark Sea Grey is already on.\ said:Ready for painting Joe?Good work til now, starting to get shape very well.
Francesco
G
Guest
Guest
Oh yes, my bad...
I think I was thinking to all the primer I'm spraying on mine.
Francesco
I think I was thinking to all the primer I'm spraying on mine.
Francesco
G
Guest
Guest
Go for it, Joe.
We're waiting for it.
Francesco
We're waiting for it.
Francesco
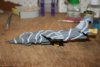
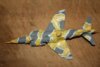
Had trouble with the paint so had to order a new pot. Dave's paint bug is spreading! The finished camouflage didn't have quite the effect I had hoped for, maybe a bit hard edged, but it is what it is considering the issues I had with the original dark green. Bits and bobs attached and now waiting for a gloss coat and the weather to play ball before decal application. I'll update with photos later, am away until Saturday for work. Determined to get this one done and then plan to move onto the FAA SIG build with the Sea Harrier. May as well stick with the Harrier theme for a while. I've also acquired and started a Bedford fuel tanker to go with the GR.3, so will start my first vehicle build soon.
Photo update:
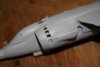
Grey blanked off with Tamiya tape on the Blutac rolls. This was in itself at least a two to three hour job:
View attachment 81852
The dark green on. Had a lot of issues with this paint as indicated in previous posts, had to get a new pot but it worked out okay in the end at the expense of my hoped-for nice feathered edges.
View attachment 81853
The result:
View attachment 81854
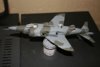
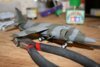
Air brake, landing gear, outriggers, exhaust nozzles and other bits started to go on:
View attachment 81855
View attachment 81856
Just noticed Italeri provided a few errors in their decal sheet. The first is the serial number, XV744 has been presented as XW744, easy fix with a pair of scissors. The second is the pilot name, Captain Pasquale. Captain Thomas Pasquale was a USMC pilot on exchange who was killed in 1973 in GR.3 XZ137 in Germany, 9 years before the model depicted here. Italeri kits are prone to small errors like this all the time in my experience. Reasonably nice kits, but the research can be dodgy do do your homework as always if you want accuracy.
View attachment 194875
View attachment 194876
View attachment 194877
View attachment 194878
View attachment 194879
Grey blanked off with Tamiya tape on the Blutac rolls. This was in itself at least a two to three hour job:
View attachment 81852
The dark green on. Had a lot of issues with this paint as indicated in previous posts, had to get a new pot but it worked out okay in the end at the expense of my hoped-for nice feathered edges.
View attachment 81853
The result:
View attachment 81854
Air brake, landing gear, outriggers, exhaust nozzles and other bits started to go on:
View attachment 81855
View attachment 81856
Just noticed Italeri provided a few errors in their decal sheet. The first is the serial number, XV744 has been presented as XW744, easy fix with a pair of scissors. The second is the pilot name, Captain Pasquale. Captain Thomas Pasquale was a USMC pilot on exchange who was killed in 1973 in GR.3 XZ137 in Germany, 9 years before the model depicted here. Italeri kits are prone to small errors like this all the time in my experience. Reasonably nice kits, but the research can be dodgy do do your homework as always if you want accuracy.
View attachment 194875
View attachment 194876
View attachment 194877
View attachment 194878
View attachment 194879
Attachments

- Status
- Not open for further replies.
Legal Notice
scalemodelling.co.uk is a privately operated online discussion forum. All content posted by members reflects their own views and opinions and does not necessarily represent those of the forum owners or administrators. While reasonable efforts are made to moderate content, no responsibility is accepted for user-generated material. By using this site, you agree to comply with UK law and the forum rules.