Theme editor

Scale Model Shop

Joe's 1/72 Italeri Harrier GR.3

Status
Not open for further replies.

flyjoe180

SMF Supporters
Joined
Jan 18, 2012
Messages
13,296
Reaction score
1,096
Points
113
Location
Earth
1/3
Thread owner
Bit quiet in here and I have a chance to get back into things, so count me in please.

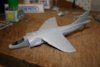
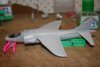
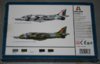
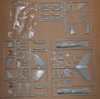
Italeri's 1/72 Harrier GR.3. A nice looking kit, just wish Italeri would dispense with the end-openeing boxes. Three options, one on the way to the Falkands with No.1 Squadron RAF, one in No.4 Squadron markings 1982, and another for a No.1 Squadron machine in winter Norwegian exercise colours in 1986. At this stage I think I'll go with the Cottesmore 4 SQN one.

View attachment 79220

View attachment 79221

View attachment 79222


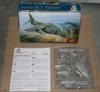
Box is a little worn, it's been in the stash box since I moved house. Decided to leave my Sea Harrier for the Fleet Air Arm build later in the year.

View attachment 192243

View attachment 192244

View attachment 192245
 

Attachments

  • IMG_2046.JPG
    IMG_2046.JPG
    2.8 KB · Views: 0
  • IMG_2043.JPG
    IMG_2043.JPG
    2.2 KB · Views: 0
  • IMG_2055.JPG
    IMG_2055.JPG
    2.7 KB · Views: 0
\ said:
Decided to leave my Sea Harrier for the Fleet Air Arm build later in the year.
i had the same thought! :cool: not quite ready for big plane at the moment
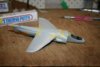
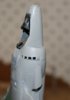
look forward to seeing this go together, dont think ive ever done an Italerai aircraft, what are they like?
 
This was one of my 'returning to models' builds. I probably didn't do it justice, but seem to remember it was a decent model.
 
Thread owner
\ said:
look forward to seeing this go together, dont think ive ever done an Italerai aircraft, what are they like?
I have a few of Italeri's aircraft kits, they all seem to be very nicely done. No flash to speak of, finely engraved panel lines and the clear parts come in separate plastic bags. The last one I built was the UH-1B Huey for the helicopter GB and it was a nice easy build with only a little filler. I highly recommend their decals too, very easy to work with and not too thick. After a series of old kits this should hopefully be pretty straight forward build-wise. My only gripe with Italeri is their silly end-opening boxes. Nice art work though :) I think I'm going to have to give some thought to how I paint this one, the wrap-around scheme is a challenge in itself.
 
Nice one Joe.

I rather like the look of the winter camouflage one....

Ian M
 
Thread owner
\ said:
Nice one Joe.I rather like the look of the winter camouflage one....

Ian M
Next time. I want a traditional looking Harrier for now, and besides, I can't be arsed working with all that white to be honest :)
 
Thread owner
Cockpit is nearly finished. To the ejection seat I have added some home made straps using painted tape and a little ejection handle at the base of the seat using wire. Progress photos will come soon.

I've found some very useful walk around and Harrier modelling links. These may be of use to someone else as well:

A treasure trove of modelling tips and Harrier detail information: http://www.harriersig.org.uk/index.htm

Walk arounds, ejection seats etc, all in one place, and if you feel like it you can buy a real one:

http://www.jetartaviation.co.uk/what-we-do/aircraft/
 
Nice link. I'd rather have the tonka though. Nothing says naff off like a Tornado. Mind you the Harriet would be easier to park! lol

Ian M
 
Thread owner
Today's progress at the end of play. Hoping Tropical Cyclone Lusi doesn't hit like the weather reports say it will tonight/early tomorrow morning. My new modelling area is under the house and I have to brave the elements to get to it!

Ejection seat:

View attachment 79299

View attachment 79300

View attachment 79301


Cockpit installed into nose section of fuselage.

View attachment 79302


Nose section mated with main fuselage which has front compressor blade, air brake detail and the main wheel stub installed.

View attachment 79303


The main wings will go on after the fuselage has been cleaned up a bit. It's not a simple kit, but it does go together quite well with some care and fore-thought. Some minor filling and sanding is next on the agenda.

View attachment 192322

View attachment 192323

View attachment 192324

View attachment 192325

View attachment 192326
 

Attachments

  • IMG_2074.JPG
    IMG_2074.JPG
    2.2 KB · Views: 0
  • IMG_2068b.jpg
    IMG_2068b.jpg
    2.2 KB · Views: 0
  • IMG_2062.JPG
    IMG_2062.JPG
    2.8 KB · Views: 0
  • IMG_2060.JPG
    IMG_2060.JPG
    2.7 KB · Views: 0
  • IMG_2058.JPG
    IMG_2058.JPG
    1.9 KB · Views: 0
Nice choice Joe, have been tempted to do the Winter Camo myself. Cheers Derek
 
Top work Joe, as ever I'm amazed by the care & detail achieved in such a small scale!

Cheers

Patrick
 
Thread owner
Wings are now on, and it's looking more like a Harrier. I have taken a couple of Matra rocket launchers from my Fujimi Sea Harrier (Italeri provide only bombs or Sidewinders) for that traditional Harrier ground attack look and exchanged them for the Italeri Sidewinders (The Fujimi ones look like sticks with a bit of sprue blobbed on and as the FRS.1 is more of a fighter aircraft they will be more at home on that). Looking at the two kits, the Fujimi Sea Harrier and Italeri (probably formerly ESCI) kits are eerily very similar in layout and construction. I guess there are only a few ways of building a Harrier in this scale. That will come in handy for the FAA build later and I have made some notes as I learn along the way.
 
Coming a long nice.

"Build area is under the house"..... I hope you mean in a cellar or basement and not "Under" the house.....

Ian M
 
Thread owner
\ said:
Coming a long nice."Build area is under the house"..... I hope you mean in a cellar or basement and not "Under" the house.....Ian M
The basement, not under the entire structure. I have a little work shop in there. :cool:
 
Thread owner
Wings attached, then a tidy up of the basic airframe with my old mate Tamiya putty.

View attachment 79403


Filled, sanded, sanded again and cleaned up. Tail fin fitted. Once that is cleaned up the horizontal stabs will go on, then it's time to think about masking. Periphery work has included construction on drop tanks, the Matra rocket launchers and landing gear components.

View attachment 79404


View attachment 192426

View attachment 192427
 

Attachments

  • IMG_2082.JPG
    IMG_2082.JPG
    2.3 KB · Views: 0
  • IMG_2080.JPG
    IMG_2080.JPG
    2.4 KB · Views: 0
Thread owner
Horizontal stabilators are on. I'll leave the nose cone and pitot head off for now, they will be prone to damage until the time comes to paint:

View attachment 79414


Research shows that Harriers at rest have the top four intake vents open due to gravity. The fifth vent partially opens. The bottom ones remain closed. When running or in hover mode the vents are all open, and in fast forward flight they are closed as depicted in the kit:

View attachment 79415


So as Italeri fail to provide a pilot or any ability to produce a wheels-up in flight kit, it is time to be brave and crack out the blade, file, sandpaper and some spare sprue:

View attachment 79416


After surgery they don't look too bad but need to be cleaned up. There were casualties, spare sprue was used to shape new spaces between the open vents. The fifth partially-open vent was filed down from the outside to present a sloping surface:

View attachment 79417


A dry fit to make sure they look okay. The intakes will need to be cleaned up some more and added after an initial paint. Now I've done this I now also realise my roundel decal will have to be cut to fit the new surfaces. Yay:

View attachment 79418


View attachment 192437

View attachment 192438

View attachment 192439

View attachment 192440

View attachment 192441
 

Attachments

  • IMG_2090.JPG
    IMG_2090.JPG
    1.8 KB · Views: 0
  • IMG_2089.JPG
    IMG_2089.JPG
    1.3 KB · Views: 0
  • IMG_2087.JPG
    IMG_2087.JPG
    2.1 KB · Views: 0
  • IMG_2084.JPG
    IMG_2084.JPG
    2.4 KB · Views: 0
  • IMG_2088.JPG
    IMG_2088.JPG
    1.7 KB · Views: 0
Status
Not open for further replies.
Back
Top