G
Guest
Guest
Finally! This took almost 6 months from start to finish (an hour here, two hours there, and a gap in the middle), but here is the French Infantry vignette circa 1916.
Photos aren't the best, and don't really reflect the tones properly, but who knows? Maybe I'll take it to a model show one day and try my luck in a competition.
Feedback appreciated (especially on the vexed issue of photographing these things).
Cheers
DSView attachment 315110View attachment 315111View attachment 315112View attachment 315113View attachment 315114View attachment 315115
And it looks like I'm running out of space...
View attachment 315116
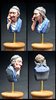
The figures are by ICM models (part of a 1/35th 4-fig set and you can get the same ones with gas masks on if preferred). The barbed wire is by Verlinden (and had languished unused in the box since ~1990!), the broken bottle & rusted tin likewise. The stick grenade is by Tamiya (WWII: hence its application of 'mud', to hide the contoured grip and represent a bit of battlefield debris, rather than a threat to our brave heroes).
The figs are painted with Humbrol enamels. Horizon Blue is a general term, but I used modified Matt 89 - as the figs were painted a month or so apart, you may see a difference in the tones of their uniforms... I don't care! You can't use the paint 'neat' as it's way too bright, but this colour gives you a starting point for French uniforms post-1914, and looks good for Union Army trousers for the American Civil War (suggestions of decent figures for that conflict appreciated). Everything else was painted with, usually, modified Humbrol colours. Except the Chauchat LMG was washed with Tamiya Smoke (a favourite in my modelling world, as you'll see).
The fence posts are a couple of cocktail sticks snipped in half (hence their smooth profiles - something to work on in the future). The broken bits of wood are just that.
The base is a rectangle of 9mm ply, with wood laminate edging ironed into place, varnished & topped with acrylic paste. I then completed the figs on thin plastic sheet bases , which were glued down so they sat horizontally (No1 (gunner) was painted in situ). The posts & wire were put in place once the gunner was sorted. After No 2 was fixed into position, a sprinkling of Polyfiller Exterior made the rough terrain of No Man's Land, and I pressed the few accessories I had into place.
Then the ground work got two coats of matt enamel varnish to set it firmly. I liked the variety of tones & shades this created, so dropped the idea of painting it and washed it three times with Tamiya acrylic Smoke. The posts and splintered wood were stained with Smoke and left because this brought the grain and splinters out so nicely.
The wire was rather shiny, so had two coats of matt varnish (Vallejo) before washing with smoke, then three matt coats to take the sheen off again, and finally a dry-brushing with Humbrol gun metal enamel.
Painted the can, bottle & stick bomb, washed them (Smoke again), matt varnished everything but the broken bottle, then dry brushed highlighting onto the ground work etc in successively paler tones of 'dust'.
A nice project and a subject that, for me, is all too scarce.
Photos aren't the best, and don't really reflect the tones properly, but who knows? Maybe I'll take it to a model show one day and try my luck in a competition.
Feedback appreciated (especially on the vexed issue of photographing these things).
Cheers
DSView attachment 315110View attachment 315111View attachment 315112View attachment 315113View attachment 315114View attachment 315115
And it looks like I'm running out of space...
View attachment 315116
The figures are by ICM models (part of a 1/35th 4-fig set and you can get the same ones with gas masks on if preferred). The barbed wire is by Verlinden (and had languished unused in the box since ~1990!), the broken bottle & rusted tin likewise. The stick grenade is by Tamiya (WWII: hence its application of 'mud', to hide the contoured grip and represent a bit of battlefield debris, rather than a threat to our brave heroes).
The figs are painted with Humbrol enamels. Horizon Blue is a general term, but I used modified Matt 89 - as the figs were painted a month or so apart, you may see a difference in the tones of their uniforms... I don't care! You can't use the paint 'neat' as it's way too bright, but this colour gives you a starting point for French uniforms post-1914, and looks good for Union Army trousers for the American Civil War (suggestions of decent figures for that conflict appreciated). Everything else was painted with, usually, modified Humbrol colours. Except the Chauchat LMG was washed with Tamiya Smoke (a favourite in my modelling world, as you'll see).
The fence posts are a couple of cocktail sticks snipped in half (hence their smooth profiles - something to work on in the future). The broken bits of wood are just that.
The base is a rectangle of 9mm ply, with wood laminate edging ironed into place, varnished & topped with acrylic paste. I then completed the figs on thin plastic sheet bases , which were glued down so they sat horizontally (No1 (gunner) was painted in situ). The posts & wire were put in place once the gunner was sorted. After No 2 was fixed into position, a sprinkling of Polyfiller Exterior made the rough terrain of No Man's Land, and I pressed the few accessories I had into place.
Then the ground work got two coats of matt enamel varnish to set it firmly. I liked the variety of tones & shades this created, so dropped the idea of painting it and washed it three times with Tamiya acrylic Smoke. The posts and splintered wood were stained with Smoke and left because this brought the grain and splinters out so nicely.
The wire was rather shiny, so had two coats of matt varnish (Vallejo) before washing with smoke, then three matt coats to take the sheen off again, and finally a dry-brushing with Humbrol gun metal enamel.
Painted the can, bottle & stick bomb, washed them (Smoke again), matt varnished everything but the broken bottle, then dry brushed highlighting onto the ground work etc in successively paler tones of 'dust'.
A nice project and a subject that, for me, is all too scarce.