Theme editor

Scale Model Shop

Liberation, Italy 1944

Definitely worthwhile there Tim ...quite a harvest of Sunflowers.

Lazer cutting has made the hobby much more interesting producing such delicate items that in the past was only a dream to make.

Cheers,
Richard
 
Thread owner
Thanks guys.

A little more progress on the vegetation. This has been achieved with more Mininatur grass tufts: specifically Two Colour Tufts Summer and Weed Tufts Summer. The latter is particularly useful, because it has tiny leaves and flowers mixed in with the grass.

View attachment 315089
View attachment 315090
View attachment 315091
View attachment 315092
View attachment 315093

The idea is to create a more lush type of vegetation in and around the ravine. I recognise that the fact that I have used four different shades of grass now makes the scene look a little like a patchwork - but I am confident that this will look more subtle once I have got to work with washes and pigments...

There is still a lot more to do here because the centre of the ravine will be the darkest and greenest of all. For this I have various laser cut paper plants in various states of completion. In the end I am probably going to add a little water trickle of water because, although this is the height of an Italian summer, this is in the mountains and it DID rain for a few days following the liberation of Rome in June 1944...

You will also see one of my sunflowers temporarily in place, as well as a German casualty in the foxhole (this is an unpainted Stalingrad Miniatures figure).
 

Attachments

  • Foliage third stage 1.jpg
    Foliage third stage 1.jpg
    2.5 KB · Views: 0
  • Foliage third stage 5.jpg
    Foliage third stage 5.jpg
    3.6 KB · Views: 0
  • Foliage third stage 4.jpg
    Foliage third stage 4.jpg
    2.5 KB · Views: 0
  • Foliage third stage 3.jpg
    Foliage third stage 3.jpg
    3 KB · Views: 0
  • Foliage third stage 2.jpg
    Foliage third stage 2.jpg
    2.7 KB · Views: 0
Thread owner
Thanks Steve.

As it is now mid October I have to admit to myself that I am not going to finish this project in time for Scale Model World at Telford in November - although I will be there in person (and my usual flowery shirts!)

But hey ho... this is the part of the build which I find the most enjoyable, where everything comes together. And there seems no point in rushing it.

First off there are my figures. Most of them are completed, but apart from a black and white (actually Vallejo 'concrete' 71.131) highlight shade with the airbrush, they still await real painting.

View attachment 316470

View attachment 316472

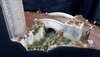
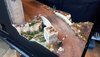
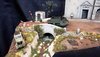
Meanwhile, I have been working on stowage for my Universal Carrier. I will cover this in more depth once I finish it, but suffice to say that there is a lot! In the shot below it is all temporarily installed and, although the carrier has had oil washes applied, the all-important dust has still to make its appearance!

View attachment 316473

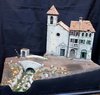
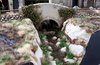
I have also been adding to my vegetation around the ravine and bridge. There is still quite a lot more plant life to add to the ravine itself, which has been further darkened with Vallejo acrylic washes, but the most obvious developments are the ivy around the bridge itself and the olive tree behind it.

Here I followed the lessons of master modeller Rodrigo Hernandez Cabos (whom I had the pleasure of meeting in his home town Madrid and at several shows here in the UK) and his wonderful series of books 'Landscapes of War' (Accion Press).

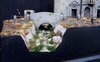
For the ivy I began by forming the branches using 'Lichen Fine' which is sold as part of his diorama accessories range 'Landscapes in Detail' (LANDS202). This was cut and stretched into tendrils and then glued to the sides of the bridge using Deluxe Materials PVA (which is faster setting than the ordinary stuff).

View attachment 316474

At this point I have to admit that I wasn't quite sure it was going to work - it looked more like jungle creepers or something out of an Indiana Jones film. But once I attached a piece of ivy (see top left) I could see that it would look fine...

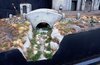
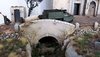
After an application of Vallejo acrylic Dark Brown Wash to tone it down I then added the 'ivy'. This is actually a combination of MiniNatur 'Plane Tree Foliage Early Fall' (933-23) and 'Ivy Dead', cut and stretched into suitable shapes and then glued on with Gorilla glue.

View attachment 316475
View attachment 316476

In the background of the shot above you can also see that the olive tree has finally sprouted some leaves! This tree began life as a wind-blown piece of heather (found on top of Curbar Edge in the Derbyshire Peak District if you want to know) to which I added some bark texture using Magicsculp. After being airbrushed in various browns and greys I then added olive foliage courtesy (once again) of MiniNatur. Here's a pic before I added it to the diorama...

View attachment 316477
 

Attachments

  • Ivy on bridge 3.jpg
    Ivy on bridge 3.jpg
    2.8 KB · Views: 0
  • Ivy on bridge 1.jpg
    Ivy on bridge 1.jpg
    3.4 KB · Views: 0
  • Ivy on bridge early.jpg
    Ivy on bridge early.jpg
    2.8 KB · Views: 0
  • Carrier on the bridge with stowage.jpg
    Carrier on the bridge with stowage.jpg
    2.7 KB · Views: 0
  • Figures in black and white 2.jpg
    Figures in black and white 2.jpg
    2.9 KB · Views: 0
  • Figures in black and white 1.jpg
    Figures in black and white 1.jpg
    3.1 KB · Views: 0
  • Olive tree.jpg
    Olive tree.jpg
    2.7 KB · Views: 0
That looks brilliant, absolutely love the ivy......really natural look to it.
 
Excellent work on the foliage Tim. The figures are like wine maturing in the cellar waiting to be popped out. The Carrier is a must see with dust on. :thumb2:

You are right that it is too close to rush for Telford. Just put the lid on and let it simmer until all the ingredients blends in. There's always next year.

Cheers,
Richard
 
Excellent gardening. Your patience with this work is paying off big time. PaulE
 
Thread owner
Thanks one and all...

Today I have almost completed my work on the ravine by adding various laser-cut plants and some grass from Mk35. These pictures aren't the best, but I will try to take some more tomorrow in daylight...

 
Its a wow from me Tim. :thumb2::thumb2::thumb2:
Love the greenery, off to check that out, love the one with the flowers mixed in with the grass. That Olive tree is exceptional.
John .
 
Thread owner
As promised, some more (and hopefully better) pictures taken in daylight...

file.php
file.php
file.php

file.php
 
Don't think this could be better !
Fantastic work Tim .Certainly learnt a lot with the ground work , thanks .
John.
 
Late to this, Fantastic work, Tim!!!! :thumb2: and very inspirational for me as I venture into my first ever foam board building - an urban enviroment in Damascus.
 
Back
Top