
You are using an out of date browser. It may not display this or other websites correctly.
You should upgrade or use an alternative browser.
You should upgrade or use an alternative browser.
Liberation, Italy 1944
- Thread starter TIM FORSTER
- Start date
G
Guest
Guest
Tim.
Stone work A1, great depth with those washes. Light or lights as well. ! Going to o be something !
Nice work on the road up to the bridge .:thumb2:
John .
Stone work A1, great depth with those washes. Light or lights as well. ! Going to o be something !
Nice work on the road up to the bridge .:thumb2:
John .
Thank you for all your kind comments.
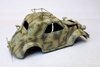
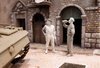
After a busy weekend with the airbrush I have managed to make some progress with painting the Topolino staff car and Universal carrier (for more details see my separate threads).
View attachment 308634
The Topo after camouflage and chipping.
View attachment 308635
The carrier after a base coat.
And here they are temporarily on the diorama...
View attachment 308639
View attachment 308640
So we're getting there!
Attachments
I've been on holiday for a couple of weeks and sadly there just wasn't room to take the diorama with me... however, I was able to get to work on some of the figures.
These are being covered in a separate blog:
http://www.scale-models.co.uk/threads/figures-for-my-wwii-diorama-liberation-italy-1944.30821/
View attachment 310644
However, I promise a lot more landscaping is coming soon!
These are being covered in a separate blog:
http://www.scale-models.co.uk/threads/figures-for-my-wwii-diorama-liberation-italy-1944.30821/
View attachment 310644
However, I promise a lot more landscaping is coming soon!
Attachments
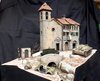
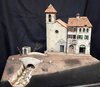
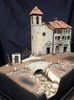
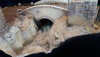
First coat of paint on the groundwork
It's finally time to say goodbye to the pink DAS clay and get to some sort of uniform colour on the groundwork. This is only a basic mix of brown shades applied with brush and airbrush - with a little shading in the obvious hollows and beneath the locations for the vehicles - but it finally gives me a chance to see my buildings in a more realistic setting.
View attachment 311416View attachment 311417
There's still more work to be done picking out the larger stones, etc in highlighting colours - but then I'm ready to get stuck into the vegetation!
Attachments
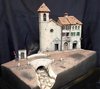
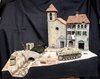
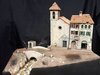
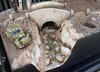
Today I have been working on stone highlights: basically finding every stone on the diorama and highlighting them with a mixture of acrylic colours ranging from reddish brown to grey. It's actually quite therapeutic!
View attachment 311712
View attachment 311714
View attachment 311715
View attachment 311712
View attachment 311714
View attachment 311715
Attachments
G
Guest
Guest
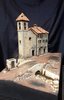
Lovely dio and building work Tim, looking forward to the final reveal. :smiling2:
View attachment 313627
Vegetation
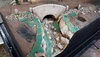
At last I have made a start on the greenery. Well I say 'greenery' - but because this is going to be Tuscany in the summer of 1944 its more of a collection of reds, yellows and browns.
The first step was to add rough grass to the areas around the ravine and road. This was done with a method I only read about recently. The hanging basket liner method is pretty well known, but what I hadn't understood was that it works best of you stick it 'grass' side down using PVA. It's dry within 24 hours. The trick then is to peel away the backing (it usually comes away quite easily with tweezers).
What you're left with can best be described as something like Donald Trump's hair... so it needs to be tamed with scissors, tweezers and fingers to make it look something like rough grass.
View attachment 313628
View attachment 313629
View attachment 313630
The area behind the bridge clearly needs a bit more work!
Now, as I say, this gives you a basic covering of what is basically rough grass or undergrowth. It's very cheap, quick and easy way of covering quite large areas.
However, it needs something more to make it look like real vegetation.
This is where I turned to the excellent MiniNatur range of grass tufts. These come as little tufts of varying size and different shades, which you pull of the backing strip using tweezers. They can then be easily glued in place with PVA.
I used a mixture of 'Golden grass prairie tufts, tall' (727-35 S) and 'Two colour grass tufts late fall' (737-34).
I effectively used them to 'surround' the basket liner areas to give a more natural look.
View attachment 313631
View attachment 313632
View attachment 313633
The contrasts may look a little strong in these shots, but here's still more to be added and, ultimately, pigments (and perhaps a little airbrush work) should help to bring everything together.
Onward and upward!
Vegetation
At last I have made a start on the greenery. Well I say 'greenery' - but because this is going to be Tuscany in the summer of 1944 its more of a collection of reds, yellows and browns.
The first step was to add rough grass to the areas around the ravine and road. This was done with a method I only read about recently. The hanging basket liner method is pretty well known, but what I hadn't understood was that it works best of you stick it 'grass' side down using PVA. It's dry within 24 hours. The trick then is to peel away the backing (it usually comes away quite easily with tweezers).
What you're left with can best be described as something like Donald Trump's hair... so it needs to be tamed with scissors, tweezers and fingers to make it look something like rough grass.
View attachment 313628
View attachment 313629
View attachment 313630
The area behind the bridge clearly needs a bit more work!
Now, as I say, this gives you a basic covering of what is basically rough grass or undergrowth. It's very cheap, quick and easy way of covering quite large areas.
However, it needs something more to make it look like real vegetation.
This is where I turned to the excellent MiniNatur range of grass tufts. These come as little tufts of varying size and different shades, which you pull of the backing strip using tweezers. They can then be easily glued in place with PVA.
I used a mixture of 'Golden grass prairie tufts, tall' (727-35 S) and 'Two colour grass tufts late fall' (737-34).
I effectively used them to 'surround' the basket liner areas to give a more natural look.
View attachment 313631
View attachment 313632
View attachment 313633
The contrasts may look a little strong in these shots, but here's still more to be added and, ultimately, pigments (and perhaps a little airbrush work) should help to bring everything together.
Onward and upward!
Attachments
-
 Foliage second stage 2.jpg2.6 KB · Views: 0
 -
 Foliage second stage 1.jpg2.6 KB · Views: 0
 -
 Basket liner after backing removed.jpg2.5 KB · Views: 0
 -
 Basket liner backing removed.jpg3.3 KB · Views: 0
 -
 Basket liner glued in place with PVA.jpg3 KB · Views: 0
 -
 Foliage second stage 3.jpg2.8 KB · Views: 0
 -
 Foliage second stage 4.jpg2.8 KB · Views: 0
Fingers crossed Steve! It's all coming together...
1/3
Great progress Tim. Nice to see the old Barry Norman grass technique being updated and still giving such great results. The pastel tones of the whole scene are really pleasing and look really convincing. You can almost feel the heat coming off the ground.....
If I may offer an observation, the mini natur tufts look a little evenly spaced in places, so you might want to break that up a little?
Cheers
Tim
If I may offer an observation, the mini natur tufts look a little evenly spaced in places, so you might want to break that up a little?
Cheers
Tim
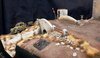
Sunflower Madness
Now I will be the first to confess that I thought I had taken leave of my senses at this point... it all started when I was on holiday in Italy a couple of years ago and we were staying in a villa surrounded by sunflowers. I got it into my head that I wanted a field of them to feature in my diorama.
After a bit of research I discovered these wonderful 1/35 sunflowers in kit form: GreenLine GL085 laser cut sunflower plants.

Now I haven't worked with many paper kits before, but these are absolutely stunning. They are also quite ingenious. And quite time-consuming... Having said that, I believe they are absolutely worth the effort.
The set comes with sheets of flowers and leaves pre-coloured in yellow and green. The leaves are even embossed with the leaf veins in a slightly lighter shade. There's a piece of thicker cardboard for the circular stamen and 14 lengths of flexible brass rod. Everything can be pushed out from the surrounding sheets with a minimum of fuss.
Then the fun begins. The flowers are easy enough to make with five layers + the stamen. The leaves then almost 'clip' onto the brass rod, although they need to be glued in place. I used my new favourite glue: Gorilla Super Glue Gel. This is the first glue I have found that actually doesn't clog just as it promises...


It's important not only to arrange the leaves in a three-dimensional way, but also to give them some shape by bending them over a cocktail stick / end of a paintbrush. This is best done before gluing them in place.
Also, although the kit promises to make you 14 plants, I would advise buying two sets if you want to add more leaves (as I did).
Lastly, I brush painted the brass stems using a mix of Vallejo Uniform Green 70922 and USMC Tank Crew 319 + a little black.
Et voila!

Well, as I say, despite the effort I felt that it was worth it. They look great! Now I just have to work out where to put them all...
Now I will be the first to confess that I thought I had taken leave of my senses at this point... it all started when I was on holiday in Italy a couple of years ago and we were staying in a villa surrounded by sunflowers. I got it into my head that I wanted a field of them to feature in my diorama.
After a bit of research I discovered these wonderful 1/35 sunflowers in kit form: GreenLine GL085 laser cut sunflower plants.
Now I haven't worked with many paper kits before, but these are absolutely stunning. They are also quite ingenious. And quite time-consuming... Having said that, I believe they are absolutely worth the effort.
The set comes with sheets of flowers and leaves pre-coloured in yellow and green. The leaves are even embossed with the leaf veins in a slightly lighter shade. There's a piece of thicker cardboard for the circular stamen and 14 lengths of flexible brass rod. Everything can be pushed out from the surrounding sheets with a minimum of fuss.
Then the fun begins. The flowers are easy enough to make with five layers + the stamen. The leaves then almost 'clip' onto the brass rod, although they need to be glued in place. I used my new favourite glue: Gorilla Super Glue Gel. This is the first glue I have found that actually doesn't clog just as it promises...
It's important not only to arrange the leaves in a three-dimensional way, but also to give them some shape by bending them over a cocktail stick / end of a paintbrush. This is best done before gluing them in place.
Also, although the kit promises to make you 14 plants, I would advise buying two sets if you want to add more leaves (as I did).
Lastly, I brush painted the brass stems using a mix of Vallejo Uniform Green 70922 and USMC Tank Crew 319 + a little black.
Et voila!
Well, as I say, despite the effort I felt that it was worth it. They look great! Now I just have to work out where to put them all...
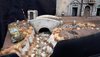
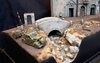
Oh yes, I forgot the 'team' shot...

Legal Notice
scalemodelling.co.uk is a privately operated online discussion forum. All content posted by members reflects their own views and opinions and does not necessarily represent those of the forum owners or administrators. While reasonable efforts are made to moderate content, no responsibility is accepted for user-generated material. By using this site, you agree to comply with UK law and the forum rules.