Theme editor

Scale Model Shop

OEZ 1/48 Sukhoi su7

Thread owner
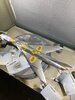
Getting to the stage now where more bits are being added to the airframe . There are 13 scoops/ intakes that have to be stuck on in various places so these were cleaned up and as none of them were hollow ive drilled and ‘scooped’ them out .The weapons pylons have also been fitted and ive been deciding what ordnance its going to have and assembling that.
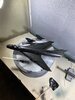
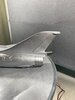
The range on the Su7 was poor so they were almost never seen without two or more drop tanks , usually on the underfuselage pylons. The other thing seen commonly was the UB16 unguided rocket pod so two of those are going on too . Im leaving the middle pylons empty .The drop tanks had the thickest fins youve ever seen so they were cut off and replaced with plastic card . 28D7395C-849F-428D-BDEA-512DC686737E.jpegA2173F47-CA4A-4427-BF97-D5F659C67F8E.jpeg65E6F441-4674-4BA6-A1A6-2134901FFA2E.jpegA23782E4-673F-4316-9B80-55ADCAA79878.jpeg1F383A2B-70E8-4C55-A898-E78D184CC6FC.jpeg147A7AD5-6114-4FA2-B75E-FB0B2891BC8A.jpeg
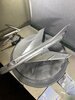
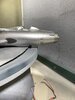
The aforementioned gun camera has been painted and fitted , also ive made a couple of demisting bars from fuse wire and painted and fitted these to the instrument panel shroud . These finish flush with the windscreen back edge and connect to another pair on the rear canopy which i’ll have to make too. Once these were fitted I could get the windscreen glued on and its now setting , held down with a bit of tape. 510286C9-DD1A-4B46-9791-7AA7B934FE39.jpegCF9707A0-1475-4DF1-A61A-EFF46757ACC2.jpeg230ABCEB-7FF4-4522-866C-6CD854570569.jpeg
 
I'm liking what I see here. it's got a Gerry Anderson swept look about it. And I think you're getting fussy in your old age, that kit supplied seat looks absolutely, errm, adequate.
 
Thread owner
And I think you're getting fussy in your old age, that kit supplied seat looks absolutely, errm, adequate.
Yes it is colin , if youre after a short back and sides and maybe something for the weekend sir! :smiling5:
 
Thread owner
The airframe has now been cleaned up and had a misting of Halfords grey primer to show any areas that needed sorting . It was all ok so it just got a quick rub with some very worn 1200 sanding sponge followed by a coat of gloss black . Next up is the silver . View attachment 431488
 

Attachments

  • 51220C27-CD92-4FDE-A0F6-ACE516B79074.jpeg
    51220C27-CD92-4FDE-A0F6-ACE516B79074.jpeg
    3.3 KB · Views: 0
Thread owner
After the gloss black had thoroughly dried it showed up some noticeable sink marks on the upper wings , above the undercarriage bays . These have been filled and sanded and touched up . Ive also been looking at assembling the multi part undercarriage legs , not helped at all by the very vague instructions . After a look at a lot of online pics of the legs I think ive got them sorted , just a transverse link to be added after they are fitted . The undercarriage on the BKL version had a retractable ski under the main bogey , just above the level of the tyre ,which was used when landing on rough fields or snow to prevent the wheels sinking in .89D1964A-33F6-4673-97ED-F4581352C33E.jpegEF950BEE-4D16-4C31-B04E-C6A21971BDFF.jpeg52B36961-A4B1-4519-BBB8-52DFD9D55686.jpeg82027210-741F-4B3A-9C45-2DB3713B9CAC.jpeg432150FA-BBA3-44D2-B63B-3DDA7D5FFE54.jpeg
 
Nice catch on the wings Tony. Be a right pain if that had only showed on the final finish.
 
Thread owner
Slow going on this one , been too knackered after work to do anything but heres the latest progress. The airframe got a coat of silver a week or so ago ( vallejo metal color , white aluminium ) and today i started to mask up and spray a few access panels and other areas in a darker shade ( dark aluminium) . The blast shields for the cannons in front of the wing roots and the drag chute housing on the tail were done in steel as these areas were stainless steel and darkened quite considerably . View attachment 432924View attachment 432925View attachment 432926View attachment 432927View attachment 432928
 

Attachments

  • 0D1B1B76-EBE8-49DB-ADD9-6B3132A7A185.jpeg
    0D1B1B76-EBE8-49DB-ADD9-6B3132A7A185.jpeg
    3.1 KB · Views: 0
  • 68992029-6242-4EE7-B800-FD0B26B573E4.jpeg
    68992029-6242-4EE7-B800-FD0B26B573E4.jpeg
    3.4 KB · Views: 0
  • 34A34A71-33B4-45AB-BEDE-E298C5E05912.jpeg
    34A34A71-33B4-45AB-BEDE-E298C5E05912.jpeg
    3.3 KB · Views: 0
  • 912E94FA-9DAB-4EEE-A05B-5B8F259483F2.jpeg
    912E94FA-9DAB-4EEE-A05B-5B8F259483F2.jpeg
    3 KB · Views: 0
  • D44E1020-15DB-4665-9408-0AB3F4BB3F2D.jpeg
    D44E1020-15DB-4665-9408-0AB3F4BB3F2D.jpeg
    2.7 KB · Views: 0
Works a bugger ain't it!
The planes looking very good though,paintwork looks lovely :thumb2: look forward to the seeing the end result.
 
Excellent work Tony. The different shades on the metal give a nice variation to the finish.
 
Tony

Apologies, got very behind on this. It's come on leaps and bounds since I last saw it.

Looking very good indeed.

Very well done.

Andrew
 
Thread owner
Tony

Apologies, got very behind on this. It's come on leaps and bounds since I last saw it.

Looking very good indeed.

Very well done.

Andrew
No need to apologise andrew , ive been behind on it myself !! Cheers tony
 
Thread owner
Decals on today and what looked like a simple quick job turned into a bit of a slog! First off the kit instructions dont have any decal placement drawings . All you get is a three view of each of the camouflaged aircraft and a side view only of the silver russian one , and these are on the back of the box! The six red stars and bort number were easy to locate but there are quite a few stencils on the sheet ( some black ,some yellow) , not numbered and with no clue as to where they go .To top all this off the kit decal sheet has an all over carrier film meaning each decal to be applied has to be closely cut round .
I found a few images for stencil placement on the net ,pages from the Eduard and Modelsvit instructions so with a few extra stencils from the spares box applied them in roughly the right places . Luckily soviet cold war era stuff wasnt as liberally sprayed with the damn things as US aircraft were so there arent hundreds to sort .Next up painting the undercarriage and fitting the multi part undercarriage doors ( again with bugger all help from the instructions !)42B88301-9AD0-46B7-A294-F5EA5BC5817A.jpegF529D7FC-5B68-47CF-8B0E-7B0925CE259C.jpeg73E95AB0-9C4A-47F7-96C9-E5CEDA9D7D6D.jpeg08D4FCB0-9D01-4E5D-BF91-E5CBF83D8513.png
 
Good detect work on the stickers Tony. Looking good when they’re on as well.
 
Thread owner
Back
Top