
You are using an out of date browser. It may not display this or other websites correctly.
You should upgrade or use an alternative browser.
You should upgrade or use an alternative browser.
P61 Black Widow
- Thread starter Dave W
- Start date
- Status
- Not open for further replies.
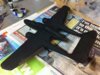
The wifes gone to Wembley to see 'Take That' with here mates tonight.So ive had a three hour modelling session this evening and made quite a bit of progress with the build.Still some filling and rescribing to do but its looking like a widow now.Still havent fitted the shoulder harnesses to the seats.Actually,im not expecting the wife back till after 1am so will go and fit them now.
View attachment 30824View attachment 30825
View attachment 35931
View attachment 35932
View attachment 148957
View attachment 148958
View attachment 30824View attachment 30825
View attachment 35931
View attachment 35932
View attachment 148957
View attachment 148958
Attachments
Ian.If Great Wall are doing it that should be a pretty special kit.The Monogram kit is one of their better efforts.It has a detailed no.1 engine with open engine cowl option.Also reasonably detailed cannon bays again with open panel option.And the cockpit detail is good despite my ham fisted attempt at painting it.Ok,the fit of parts isnt exactly Tamiya standard,but i personally dont mind a bit of filling and sanding.I looked at the resin canopies you suggested and they are fantastic. But the kit ones look pretty good now ive coated them with Klear,so im going to go with those.
Top stuff dave, keep at it. The old monogram kits were very good detail wise, and always made an impressive build, i remember the 1/48 b25 mitchell i built years ago,it had full interior details all through the fuselage! Cant wait to see the p61 in paint, cheers tony
Thanks Tony.I built the 1/48 Italeri Mitchell some time ago.I wasnt mega impressed with it considering it cost me £35.Ive seen it since in my local hobb shop for £57!.Reckon i could have built something just as good out of the considerably cheaper monogram offering.
View attachment 30850View attachment 30851View attachment 30852View attachment 30853View attachment 30854
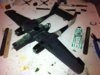
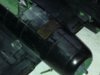
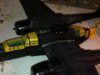
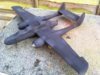
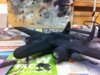
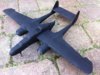
Some more progress today.I cut a piece off a sheet of lead flashing,rolled it up and bashed it to shape with a hammer.This piece weighs 50g (or one and three quater ounces to the senior forum members).I put this in the nose radome and glued it onto the model.Its more than enough to make the model sit on its nose.I also managed to superglue another PE grill to the underside of an engine without sticking my fingers to it or getting glue everywhere.I found a wooden toothpick very useful for final positioning and holding down whilst the glue set.Done some more filling and scribing.Also fitted the flaps (before the nose weight) to make sure it wasnt going to be a tail sitter.Still havent finished those seat belts.
Some more progress today.I cut a piece off a sheet of lead flashing,rolled it up and bashed it to shape with a hammer.This piece weighs 50g (or one and three quater ounces to the senior forum members).I put this in the nose radome and glued it onto the model.Its more than enough to make the model sit on its nose.I also managed to superglue another PE grill to the underside of an engine without sticking my fingers to it or getting glue everywhere.I found a wooden toothpick very useful for final positioning and holding down whilst the glue set.Done some more filling and scribing.Also fitted the flaps (before the nose weight) to make sure it wasnt going to be a tail sitter.Still havent finished those seat belts.
G
Guest
Guest
Nice work Dave, glad to see the old squadren Green in use, i love this stuff it is the best filler i have found to date.
Keep up the good work.
Andy
Keep up the good work.
Andy
View attachment 30863View attachment 30864View attachment 30865View attachment 30866View attachment 30867
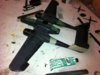
Here are the pictures that should have accompanied my last post.I really must spend some time on the computer sorting out my posting problems.
View attachment 35965
View attachment 35966
View attachment 35967
View attachment 35968
View attachment 35969
View attachment 148991
View attachment 148992
View attachment 148993
View attachment 148994
View attachment 148995
Attachments
Looking good Dave. A very useful first pic - nice reminder, I'm off to weight some lead ! How is the black plastic to work with ? I've bought an F104 tiger meet starfighter for No1 daughter, it's in yellow plastic !!
Colin M........
Colin M........
G
Guest
Guest
Great looking progress Dave. I'm going to get that great wall Widow when its released !
View attachment 30966View attachment 30967View attachment 30968
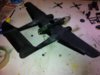
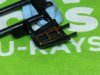
I've spent the last couple of evenings masking and fitting the canopies.Some of these parts dont fit very well.The rear compartment hatch is particularly bad and i've had to add a strip of plastic card to two sides so it will fit the gap.I'll have to paint the interior edges of these green or they will show up like a sore thumb.The main canopy isnt too bad.I've only needed to add a strip of plastic along the rear edge to fill a gap.That main canopy took me almost an hour to mask.Its not perfect but i've decided it will have to do.There are two more hatches to mask and fit then i can start painting the model.
View attachment 36068
View attachment 36069
View attachment 36070
View attachment 149094
View attachment 149095
View attachment 149096
Attachments
G
Guest
Guest
Great tape job,one of my least favorite things to do!
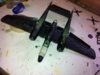
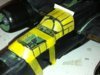
I've been having a go at spraying different shades of black in the centre of some panels to break up the otherwise total black paint scheme.I said i would post the results good or bad,so here they are.Apart from the starboard wing i was reasonably happy with it.Until i took it out side that is.As you can see from the photos, i've over done it.And it really shows up in the photo taken in daylight.Not the subtle difference in shades i had hoped for.So im going to respray it black and start again.
View attachment 31626View attachment 31627View attachment 31628
View attachment 36640
View attachment 36641
View attachment 36642
View attachment 149666
View attachment 149667
View attachment 149668
View attachment 31626View attachment 31627View attachment 31628
View attachment 36640
View attachment 36641
View attachment 36642
View attachment 149666
View attachment 149667
View attachment 149668
Attachments
Dave, instead of spraying it black and starting again, why not try to save it by 'post shading' with the black in the areas that you think are to light. You have nothing to loose, if it goes pear shaped on you you can just spay it over. Might save you a total respray...
Ian M
Ian M
")
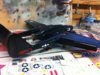
I've finally found the time to continue with this build.As you can see i've added PE parts to the rear hatch.I've also redone the paint job and got a much more subtle effect than my first attempt.I then put three coats of KLEAR (the new version) on the model.Only used this once before and it wasnt a sucess.But having read all the threads on the stuff i decided to give it another go.Partly because of the overwhelming evidence that the stuff works.And partly because im tight and didnt want it to have been a waste of money!.Anyway,i brush painted the stuff on giving a days drying time between coats and it seems to have done the job.Im now in the middle of applying the decals.The Microscale decal sheet contains a lot of stencils.Unfortunately you cant read most of them and they are not numbered.So in most cases its impossible to tell which ones go where.So im resorting to using the original Monogram decals.The red wing walkway lines predictably broke up so i may paint them on or not bother.Havent decided yet.
View attachment 31803View attachment 31804View attachment 31805View attachment 31806
View attachment 36775
View attachment 36776
View attachment 36777
View attachment 36778
View attachment 149801
View attachment 149802
View attachment 149803
View attachment 149804
View attachment 31803View attachment 31804View attachment 31805View attachment 31806
View attachment 36775
View attachment 36776
View attachment 36777
View attachment 36778
View attachment 149801
View attachment 149802
View attachment 149803
View attachment 149804
Attachments

- Status
- Not open for further replies.
Legal Notice
scalemodelling.co.uk is a privately operated online discussion forum. All content posted by members reflects their own views and opinions and does not necessarily represent those of the forum owners or administrators. While reasonable efforts are made to moderate content, no responsibility is accepted for user-generated material. By using this site, you agree to comply with UK law and the forum rules.