Theme editor

Scale Model Shop

Pocher Porsche 917 1/8 Scale

Thread owner
IMG_4837.jpg IMG_4835.jpg IMG_4834.jpg IMG_4833.jpg IMG_4832.jpg 
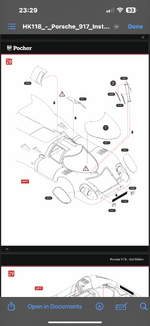
Porsche 917K continuation adding the wheels to the chassis
So with the wheels decals done, I can now add the two remaining tires to the rear wheels and glue the tiny valves into place after this they are to simply screwed to the axles on the chassis like Nigel found out they’re not a great fit. They wobble all over the place though they look the part, so that’s good enough
With the wheels fitted it is now time to start the decaling and I have to say that the decals are superb. They go down really easy. (One word of caution here if anybody is making this when you come to fit the second decal on the bonnet with those little cut outs on it make sure that you cut the back piece of the triangle because it hasn’t been cut and you’ll have a problem getting it to set down if you don’t) They need just a bit of persuading to get rid of the wrinkles but other than that they’re fine they are then coated with MICROSOL setting solution and I’ve gone as far as I can at the moment as I’ve gotta wait for these decals already added to dry properly as to finish off the door decals. I’m going to need to tilt the model and I don’t want to handle it with wet decals on it

Apologies for the way the photos have come out they always come out above the text and this time they’ve come out back to front so instead of you showing the wheels with the valves being added it showing you the completed car to the stage I’ve got to it should be the other way round. I’ve tried to figure this thing out and I cannot get the text or the photos to go where I want them to.
 
Thread owner
IMG_4840.jpg IMG_4834.jpg IMG_4865.jpg IMG_4840.jpg IMG_4838.jpg IMG_4837.jpg IMG_4836.jpg IMG_4834.jpg IMG_4833.jpg Porsche 917K final section
so we come to the end at the last the wheels have been fitted on the centre hexagonal nuts covers have been added. There were two gurney flaps on the back to be fitted. Those have been added the windscreen wipers a cut off switch on the left-hand side is just basically a T piece that fits into a red circular cut out the top of the engine cover along with the two rocker covers and all the transparencies which will be held in place with double sided clear 1 mm tape which I’ve ordered and I’m waiting for a delivery. I’m not using glue cause it’s gonna show wherever you do so I think the best way is what Nigel suggested use clear double sided tape and once the model to put on the shelf inside its case it shouldn’t move anyway and the elements won’t get to it so it shouldn’t deteriorate too much either
So attached to this are the last of the instructions and photos to illustrate the final build sequence
 
Thread owner
Click image for larger version  Name:	IMG_4889.jpg Views:	0 Size:	256.4 KB ID:	1265804 Click image for larger version  Name:	IMG_4889.jpg Views:	0 Size:	256.4 KB ID:	1265804 Click image for larger version  Name:	IMG_4889.jpg Views:	0 Size:	256.4 KB ID:	1265804 Click image for larger version  Name:	IMG_4889.jpg Views:	0 Size:	256.4 KB ID:	1265804 Click image for larger version  Name:	IMG_4889.jpg Views:	0 Size:	256.4 KB ID:	1265804 Click image for larger version  Name:	IMG_4889.jpg Views:	0 Size:	256.4 KB ID:	1265804 Click image for larger version  Name:	IMG_4889.jpg Views:	0 Size:	256.4 KB ID:	1265804 Click image for larger version  Name:	IMG_4889.jpg Views:	0 Size:	256.4 KB ID:	1265804 Click image for larger version  Name:	IMG_4889.jpg Views:	0 Size:	256.4 KB ID:	1265804 Click image for larger version  Name:	IMG_4889.jpg Views:	0 Size:	256.4 KB ID:	1265804 The Finishing photos, Porsche 917K
 

Attachments

  • IMG_4874.png
    IMG_4874.png
    523.8 KB · Views: 0
Back
Top