hello everyone, don't know if I have done this right as im still learning how to use computers !, anyway heres a few pics of revell 1/16 scale rolls continental im building for some one

You are using an out of date browser. It may not display this or other websites correctly.
You should upgrade or use an alternative browser.
You should upgrade or use an alternative browser.
revell 1/16 rolls continental
- Thread starter shovelhead 1977
- Start date
- Status
- Not open for further replies.

Hi Raymond,
A warm welcome to the forum. I'm looking forward to watching this progress.
A warm welcome to the forum. I'm looking forward to watching this progress.
G
Guest
Guest
Hi Raymond built this a while ago when my mojo was low good kit sure you will do a better jib than me, off to a great start
Tim Marlow
SMF Supporters
1/3
Nice start Raymond, hello and welcome....
thanks will post more pics as it progressesHi Raymond
Welcome to the forum. I am sure you will enjoy your time here.
Looks like you have made a fine start on the RR. I've not seen this built before so interested to see how it goes.
Jim
hi , how did you find the fitment of parts, only mine need a lot of filling sanding etcHi Raymond built this a while ago when my mojo was low good kit sure you will do a better jib than me, off to a great start
G
Guest
Guest
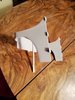
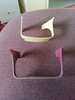
I must admit the fit was ok but the same kit can vary depending on where it was stored kits can warp (stored in the warehouse next to the heater for instance)
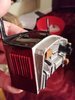
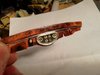
like this you meanI must admit the fit was ok but the same kit can vary depending on where it was stored kits can warp (stored in the warehouse next to the heater for instance)
Attachments
G
Guest
Guest
Wow that is bad.
Hi Raymond. Looks like you forgot the photos in your last post. Also you do not start a new thread for each part of the build, just carry on in this one.
ah right, getting the hang of it slowly !Wow that is bad.
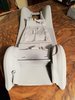
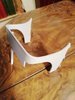
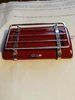
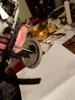
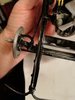
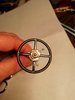
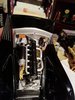
rolls steering parts, it do turn, but its very flimsy
Attachments

G
Guest
Guest
A welcome from a me as well Raymond .
Going to enjoy this. At least you can say you have a Rolls !
John.
Going to enjoy this. At least you can say you have a Rolls !
John.
Hi Raymond
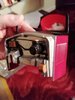
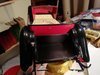
The flimsy steering is a common problem with these car builds. I built an SS100 Jaguar and once I had decided how much of a turn I wanted on the steering I glued it all solid.

You can see how many pivot points there were and how loose fitting it all was.
Jim
The flimsy steering is a common problem with these car builds. I built an SS100 Jaguar and once I had decided how much of a turn I wanted on the steering I glued it all solid.
You can see how many pivot points there were and how loose fitting it all was.
Jim
actually making this for someone else, once I show him the steering he may want it glued in place !A welcome from a me as well Raymond .
Going to enjoy this. At least you can say you have a Rolls !
John.
lots of moving parts on there, these bits are always fragileHi Raymond
The flimsy steering is a common problem with these car builds. I built an SS100 Jaguar and once I had decided how much of a turn I wanted on the steering I glued it all solid.
You can see how many pivot points there were and how loose fitting it all was.
Jim
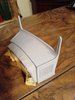
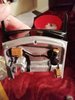
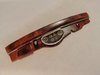
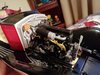
well, heres a few more bits of the rolls, dashboard was warped ,so knocked a new one up, cut the instrument housing off the old one and glued it to the new dash. the join at the top of the dash was not perfect hence the chrome rail,, made the glove box and the two switches , before everything was glued on covered the dash and glove box with walnut burr. that was a job and half on its own ! rear part of the body is now glued in place as is the bulkhead, more pics to follow when a bit more has been done !
Attachments
- Status
- Not open for further replies.
Legal Notice
scalemodelling.co.uk is a privately operated online discussion forum. All content posted by members reflects their own views and opinions and does not necessarily represent those of the forum owners or administrators. While reasonable efforts are made to moderate content, no responsibility is accepted for user-generated material. By using this site, you agree to comply with UK law and the forum rules.