Theme editor

Scale Model Shop

Revell 1:32 SD Lysander

Status
Not open for further replies.

colin m

Moderator
Staff member
Moderator
Joined
Dec 26, 2008
Messages
9,113
Reaction score
381
Points
83
Location
Stafford, UK
1/3
Thread owner
View attachment 55616

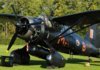
I bought this model over a year ago during a trip to the Shuttleworth collection. And like there real example, it will be the all black special duties Lysander that I'm going to have a go at.

This will be a rare venture into this scale for me, infact it's only my second 1:32 ever.

The kit is very basic, but this means there's plenty of opportunities to add some extra detail.

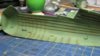
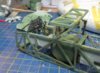
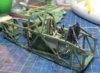
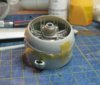
So, the cockpit is vast and sits under a greenhouse. I've spent a bit of time in this area adding a few wires / cables etc, there is so much unused space in here you could go on for ages adding bits and pieces everwhere, but evebtually I had to stop.

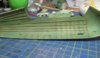
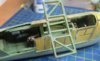
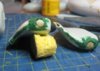
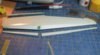
I started the interior with extra ribs / stringers or whatever they're called. I haven't been very accurate here as I just needed to break up the empty space.

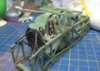
View attachment 55617View attachment 55618 Then followed a bit of preshading, painting and a wash to break things up even further.

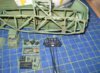
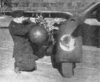
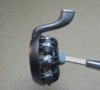
The interior 'cage' and instrument panels were given the same treatment.

View attachment 55619

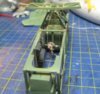
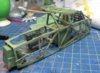
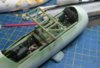
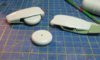
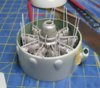
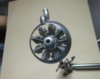
Next step was to put it all together and give it a bit of a dusting with some pastels. The harnesses are both home made, in this scale, not such a hard job ! I'm begining to see the advantages of 1:32 scale.

As this is the SD, the normal rear seat and guns are removed, this seat (my creation) may not accurate, but finding details of the SD Lysander is proving a bit difficult. I may have to 'create' a few more features as the build continues !

View attachment 55620View attachment 55621View attachment 55622View attachment 55623View attachment 55624

The interior is Humbrol 78, a colour I like for RAF interiors, even though I changed to Vallejo a while back, sometimes I have to revert to my old collection of enamels just to get the right shade.

The kit is quite old and has many problems, but nothing too difficult that someone somewhere hasn't already worked out a solution for.

That's it for now. If anyone has any advice on the SD Lysanders, shout out loud please.

Colin M..

View attachment 57759

View attachment 57760

View attachment 57761

View attachment 57762

View attachment 57763

View attachment 57764

View attachment 57765

View attachment 57766

View attachment 57767

View attachment 170785

View attachment 170786

View attachment 170787

View attachment 170788

View attachment 170789

View attachment 170790

View attachment 170791

View attachment 170792

View attachment 170793
 

Attachments

  • 63979.jpg
    63979.jpg
    3 KB · Views: 0
  • 1.jpg
    1.jpg
    2.2 KB · Views: 0
  • 2.jpg
    2.jpg
    2.3 KB · Views: 0
  • 3.jpg
    3.jpg
    3.4 KB · Views: 0
  • 4.jpg
    4.jpg
    3.1 KB · Views: 0
  • 5.jpg
    5.jpg
    3 KB · Views: 0
  • 6.jpg
    6.jpg
    3.5 KB · Views: 0
  • 7.jpg
    7.jpg
    3.2 KB · Views: 0
  • 8.jpg
    8.jpg
    3.2 KB · Views: 0
Brilliant work colin, the extra details look great especially the belts! Ive got this one in the stash but ive been holding off for a few years as ,like yourself ,i felt it needed a lot of extra details adding . Heres a useful link for a few good detail shots , cheers tony Westland Lysander in detail
 
so are we going all out on this build if you are fantastic work so far and the colours are nice

mobear
 
You've got off to a first class start Colin, spectacular cockpit. Derek
 
Colin you may get some help from Vaughan's build which at a guess would be about a year ago on this forum.

Bought this one about 18 months ago but decided to save it until I could hopefully do it justice.

Finishing my Swordfish in a week or so then tackling this one. It is a strange beast. Rather like the Swordfish they were both weird aircraft but did a splendid job & are both fascinating.

Looking for tips for my build Colin keep them coming.

Laurie
 
Thread owner
Thanks all for having a look. And Tony, nice link, which shows I've missed a fuel tank out ! Oh well, I mean - how much fuel did it really need ! !

For sure, an unusual aircraft, blessed with 'purposeful' looks that only a mother could love. It had a difficult early life, but when settled into its 'special duties' role that's when I think people saw the Lysander in a different light.

Laurie, are you sure you want to tackle this next ? Tamiya to Revell (Matchbox) in one quick move, just might be a bit of a shock to the system.

Anyway, a bit more progress. The 'cage' has been fitted to the fuselage without any real drama. I was careful when adding my extra wires etc to make sure they didn't foul the mounting points. The fuselage joint didn't need any filler, just a bit of a sanding down along the seams.

View attachment 55750

I've started fitting the glazing, now this is where things need to slow down a bit. Lots of people have trouble in this area, and not always experiencing the same problems - a bit odd really.

It's obviously a good idea to start from the front and work backwards, but the other bits all need trial fitting at the same time, as many bits might need sanding to help the alignment. I had to lower the front part of the canopy to get a good fit at the front, this has caused a bit of a fit issue at the rear of this piece, but one I can live with.

You can see below, I had to file two notches in order to get this part of the canopy to fit. This will drop this part of the canopy by about 1mm, which might cause problems later with the wings - well, we'll see.

View attachment 55752

I can't tell you how long all the masking took, but at least it's big and chunky and fairly easy to do, there's just loads of it !

That's it for tonight, as I said before, any advice / info about the Lysander, greatly received.

Colin M..

View attachment 57889

View attachment 57891

View attachment 170915

View attachment 170917
 

Attachments

  • 12.jpg
    12.jpg
    2.7 KB · Views: 0
  • 9.jpg
    9.jpg
    2.9 KB · Views: 0
Your putting some fantastic detail into this build Colin here's a link to my build of the Lysander in 2011 if it's any help.

Vaughan
 
That is looking very nice Colin. Love the cock pit.

Ian M
 
Thread owner
Thanks for looking in Gentlemen.

Vaughan, this is also from the Shuttle worth collection, I picked it up during a visit there ages ago. I'm going to finish this one in the all black scheme - so how to make black look interesting ?? I'll look into that later.

For now though, I've built / wrestled with the pretty poor wheel housings. The wheels themselves are just plain discs, well not in real life there not, so some creative input will be needed here. And the housings are a bit difficult as well. However, they're not as bad as my pictures make out. I think the trick is, a bit of round masking tape, and sand, sand sand etc.

And hopefully, they will look something like this.

View attachment 55988

Rather than this !

View attachment 55989View attachment 55990

Now then, the wings. The Lysander has an automatic slat and flap system. Meaning the slats and flaps would lower and retract by themselves depending on air speed. One less job for the pilot to do as he landed in a French field in the dead of night.

However, the model is moulded with everything retracted, but really on the ground, they should all be extended. Out with the saw !

View attachment 55991View attachment 55992

It's a bit mad really. I've cut everything off, just to stick it all back on !

Right, time for more sanding, and then more..................

View attachment 58109

View attachment 58110

View attachment 58111

View attachment 58112

View attachment 58113

View attachment 171135

View attachment 171136

View attachment 171137

View attachment 171138

View attachment 171139
 

Attachments

  • 10.jpg
    10.jpg
    2.4 KB · Views: 0
  • 11.jpg
    11.jpg
    2.8 KB · Views: 0
  • 18.jpg
    18.jpg
    1.8 KB · Views: 0
  • 17.jpg
    17.jpg
    2 KB · Views: 0
  • lysander_winglet.jpg
    lysander_winglet.jpg
    2.8 KB · Views: 0
\ said:
Laurie, are you sure you want to tackle this next ? Tamiya to Revell (Matchbox) in one quick move, just might be a bit of a shock to the system.

Colin M..
Not built a 1/32 & as I bought it at the same time as Vaughan it has been looking at me in a very aggressive manner. Hoping Colin you will let me into all the horrible bits, gently, so that I have a smooth ride.

Laurie
 
Thread owner
Look at that, four days since my last post ! I never was that good at a WIP thread. But, I have not been totally idle.

I've built the engine. 1:32 scale, it's big, but lacks a lot of detail. One obvious missing detail is the lack of connection between the cylinder heads and the collector ring. I've addressed this problem with 18 tiny bits of plastic rod, and now realise, they are too small in diameter. An error I'll have to live with !

View attachment 56192

The engine should really be black, but as my whole model will be black, I needed a contrast somewhere.

The rods were all carefully bent into the collector ring. It took me ages to work out a way of building the engine and getting the distances right between the cowling and ring etc.

View attachment 56193

Once all in the right place, I was able to spray the collector ring. Think of this as the underoat. The finished ring will have an attack by pastels at the end of the build.

View attachment 56194View attachment 56195

Now then, collector ring colour. There are many opinions and many different type of finishes. Some were painted, many were not.

View attachment 56196

This is the plane I'm building, so I'll aim for something like this collector ring. Sure it's not as tired as an in service item (even though it's been repaired a few times) it's probably a lot cleaner than normal.

The engine now has its cowl in place, some tricky filling and sanding along the seams will be needed as the fit is a bit 'off' !!

View attachment 58287

View attachment 58288

View attachment 58289

View attachment 58290

View attachment 58291

View attachment 171313

View attachment 171314

View attachment 171315

View attachment 171316

View attachment 171317
 

Attachments

  • 14.jpg
    14.jpg
    3.5 KB · Views: 0
  • 15.jpg
    15.jpg
    3 KB · Views: 0
  • 15a.jpg
    15a.jpg
    2 KB · Views: 0
  • 15b.jpg
    15b.jpg
    2.2 KB · Views: 0
  • Lysander-cockpit-checks-XL.jpg
    Lysander-cockpit-checks-XL.jpg
    3.3 KB · Views: 0
Top work colin, looking great. Its a bugger on these engines isnt it , i had to add the exhaust to collector rings on my 1/32 beaufighter too , i ended up using the brown plastic wire out of a 15 amp cable . The collector ring itself is a controversial topic too, all too often you see them in bright copper colours , whereas they all started life looking like your silver one ,then slowly darkened with use . I reckon a few brown washes over the silver will be spot on, cheers tony
 
Thread owner
Wire, that would have been so much easier ! The daft thing is, the Matchbox 1:72 version, has the exhaust pipes moulded in place, but not the 1:32. doh..........
 
Colin thats some great work going on! I'm surprised that the detail is so lacking on such a large scale. You're doing a cracking job fixing that tho!
 
Status
Not open for further replies.
Back
Top