Theme editor

Scale Model Shop

Revell 1:48 DH Mosquito B Mk IV

Status
Not open for further replies.

colin m

Moderator
Staff member
Joined
Dec 26, 2008
Messages
9,113
Reaction score
380
Points
83
Location
Stafford, UK
1/3
Thread owner
105 squadron motto ‘Fortis in proeliis’

The model I’m building was flown by Wing Cdr John de Lacey Wooldridge. He joined the RAf as a sergeant in 1938 rising through the ranks to become the CO of 105 Sq in March 1943.

Surviving the war he became a successful film composer with many titles to his credit. He unfortunately died in a car crash aged just 39, in October 1939.

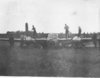
105 squadron achieved fame before Wg Cdr Wooldridge joined them for a raid on the Victoria Terrasse building, the headquarters of the Gestapo in Oslo.

This mission involved a round trip of 1800Km, crossing the North sea at a height of less than 30m. Three of the four Mosquitos returned with one force landing in Oslofjord.

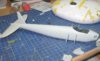
This is a rare foray into 1:48 scale for me, but as the eyes age, I think I’ll be doing a bit more building in this scale. I mean, as so many already know, detailing is so much easier.

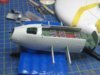
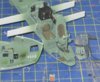
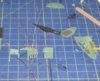
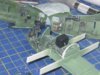
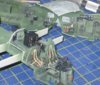
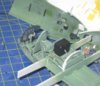
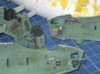
So, here is the cockpit built up. The pics appear to suggest the pit is really dirty, but to the naked eye, it’s not so bad. Honest.

I’ve used the Eduard PE set for the cockpit, it’s actually for the Tamiya kit, but it sort of fits the Revell. I’ve also added a bit of wiring to some of the nav aids, radio etc.

View attachment 34747View attachment 34748View attachment 34749View attachment 34750View attachment 34751View attachment 34752

Colin M........

View attachment 39234

View attachment 39235

View attachment 39236

View attachment 39237

View attachment 39238

View attachment 39239

View attachment 152260

View attachment 152261

View attachment 152262

View attachment 152263

View attachment 152264

View attachment 152265
 

Attachments

  • Cockpit.jpg
    Cockpit.jpg
    3.4 KB · Views: 0
  • Cockpit wiring.jpg
    Cockpit wiring.jpg
    3.2 KB · Views: 0
  • Cockpit 4.jpg
    Cockpit 4.jpg
    3.1 KB · Views: 0
  • Cockpit 3.jpg
    Cockpit 3.jpg
    3.6 KB · Views: 0
  • Cockpit 2.jpg
    Cockpit 2.jpg
    3.3 KB · Views: 0
  • Cockpit 1.jpg
    Cockpit 1.jpg
    2.7 KB · Views: 0
Hi Colin

It's looking very nice. The detailing is impressive. I think even at 1/48 the scale is too small for me. I have bought a 1/48 Academy Republic P47 Thunderbolt(it was only £6 from Modelzone) but I'm not sure how I'm going to get on with it. So it's last on the list to do. Well done looking forward to seeing the rest of the build.

Vaughan
 
very cool looking office there Colin... great realistic looking detail .. we have a mosquito at the local war museum in johannesburg ..... very nice looking aeroplane .....Lindsey
 
Great cockpit colin, nice bit of background info too , cheers tony
 
Hi Colin

Half way through building this model at the moment. Straight out of the box though.

The landing gear is a real pain. Unless you have the wheels retracted. The pieces are so flimsy & have had to do a lot of pairing & shaping. Good idea to look at photos of the real thing as this gives a better clue than the instructions.

Watch the mudguards as the instructions are inaccurate. If you look at instruction No. 43 the brackets are shown with the larger hole near to the rounded part of the mudguard. This brings the spindle on the mudguard to close to the wheel. Look at instruction 45 where they show how to fit the completed mudguard & the brackets are around the other way & that is correct. Completed both before trying to fit to the undercart. Such stress !!

The bomb bay is a real joy to build & looks good when complete. Think you are wise to detail more in the cockpit. I was disappointed in this area compared to the bomb bay it looks bare.

Laurie
 
This is the one that I came such a cropper with - I think.

Probably shouldn't have tried it as a first kit after not doing any modeling for lots of years.

Glad to see it is doable (do-able)

Thanks for reawakening my enthusiasm for this beautiful plane Colin.

I'll be following this build with keen interest.

Tony
 
Thread owner
Thanks all for having a quick look.

The problems with this kit are quite well known, such as the landing gear being too short and the spinners a bit too stubby. Apparently the wheels are too tall, so does that cancel out the short landing gear ?? Who knows, to be honest, all the pics I've seen of the completed model look alright to me. There is some metal gear available for the tamiya which would probably fit the Revell and hence cure the gear problem, but iirc they cost more than the model, which seems a bit odd much to me.

Anyway, here's the first problem, the cockpit doesn't fit the fuselage ! Quite amazing for such a new model. But anyway, after a bit of sanding around the bulkheads I was able to close the front part of the fuselage around the interior, leaving just a small gap at the bottom which for the sake of a bit of strength, I've filled with plastic. Now this might cause a problem if you're having the bomb doors closed, but as mine are open, I don't think it will cause any problem in the future.

As for the landing gear Laurie, good lord ! Revell want you to build them before closing up the nacelles which will cause a bit of a masking problem later. But to build them off the model might lead to some alignment problems (10 parts per side make up the gear) so it looks like I'll do it as Revell instruct and have a great time masking them up ! And the mud guards, Revell do indeed instruct you to build them back to front ! Thanks Laurie, I wonder what else Revell have hidden in the instructions.

Tony (mossiepilot) I had this kit waiting for the off for over two years until I felt up to it. I'm certainly glad I didn't try it upon my return to the hobby.

View attachment 34790View attachment 34792

Colin M.......

View attachment 39268

View attachment 39270

View attachment 152294

View attachment 152296
 

Attachments

  • The gap.jpg
    The gap.jpg
    2.9 KB · Views: 0
  • 10.jpg
    10.jpg
    3.3 KB · Views: 0
Nice looking office Colin,do'nt envy you the gear build tho, good luck with it!
 
Yes Colin I looked into constructing the landing gear after putting the nacelles in place. Not a chance as the connectors for the roots of the landing gear are so deep in the Nacelles & there is very little room but so much criss cross of landing gear. Intricate but the landing gear looks impressive but once the nacelle is on a lot disappears. Actually not so bad for masking my fear is wrecking the landing gear while finishing the model.

Going to build a sprue scaffold around it when I mask up. Already snapped off the tail wheel.

Laurie
 
Hi Colin I dont know how much you paid for the kit but metal landing gear on eBay comes in at £14 including postage.

Vaughan
 
I've got mine on the top shelf, half built, waiting for my courage to return:tongueout1:

I've got a piccie from post war R.A.F. Germany of a Mossie laid in a field after a wheels up landing.

View attachment 34828

Mmmm, a thought?!

Might be a good dio for my kit. :-)

Keep going mate.

Tony

View attachment 39306

View attachment 152332
 

Attachments

  • Mosquito of 98 Sqn, Gatow, Berlin, August 1947 001.jpg
    Mosquito of 98 Sqn, Gatow, Berlin, August 1947 001.jpg
    1.8 KB · Views: 0
Mmm, when I edited the post the picture wasn't there. So I posted again to show it. Now it's there.

Done it twice, never mind lol

Tony.
 
Well that would solve the problem with the weak undercarriage. lol.

It would make a good diorama.

Ian M
 
What a copout :laughing: only kidding but it would have been a great diorama for the from a photo GB
 
Thread owner
Vaughan, would you believe it, I paid £14.95 for the kit ! So a nice set of metal gear would double the price of the model. I'm going ahead as Revell instruct, but will use tinfoil to mask up - and lots of tape.

Tony, I like the wheels up landing. For the purpose of a dio, you could take great pleasure in scattering bits of landing gear around the rear of the model. That's got to be easier than fitting the things !

Colin M....
 
Status
Not open for further replies.
Back
Top