
You are using an out of date browser. It may not display this or other websites correctly.
You should upgrade or use an alternative browser.
You should upgrade or use an alternative browser.
Revell Westland Wessex HAS Mk.3 & MRC S.58/SH-34 (MLD)
- Thread starter Fernando N
- Start date
- Status
- Not open for further replies.
Good evening all from a sunny and not too hot Almere.:smiling:
Pete, Ian and Steve thanks guys.:thumb2:
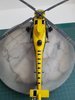
Managed to finish the last steps on this one, with first replacing the pitot tube with a bit of 0.4mm micro tube.
You can see the kit part above the brass one:
View attachment 307701
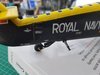
During rigging of the antenna wires I dropped her on the tail wheel resulting in it breaking at the most fragile place of the strut...
With glue repair not having any success I replaced it with 1mm brass wire:
View attachment 307702
You can also see the antenna wires with turnbuckles here, the wire is Ushi fine size 0.003 and the buckles are Albion Alloys TB1 0.4x0.25x3mm (1/48 turnbuckles for bi-planes).
Although I could cut them to size myself, I wanted to try these out before the upcoming WW1 GB since I plan to build some bi-planes by then.:smiling:
Once the tail wheel was touched up and the antenna wires painted black using VJ 71.057, only use acrylics on the Ushi wires since the others tend to affect the stiffness resulting in saggy wires....:sad:
Also made a big snafu on the ''danger'' decals on the tail, they were placed with arrows pointing in the wrong way:upside::upside::worried:, good thing VJ varnish can be removed easily and the decals came off and were promptly placed in the correct position.:smiling4:
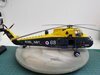
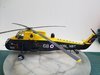
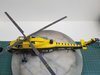
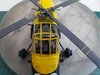
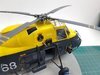
Here are the finished photo's for now, I've ordered one of those tents so more in the future:
View attachment 307703
View attachment 307704
View attachment 307705
View attachment 307706
View attachment 307707
View attachment 307708
View attachment 307709
Although a bit more work than expected, due to the age of the kit design it still was a fun project.
Nice to have another colourful birdie to add to the collection.:smiling4:
Taking a little break before the next one, as I have started work on a little box thingy on rails and want to finish that one first.
More on that one later in the week.
Thanks for looking in and have a great and cool week.
Fernando
Pete, Ian and Steve thanks guys.:thumb2:
Managed to finish the last steps on this one, with first replacing the pitot tube with a bit of 0.4mm micro tube.
You can see the kit part above the brass one:
View attachment 307701
During rigging of the antenna wires I dropped her on the tail wheel resulting in it breaking at the most fragile place of the strut...
With glue repair not having any success I replaced it with 1mm brass wire:
View attachment 307702
You can also see the antenna wires with turnbuckles here, the wire is Ushi fine size 0.003 and the buckles are Albion Alloys TB1 0.4x0.25x3mm (1/48 turnbuckles for bi-planes).
Although I could cut them to size myself, I wanted to try these out before the upcoming WW1 GB since I plan to build some bi-planes by then.:smiling:
Once the tail wheel was touched up and the antenna wires painted black using VJ 71.057, only use acrylics on the Ushi wires since the others tend to affect the stiffness resulting in saggy wires....:sad:
Also made a big snafu on the ''danger'' decals on the tail, they were placed with arrows pointing in the wrong way:upside::upside::worried:, good thing VJ varnish can be removed easily and the decals came off and were promptly placed in the correct position.:smiling4:
Here are the finished photo's for now, I've ordered one of those tents so more in the future:
View attachment 307703
View attachment 307704
View attachment 307705
View attachment 307706
View attachment 307707
View attachment 307708
View attachment 307709
Although a bit more work than expected, due to the age of the kit design it still was a fun project.
Nice to have another colourful birdie to add to the collection.:smiling4:
Taking a little break before the next one, as I have started work on a little box thingy on rails and want to finish that one first.
More on that one later in the week.
Thanks for looking in and have a great and cool week.
Fernando
Attachments
-
 20180702_213825_resized.jpg2.6 KB · Views: 0
 -
 20180704_172356_resized.jpg3 KB · Views: 0
 -
 20180708_082914_resized.jpg2.5 KB · Views: 0
 -
 20180708_082922_resized.jpg2.3 KB · Views: 0
 -
 20180708_082936_resized.jpg2.5 KB · Views: 0
 -
 20180708_082944_resized.jpg2.5 KB · Views: 0
 -
 20180708_082954_resized.jpg3.1 KB · Views: 0
 -
 20180708_083005_resized.jpg3.1 KB · Views: 0
 -
 20180708_083022_resized.jpg2.8 KB · Views: 0
- Joined
- Apr 27, 2018
- Messages
- 15,052
1/3
Fernando,
Great job and a superb overall finish.
Great job and a superb overall finish.
1/3
Hi Fernando
This is a great build, very inspiring....thanks for showing it.
Cheers
Tim
This is a great build, very inspiring....thanks for showing it.
Cheers
Tim
Brilliant build, great work. I'm trying to inject some colour onto my shelves and think this would fit in nicely, amongst all the shade of green and grey.
Thanks for the kind words guys, much appreciated.:thumb2:
Richard, I got the turnbuckles from John: https://www.scalemodelshop.co.uk/product/1-48-100pk-turnbuckles-albion-alloys-tb1
Great to have when rigging a bi-plane as you have a uniform size ready at hand, just glue one end of wire, run wire trough buckle, glue other end and then glue buckle at desired place. Simple.:smiling::thumb2:
If you're good at cutting micro-tube, you can of course cut your own 0.4mm buckles...
Colin, SAR birds are a great to add some variation to ones shelf and if you like them USN CAG birds tend to be a colourful sight too.:smiling4:
Good evening all,
Firstly sorry for my absence of late, been pretty busy with some 1/1 work on my home the last weeks:upside:.
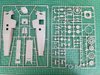
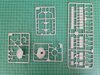
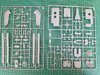
Now back to this tread after two months:smiling4:, number two coming up the MLD one, here are the sprues:
View attachment 313634
View attachment 313635
View attachment 313636
View attachment 313637
View attachment 313638
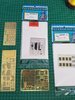
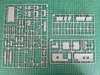
The kit supplied PE (left two) and the Eduard sets I got:
View attachment 313639
Having build a Gallary H-34 before, I knew that the PE is a bit chunky and all the glass in the office justifies the Eduard set too.:tongue-out3:
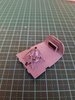
Here's the decals from the kit (left) and the decal set I'm taking my version from:
View attachment 313640
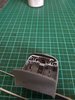
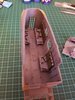
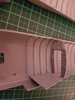
Starting with the office and cargo/crew compartment on this one too.
Begun a couple of weeks ago and with some hours here and there this is what I made so far:
View attachment 313641
View attachment 313642
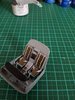
PE just added:
View attachment 313643
Now with sidewalls and weathering:
View attachment 313644
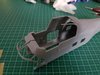
Will open one of the side panels to show the main rotor mast, otherwise it will be hidden:
View attachment 313645
And since there is a nice looking engine supplied by Gallery, why not beef up the detail a bit:View attachment 313646
The plan is to have the side door and left nose panel open, tail folded, maybe the cockpit doors and a maintenance panel open to see into the rotor mast...:smiling:
Thanks for looking in and this is all the modeling this weekend for me as for tomorrow I've scheduled a little trip to Klein-Brogel the Belgium Airforce days is held there. (hope to see the SU-27:tongue-out")
Firstly sorry for my absence of late, been pretty busy with some 1/1 work on my home the last weeks:upside:.
Now back to this tread after two months:smiling4:, number two coming up the MLD one, here are the sprues:
View attachment 313634
View attachment 313635
View attachment 313636
View attachment 313637
View attachment 313638
The kit supplied PE (left two) and the Eduard sets I got:
View attachment 313639
Having build a Gallary H-34 before, I knew that the PE is a bit chunky and all the glass in the office justifies the Eduard set too.:tongue-out3:
Here's the decals from the kit (left) and the decal set I'm taking my version from:
View attachment 313640
Starting with the office and cargo/crew compartment on this one too.
Begun a couple of weeks ago and with some hours here and there this is what I made so far:
View attachment 313641
View attachment 313642
PE just added:
View attachment 313643
Now with sidewalls and weathering:
View attachment 313644
Will open one of the side panels to show the main rotor mast, otherwise it will be hidden:
View attachment 313645
And since there is a nice looking engine supplied by Gallery, why not beef up the detail a bit:View attachment 313646
The plan is to have the side door and left nose panel open, tail folded, maybe the cockpit doors and a maintenance panel open to see into the rotor mast...:smiling:
Thanks for looking in and this is all the modeling this weekend for me as for tomorrow I've scheduled a little trip to Klein-Brogel the Belgium Airforce days is held there. (hope to see the SU-27:tongue-out
Attachments
-
 20180906_191035_resized.jpg2.8 KB · Views: 0
 -
 20180906_191049_resized.jpg3 KB · Views: 0
 -
 20180906_190934_resized.jpg3 KB · Views: 0
 -
 20180908_194345_resized.jpg3 KB · Views: 0
 -
 20180908_194409_resized.jpg2.8 KB · Views: 0
 -
 20180908_194512_resized.jpg3.3 KB · Views: 0
 -
 20180714_151950_resized.jpg3.2 KB · Views: 0
 -
 20180708_131445_resized.jpg3.3 KB · Views: 0
 -
 20180708_130857_resized.jpg2.8 KB · Views: 0
 -
 20180708_131111_resized.jpg3.5 KB · Views: 0
 -
 20180708_131142_resized.jpg3 KB · Views: 0
 -
 20180708_131216_resized.jpg3.5 KB · Views: 0
 -
 20180708_131242_resized.jpg3.3 KB · Views: 0
Allen Dewire
New member
1/3
Top Guns Fernando,
This is looking really good and your work is fabulous. Love the super detailing you are doing. Keep it going my friend!!! Have fun In Belgium, take loads of pics and I'm glad you finally put electricity in your apartment. All those candles must have cost you a fortune…….I'll get my coat!!!
Prost
Allen
- Joined
- Apr 27, 2018
- Messages
- 15,052
1/3
Looking good some nice additions the engine and office look good.
G
Guest
Guest
That's real pretty Fernando! Great work.
Hi Fernando, added details to your engine looks the bizness...:thumb2: The cockpit will look great with the windows slid back. I like that your interior seatbelts have that natural all over the place look.
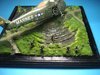
Are you replacing the mesh on the enging covers? I've got the same kit and looking closely how this gets along. Built a 1/72 Italeri version of it way back for this dio...
View attachment 313749 ...not sure if you've seen the build blog of it. Might post it for the benefit of those that have not seen it here after the Humvee build.
Cheers,
Richard
Attachments
Evening all,
Ian, Thanks:thumb2: got most of the reference of a German helo so hope it went in the right direction.
Allen, Thanks my friend, pics of the BAF open day coming up sometime in the week just have to sort trough the 1800+ photos I took...:tongue-out3:
Oh and no electrical work, the exterior painting needed to be done since it started to fall off, got a little one man scaffold from work to make it an easier job:
View attachment 313979
Paul and Peter, thanks guys hope most of the interior can be seen when all is closed up.:thinking:
Richard, great looking Marine one you got there, if you can spare the time please do post a blog of it.
Thanks for your interest and yes I'm replacing the kit PE mesh for the Eduard ones, the real stuff is pretty thin as you can see:
View attachment 313980
(from my own stock)
Sorry nothing new to report as the 1/1 work takes most of the day, hope to show some more before the end of the week.
(ps. saw the SU-27 two of them!!:tongue-out::smiling::thumb2
Attachments

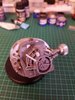
Good morning all,
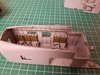
Had some time during the week to finish up most of the interior.
The paint fumes of the 1/1 work must have gotten to me as I've added some wiring and such to the cargo compartment:smiling::
View attachment 314193
View attachment 314194
View attachment 314195
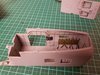
Rear bulkhead can hardly be seen when closed up but still a coat of paint and a touch of weathering to join the rest:
View attachment 314196
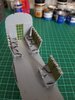
Fuselage halves underwent surgery to have the open look of the engine mesh and the port side service panel open:
View attachment 314197
Now just have to finish painting the engine before all can be assembled together and then it's time to close the fuselage...
Thanks for looking in and have a great weekend.
Had some time during the week to finish up most of the interior.
The paint fumes of the 1/1 work must have gotten to me as I've added some wiring and such to the cargo compartment:smiling::
View attachment 314193
View attachment 314194
View attachment 314195
Rear bulkhead can hardly be seen when closed up but still a coat of paint and a touch of weathering to join the rest:
View attachment 314196
Fuselage halves underwent surgery to have the open look of the engine mesh and the port side service panel open:
View attachment 314197
Now just have to finish painting the engine before all can be assembled together and then it's time to close the fuselage...
Thanks for looking in and have a great weekend.
Attachments

- Status
- Not open for further replies.
Legal Notice
scalemodelling.co.uk is a privately operated online discussion forum. All content posted by members reflects their own views and opinions and does not necessarily represent those of the forum owners or administrators. While reasonable efforts are made to moderate content, no responsibility is accepted for user-generated material. By using this site, you agree to comply with UK law and the forum rules.