Theme editor

Scale Model Shop

Richard Wabbles Matchbox 1/72 Siskin Mk.111A

rtfoe

Well-known member
Joined
Apr 29, 2018
Messages
9,251
Reaction score
542
Points
113
Location
Shah Alam, Malaysia
1/3
Thread owner
Hi guys, I'll start with the usual customary box and sprue shots to begin with...
IMG_20240105_114204.jpg
This has been in my stash for ages and is a made in China copy so I've got to read up on mandarin to work on the destruction sheet. Good thing is picture diagrams are clear.
IMG_20240105_124855.jpg
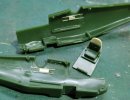
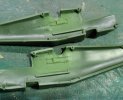
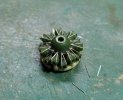
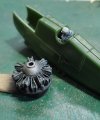
Usual clean molding from Matchbox with no sign of flash at all. Details are not too heavy but as usual no cockpit floor or tub. Decals are still good. I think the only thing I would be tinkering with will be the cockpit and the exposed radial engine...little bitties I swear.
Onwards and beyond....

Cheers,
Wabble
 
Nice one richard , we all love a good old matchbox . I dont know how they did it but their toolings were always so crisp and clean . The lack of any substantial internals is typical of the era , shows how far things have come in the meantime - modern kits are superdetailed compared to these. Cant wait to see you work your magic on it , cheers tony
 
It will be an interesting subject Richard. English language instruction sheets can be found on Scalemates, although you probably only need the pictorial instructions anyway.
 
Always nice to see you work your magic on an old kit.
I think the only thing I would be tinkering with will be the cockpit and the exposed radial engine...little bitties I swear.
Now why do I find that hard to believe :smiling:
 
Nice one Richard. Looking forward to the magic you’ll work on this kit.
Cheers
Paul
 
Thread owner
Thanks guys, in all fairness I'm afraid of not completing in time with all the other commitments in the pipeline. So I will keep it simple seriously but will do the add ons if necessary.

Cheers,
Wabble
 
Thread owner
Hi guys, have you got any problems with the format on your HP's. The interface doesn't seem to be HP friendly. Anyway I got started with the office...very bare and since the aperture is so tight, not much can be seen so I'll just add the IP and fit the pilot with one or two ribs on the side panels and perhaps a back wall and joystick.
Dry fitted the halves to see how much can be seen...
IMG_20240110_213525.jpg
Then I used blutac to help with measuring plastic strip and cutting it to fit...
IMG_20240110_213634.jpg
The pilot basically takes up the whole seat. I will reposition his head to cock to the side left as if trying to peer past the front nose.
IMG_20240110_213433.jpg

Cheers,
Wabble
Ps took me awhile to adjust. Could be the new phone that's causing this.
 
Thread owner
Meanwhile back at the bench...today's bit of work.
A bit of ribbing and side instrument panels and a back plate for the seat where the seat harness is attached to.
View attachment 499472
Not much detail as can be seen when the pilot is seated...
View attachment 499473
Then scratched the IP with the gun breech and body protruding from the side of the IP...
View attachment 499474
While waiting for these to cure I whittled away the extra plastic mold attached to the base of the propeller blades.
View attachment 499476
That's all.

Cheers,
Wabble
 

Attachments

  • IMG_20240112_000600.jpg
    IMG_20240112_000600.jpg
    3.8 KB · Views: 0
  • IMG_20240112_000641.jpg
    IMG_20240112_000641.jpg
    3.6 KB · Views: 0
  • IMG_20240112_000722.jpg
    IMG_20240112_000722.jpg
    4 KB · Views: 0
  • IMG_20240112_001719.jpg
    IMG_20240112_001719.jpg
    4.6 KB · Views: 0
'Matchbox 1974' marvelous stuff. And look, you just couldn't resist giving the special rtfoe upgrades could you.
 
Great stuff Richard. Bringing extra detail to this old kit with skill and patience.
 
Thread owner
Off to a great start with your usual excellent upgrades.
'Matchbox 1974' marvelous stuff. And look, you just couldn't resist giving the special rtfoe upgrades could you.
Nice work, he’s certainly squashed in there
Some cracking work there Richard. Coming along very nicely.
Great stuff Richard. Bringing extra detail to this old kit with skill and patience.
Thanks guys, seriously I'm doing as little scratchery as possible. The IP is very simplistic and quite deep in so it might not be seen. I have though added a joystick and locked down the figure and will be painting it in situ...
View attachment 499778
Also painted the interior base colour...
View attachment 499779
That's as much as I could do today.

Cheers,
Wabble
 

Attachments

  • IMG_20240115_121221.jpg
    IMG_20240115_121221.jpg
    4.3 KB · Views: 0
  • IMG_20240113_180028.jpg
    IMG_20240113_180028.jpg
    4 KB · Views: 0
Thread owner
Hi guys,
That's as much super detailing I'm doing on this kit just to make it look busy.
View attachment 499806

Cheers,
Wabble
 

Attachments

  • IMG_20240116_171422.jpg
    IMG_20240116_171422.jpg
    3.9 KB · Views: 0
Thread owner
Painted and dry brushed the silver highlights to the radial engine. Notice when the fuselage halves are closed up you can hardly see anything in the cockpit...still I painted the IP and side panels for nothing I guess. The pilot is in zenithel mode and will be painted later.
View attachment 499865

Cheers,
Wabble
 

Attachments

  • IMG_20240117_174045.jpg
    IMG_20240117_174045.jpg
    4 KB · Views: 0
Wabble,
Good to see the progress on this veteran kit, like what you have done with the 'mummy'
Cheers
Wibble
 
Back
Top