Theme editor

Scale Model Shop

Richard's Revell Ex-Matchbox 1/72 Victor Resurfaces

Thread owner
Looking very good Richard, some very nice work.

Thanks Ian,

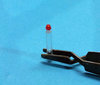
I spent a bit of time yesterday to add more stuff that wasn't supplied in the kit. Aviation navigational lights for the top and bottom of the aircraft. I carved and sanded two from clear sprue, added a thin coat of red and sealed it with Future.

View attachment 327925

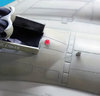
The top one is placed slightly off center to the left of the fiuselage just behind the inflatable dinghy storage hatches I think...

View attachment 327926

The other is situated under the bulge just aft of the front undercarriage doors.

View attachment 327927

Cheers,
Richard
 

Attachments

  • V87.jpg
    V87.jpg
    2.4 KB · Views: 0
  • V89.jpg
    V89.jpg
    2.9 KB · Views: 0
  • V88.jpg
    V88.jpg
    2.4 KB · Views: 0
Thread owner
Richard, your attention to detail is very high well worth the effort.

Thanks Vaughan, there are lapse of laziness in between my builds that will creep up now and then so it always end up sadly semi detailed.:smiling6: But at the end its still worth it for the enjoyment of the challenge.

Cheers,
Richard
 
All looking very nice Richard. I converted one of these Revell kits to a B2 (I think I'm right) many years ago. And now we have a nice new Airfix one. The one thing I remember was (apart from the intakes) was finding recessed panel lines on the wings and raised lines on the fuselage. Strange but true.
 
Thread owner
All looking very nice Richard. I converted one of these Revell kits to a B2 (I think I'm right) many years ago. And now we have a nice new Airfix one. The one thing I remember was (apart from the intakes) was finding recessed panel lines on the wings and raised lines on the fuselage. Strange but true.

Thanks Colin, yes it is strange but very true for Matchbox kits. The same was on the Matchbox B-26 Marauder but on the re-boxed Revell, the wings were raised panel lines. Revell perhaps must have done something to it when they decided to box it as a K Mk.2. It was easier scribing the wings than the fuselage and was good practice when I scribed my O2 Skymaster.

Cheers,
Richard
 
Thread owner
Richard,
Some excellent work as always.

Thanks Paul, glad you like it. I had a recent debate with myself on whether to approach the wing navigational lights differently. Obviously my laziness during construction should have seen to this at the early stages. At the moment I have masked both wing edges. The decision was to either take the lazy route again and paint and varnish and be done with it or cut off and replace with a clear sprue and drilled hole for a light bulb....

V90.jpg

I have a whole weekend to decide and attempt the surgery. Any comments on what I should do? If not let's see what happens because after the weekend we have a long holiday for Chinese New Year.

Cheers,
Richard
 
Hi Richard
I'd be most interested to see how the wing light surgery is done.

xin nian hao - I have probably just said that I hope your grandmother turns into a watermelon but it is supposed to wish you and yours a happy new year.

Jim
 
Stunning work Richard.I was at RAF Marham just after the gulf war in 1991 and all the Victors returned during our visit.We had a great view into the base from an elevated farmers field.Most of the Victors when landed taxied away with union jacks and skull and crossbones flying from cockpit windows.
Halcyon days when i went plane spotting.
A model to be proud of!!!.
Richard
 
Oh yes go for it Richard, it's bound to look great .
Jim , that made me laugh out loud, only to be admonished by management! !
John
selamat tahun baru .
 
Richard always lots to learn and steal from your builds. Why not stick an LED in there?

Gong Xi Fa Chai

John
 
Thread owner
Wow! What a response...

Neil, if I do it'll take a while to complete and hope you have the patience. :smiling2:
Jim, yes it's decided I will go ahead...laughed while google translating what you typed...you see to the Chinese I'm known as a banana, yellow on the outside and white on the inside. Reason is I look Chinese but can't read or right the lingo. :smiling6:
Richard, envy you actually seeing the real thing and feeling the accomplishment of a mission that these old ladies achieved. Must have been a sight with the flags.
John R, yep it's a go ahead...I was lucky not to be caught laughing. Well said in our National language.
John B, it's the same for me with your builds. Impossible to light at this stage but your LED suggestion brings to mind the cutting and shaping the coloured LED instead of using clear sprue. Ah...wishes of great happiness and prosperity...you must have many southern Chinese residing in Canada.

Here's wishing you a Happy Chinese New Year, Selamat Tahun Baru, Xin Nian Hao, Gong Xi Fa Chai, Gong Hey Fatt Choy and Cīṉa puttāṇṭu vāḻttukaḷ.

Cheers,
Richard
 
cutting and shaping the coloured LED instead of using clear sprue
Would that make a lot of difference in the end? I somehow doubt it, except in cost (clear sprue being free and all).
 
Looks great Richard and go for it, with all the added detail you can’t leave out the wing lights.:tongue-out3::thumb2:

Happy Chinese New Year!
 
Thread owner
Would that make a lot of difference in the end? I somehow doubt it, except in cost (clear sprue being free and all).

Jakko, not if you're looking at coloured covers but since it involves a clear perspex over a coloured bulb plus the fact that I couldn't find my stash of LED's.

Looks great Richard and go for it, with all the added detail you can’t leave out the wing lights.:tongue-out3::thumb2:

Happy Chinese New Year!

Thanks Fernando, and with that this is my mornings work so far...

V91.jpg

Cut the wing tips to house the perspex covers using a jewelers saw and files...

V92.jpg

Filed down one side of a clear sprue and drilled out a hole for the bulb...when inverted you can make out the indentation through the sprue. I was careful not to drill too deep as I needed enough sprue to file to shape.

V93.jpg

Dropped paint into the hole and covered the inside facing with a mixture of black and silver...

V94.jpg

Once dry I cemented the sprue onto the wingtip and let the liquid cement bond and cure before sanding and shaping...

V95.jpg

After an hour I shaped the sprue...filing and then sanding with fine grit sand paper. I was surprised at how easy clear sprue could be filed.

V96.jpg

This was before polishing... and below after polishing with Tamiya polishing compound...

V97.jpg

Now to do the otherside...see you later.

Cheers,
Richard
 
not if you're looking at coloured covers but since it involves a clear perspex over a coloured bulb
I find transparent paint very useful for colouring lights :) (Even used Tamiya Clear Red once to spray full-size taillights for a 1960s caravan, that were only available in clear.)
 
Thread owner
I find transparent paint very useful for colouring lights :smiling3: (Even used Tamiya Clear Red once to spray full-size taillights for a 1960s caravan, that were only available in clear.)

:smiling2: The LED covers are old school before any of these tints arrived on the scene. I would have used it for my top and bottom Nav lights had I thought of it. Saves on painting but then again I would have wasted time searching for it. :smiling6: I swear they were seen in a pack of reds, greens and orange.

Cheers,
Richard
 
Thread owner
Both sides have been sanded and polished...

v98.jpg

V99.jpg

Masked and painted.

V100.jpg

V101.jpg

I am glad I did it this way. It has enhanced the wing tip even better. I am now looking at the refuelling tank pod. The propeller blades on the kit are boxie which I presume are covers for the blades. I would prefer showing the blades so some surgery coming up next.

Cheers,
Richard
 
Back
Top