Andrew, surely you've got things wrong....The caramel bicky is bootiful, covered in chocolate and all!!
Thanks John, glad you like it thus far matey.....
Colin, good result!!
Right, here's a quick update:-
Two things....
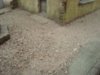
One, I've done the ground cover. I do this by carefully spreading diluted PVA just where I want the 'Dust' to stick. However, don't be too fussy about the sticky creeping up the base of the walls, this gives a nice 'Muck up the walls' effect. Then I simply sprinkle the sweepings I've collected, over the PVA, then turn the model upside down over a piece of paper...Where it's stuck it stays, where it isn't, it falls onto the paper...Job done! Because it's a natural colour, the ground doesn't need painting.
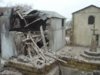
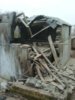
Two, I've done most of the work on the damaged building. This is just scraps of stirrer, polystyrene, cotton and hardened floor adhesive semi-crushed, all finished off with a good coating of dust.
Bit of a tip regarding damaged buildings. Initially, I always make the four sides of the building complete, and with the full amount of roof tiles,
then create the damage. This ensures the right amount of rubble/tiles are strewn about......Sounds arse about face, but so often I see trashed buildings with just a scattering of rubble and they just don't look right somehow. Doing it the above way gives you a better chance of getting the proportion between the damage and rubble something like...I realise it's different with Miniart buildings, but I think it's still worth while making loads of matching rubble when using these kits.
I will probably add some more bits to the damage, I'll see how it looks after a fresh blimp later on.
That's it for this stage. I hope you like it so far and thanks for looking in chaps.
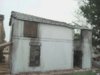
Just realised after seeing the pictures, I've forgot to darken the diddy garden wall!
Cheers,
Ron
View attachment 56751
View attachment 56752
View attachment 56753
View attachment 56754
View attachment 169777
View attachment 169778
View attachment 169779
View attachment 169780
")