Theme editor

Scale Model Shop

Trumpeter 1/32 Dauntless

Status
Not open for further replies.

BarryW

Active member
SMF Supporters
Joined
Jul 23, 2011
Messages
6,147
Reaction score
462
Points
83
Age
70
1/3
Thread owner
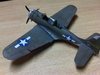
This is my second Trumpy 1/32 Dauntless, the first one I built as a USAAF BansheeView attachment 294670
I loved that build and promised myself that I would build a second.

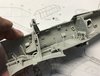
The plastic fit was outstanding, up to Tamiya standards and the kit was let down only by the terrible decals, stiff p.e for the seatbelts and a sagging undercairrage.

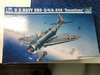
Below is the box top:
View attachment 294669
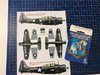
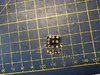
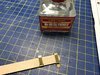
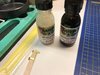
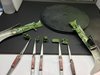
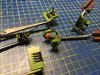
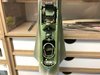
And I am dealing with the issues with these masks and SAC u/c
View attachment 294668
I have decided to build the RNZAF (top)

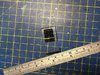
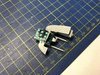
I am currently trying to find an alternative seat harness.

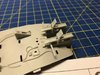
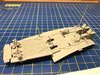
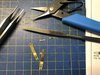
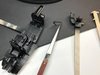
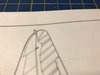
Tonight I start preparations and hopefully will cut some plastic.
 

Attachments

  • IMG_3049.jpg
    IMG_3049.jpg
    3.6 KB · Views: 0
  • IMG_3048.jpg
    IMG_3048.jpg
    2.8 KB · Views: 0
  • IMG00819-20120628-0631.jpg
    IMG00819-20120628-0631.jpg
    2.8 KB · Views: 0
Barry what decals are you going to use? the Dauntless I was building back in 2014 is still on the bench somewhere minus the decals as with good old Trumpeter they fell apart.
 
Thread owner
Barry what decals are you going to use? the Dauntless I was building back in 2014 is still on the bench somewhere minus the decals as with good old Trumpeter they fell apart.
I am using masks Vaughan.
There are three lots on this page depending on which Dauntless you are building. There are various sets of masks depending on exactly what you want. Worth exploring.
http://www.montex-mask.com/en/ofertaShow.php?skala=1/32&maska=SUPER MASK&current=super_mask_1_32

It is always worth checking out masks for any build, particularly in 1/32 but they look better whatever the scale. I will never use Trumpeter or Tamiya decals as they are so useless.

Another provider are these:
http://shop.maketar.com/?product_cat=aircraft-insignia-markings
The great thing with Maketar is the wide range of 'utility' masks and sets of insignia etc that are generic rather than aircraft specific. You can always find so,ething from either of these.

I find masks easier to use than decals anyway.
 
Thanks for the info will give them a look. I need to get my Dauntless sorted it's been far too long on the back burner.
 
Thread owner
Thanks for the info will give them a look. I need to get my Dauntless sorted it's been far too long on the back burner.
It a great kit and well worth finishing...
 
Thread owner
I have made a start on the internals...

There is a film for the instrument panel and it needs some cutting.
View attachment 294772
It is glued to a transparency, I used Gorilla Glue and when it dries it will be nice and clear
View attachment 294773
My plan is to place a drop of liquid mask on each dial and to then spray black. I will mask with tape the areas that will need to stay black and then spray Zinc Chromate. Once the masking is removed we should have a nice i.p. ready for a little more detail painting and weathering. I might 'glaze' the instruments though, depending on how they look.

Having just finished that Special Hobby I really appreciate the thoughtful engineering of this kit. If it was SH there would be no positive location for the pedals below. These parts just push so well into place with no issues of fit or worry over whether it is in the right place. Given the complexity of the pit with interlocking parts, getting the parts in exactly the right position is crucial.
View attachment 294774

The plastic on Trumpy kits is nice and crisply molded with a few minor seam lines and little or no flash needing only a quick wipe with a sanding stick , file or trim with a knife. All in all this is so refreshing after SH and Revell.

This is how I left it last night.
View attachment 294775

This is a very complex cockpit and there is a lot more to do before we join the fuselage halves.
 

Attachments

  • IMG_3053.jpg
    IMG_3053.jpg
    3.4 KB · Views: 0
  • IMG_3054.jpg
    IMG_3054.jpg
    3.4 KB · Views: 0
  • IMG_3055.jpg
    IMG_3055.jpg
    33.1 KB · Views: 0
  • IMG_3057.jpg
    IMG_3057.jpg
    3.9 KB · Views: 0
Thread owner
Fitted the ip and masked the dials with liquid mask using a cocktail stick.
View attachment 294830
I cannot find suitable seat harnesses in the aftermarket so I am using the kit pe.

I am applying some Mr Metal Primer first the prepare the pieces. I am not a fan of pe but now I have some specialist tools it is a lot more manageable.
View attachment 294831
View attachment 294833

Test fitting is essential. It is a complex pit with lots of interlocking pieces. As yet I have barely touched the surface of what is going to be inside and making sure the bulkheads are at the right angle is essential. Test fitting and applying some drops of cement to fix the position.
View attachment 294832

I am priming the interior with black but using sand yellow primer for the seatbelts View attachment 294834

Primed and ready.
View attachment 294835
 

Attachments

  • 38AD5CDC-0A34-4B0D-A81E-386687E1C1B2.jpeg
    38AD5CDC-0A34-4B0D-A81E-386687E1C1B2.jpeg
    4.1 KB · Views: 0
  • AA81A2FE-DD90-457A-BDDF-0F3703861B93.jpeg
    AA81A2FE-DD90-457A-BDDF-0F3703861B93.jpeg
    3.7 KB · Views: 0
  • 0800067E-B013-4D77-BF9C-0524C1E9A5D4.jpeg
    0800067E-B013-4D77-BF9C-0524C1E9A5D4.jpeg
    3.5 KB · Views: 0
  • 21FB875D-1AE2-4AAA-80AC-338766847877.jpeg
    21FB875D-1AE2-4AAA-80AC-338766847877.jpeg
    4 KB · Views: 0
  • 37AF4FD8-FDBB-4F5C-A025-5C8C4F605690.jpeg
    37AF4FD8-FDBB-4F5C-A025-5C8C4F605690.jpeg
    3.7 KB · Views: 0
  • 8CFBD19C-ED7D-460F-A990-8C5D7822913E.jpeg
    8CFBD19C-ED7D-460F-A990-8C5D7822913E.jpeg
    3.2 KB · Views: 0
Thread owner
I have finished the cockpit floor assembly, painted and weathered. I am rather pleased with how it came out. The instructions say Zinc Chromate for the interior but a little research suggested Interior Green instead so that is what I went with.
View attachment 295080
View attachment 295081

I then also completed the engine. This is a very nice little sub assembly as well, but not much of this (or the cockpit) can be seen once it has been buttoned up. I could have added detail but decided not to do so.

View attachment 295079

I just need to add some oil leaks to finish it off. The metal powders are a brilliant product for this kind of thing.

I will now be carrying on with the cockpit as there is a lot more to build up attached to the fuselage sides. The floor above will slot in like a jigsaw piece just before closing her up.

After my last two builds it is so nice to be back with such a well engineered and fitting kit.... If you have not built one of these I thoroughly recommend it.
 

Attachments

  • IMG_3074.jpg
    IMG_3074.jpg
    4.1 KB · Views: 0
  • IMG_3073.jpg
    IMG_3073.jpg
    3.8 KB · Views: 0
  • IMG_3072.jpg
    IMG_3072.jpg
    3.5 KB · Views: 0
That all looks very nice. Based on another of your recommendations, I might have to try some of these magical metal powders. I've already bought the chrome pen.
 
Looking good Barry plenty of nice detail. Completely agree with you it all slots together with no hassles.
 
Thread owner
I have been making more progress...

I have started work on the undercarriage
View attachment 295241
The tyres are vinyl but are actually very good and I cannot see a seam.

I have been doing the detail painting on the rest of the interior parts. These will need weathering tonight.
View attachment 295242
View attachment 295243
View attachment 295244
Also started work on the wing.
View attachment 295245

This build is progressing well with no dramas and no issues - just what I enjoy, a relaxing build.
 

Attachments

  • IMG_3078.jpg
    IMG_3078.jpg
    33.9 KB · Views: 0
  • IMG_3079.jpg
    IMG_3079.jpg
    3.5 KB · Views: 0
  • IMG_3080.jpg
    IMG_3080.jpg
    33.1 KB · Views: 0
  • IMG_3081.jpg
    IMG_3081.jpg
    3.9 KB · Views: 0
  • IMG_3083.jpg
    IMG_3083.jpg
    33.1 KB · Views: 0
All looks very nice. Funny though, that document / map wallet, looks exactly the same as Tamiya's one found in the Corsair. It must be standard USAF issue.
 
Thread owner

Attachments

  • 2E40FAF8-EECD-458D-B69B-5C13CDF7FFE4.jpeg
    2E40FAF8-EECD-458D-B69B-5C13CDF7FFE4.jpeg
    3.8 KB · Views: 0
  • 9BF36F35-0A87-451E-AF3E-CE6B735CACF5.jpeg
    9BF36F35-0A87-451E-AF3E-CE6B735CACF5.jpeg
    4.2 KB · Views: 0
  • AD6598C7-DAA0-43C9-B0BA-30F19C93E528.jpeg
    AD6598C7-DAA0-43C9-B0BA-30F19C93E528.jpeg
    4.2 KB · Views: 0
  • BE97D30F-05F4-49C0-A509-6D872844A074.jpeg
    BE97D30F-05F4-49C0-A509-6D872844A074.jpeg
    3.7 KB · Views: 0
Great work. As you said a pity it is so hidden away. Still you know it is there and we have all seen it.
 
Thread owner
Tell me - does anyone manage to complete a build without the aerial at the top of the fin, as shown in this pic from the instructions, breaking off?
View attachment 295492

I dont think I have ever managed it. I am not sure when it broke off or where it is. Why on earth do they persist in molding these parts? understandable for small scale but silly for 1/32.
View attachment 295493

I will need to use some plastic card at a later stage to replace that section.
 

Attachments

  • IMG_3104.jpg
    IMG_3104.jpg
    2 KB · Views: 0
  • IMG_3105.jpg
    IMG_3105.jpg
    2.3 KB · Views: 0
Believe it or not mines still there despite being sat on the shelf since 2014 unfinished. But yes I agree with you and I have lost a few on other builds.


View attachment 295494
 

Attachments

  • 20180307_112132_resized.jpg
    20180307_112132_resized.jpg
    2.9 KB · Views: 0
I hear your pain. Every Revell 1/32 MkII Spitfire I've built I've managed to break off the aerial attachment point on the fin. So many times in fact that I now have a mold to create new ones in resin!
It's annoying but not too taxing a job to fix.

The Dauntless is really coming along. Excellent work as always!
Cheers
P
 
Status
Not open for further replies.
Back
Top