
You are using an out of date browser. It may not display this or other websites correctly.
You should upgrade or use an alternative browser.
You should upgrade or use an alternative browser.
Trumpeter 1/32 Fairy Swordfish Mk 1
- Thread starter BarryW
- Start date
- Status
- Not open for further replies.
Quick update...
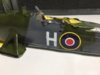
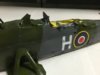
H done, decals finished and sealing gloss coat applied ready for washes....
Here is the painted on H - its not perfect but it certainly is good enough.
View attachment 121570
View attachment 234461
H done, decals finished and sealing gloss coat applied ready for washes....
Here is the painted on H - its not perfect but it certainly is good enough.
View attachment 121570
View attachment 234461
Attachments
G
Guest
Guest
Looks perfect to me Barry! Lovely finish on the paintwork
Nice work Barry.I spoke to my work colleague about his drooping wings.Reckons he assembled both models correctly.But the wings drooped over a period of time.Hes only got one swordfish now.A die cast 1/32 mosquito fell onto one from a high up shelf and wrecked it!.
Making progress, but slowly, mainly because of the time I have had available over the past couple of weeks.
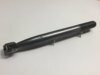
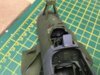
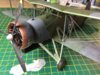
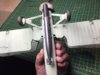
I have painted and weathered the torpedo. I used Gunze buffable iron for the body, the AK wax True Metal Old Bronze paint for the torps prop and matt black for the warhead. Weathering was simply giving the iron a good buffing, some silver pencil to make some chips and scratches to the warhead and a wash on the fuselage attachments.
View attachment 122088
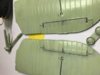
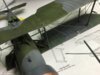
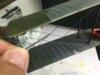
I have been doing a panel-line pin wash over the glossed camo work. I have used the AKI panel line wash for 'Grey-Green Camo'. It flows well into the detail and is removed using their odourless thinners with a flat brush. By brushing in the direction of the airflow you can get a very good effect.
View attachment 122089
View attachment 122090
I think you can get an idea of the effect above.
I have just done the first matt coat ready to apply other weathering finishes such as some dry brushing and pigments.
I should have some more pics in a day or two.
View attachment 234979
View attachment 234980
View attachment 234981
I have painted and weathered the torpedo. I used Gunze buffable iron for the body, the AK wax True Metal Old Bronze paint for the torps prop and matt black for the warhead. Weathering was simply giving the iron a good buffing, some silver pencil to make some chips and scratches to the warhead and a wash on the fuselage attachments.
View attachment 122088
I have been doing a panel-line pin wash over the glossed camo work. I have used the AKI panel line wash for 'Grey-Green Camo'. It flows well into the detail and is removed using their odourless thinners with a flat brush. By brushing in the direction of the airflow you can get a very good effect.
View attachment 122089
View attachment 122090
I think you can get an idea of the effect above.
I have just done the first matt coat ready to apply other weathering finishes such as some dry brushing and pigments.
I should have some more pics in a day or two.
View attachment 234979
View attachment 234980
View attachment 234981
Attachments
G
Guest
Guest
Beautiful job!
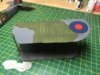
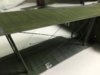
I have applied the final matt coat using the AKI Ultra Matt Varnish. Masks are now off and I have done some touching up.
View attachment 122336
I had a problem when I started removing the masking from the transparency as it pushed the transparency in. Above you can see how it had fallen down. I ended up holding the fuselage above me on its side juggling it to see if I could work the transparency into place. It eventually worked.
View attachment 122337
Above shows it back in place. When holding it on its side I touched a corner with extra thin cement and it managed to wick in and hold it.
View attachment 122338
Above, job done. Not perfect as one corner is not quite right into the frame and I had to use sharp pointed tweezers to pull away the mask which scratched the transparency. The good news is that it is difficult to see and could easily be cracked glass.
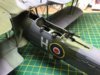
I have also put together the undercarriage.
View attachment 122339
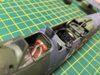
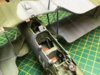
Here are some pics of the cockpit.
View attachment 122340
View attachment 122341
View attachment 122342
Next I get to the final construction stage which I will be taking slowly with more subassemblies and touching up as I go.
View attachment 235227
View attachment 235228
View attachment 235229
View attachment 235230
View attachment 235231
View attachment 235232
View attachment 235233
View attachment 122336
I had a problem when I started removing the masking from the transparency as it pushed the transparency in. Above you can see how it had fallen down. I ended up holding the fuselage above me on its side juggling it to see if I could work the transparency into place. It eventually worked.
View attachment 122337
Above shows it back in place. When holding it on its side I touched a corner with extra thin cement and it managed to wick in and hold it.
View attachment 122338
Above, job done. Not perfect as one corner is not quite right into the frame and I had to use sharp pointed tweezers to pull away the mask which scratched the transparency. The good news is that it is difficult to see and could easily be cracked glass.
I have also put together the undercarriage.
View attachment 122339
Here are some pics of the cockpit.
View attachment 122340
View attachment 122341
View attachment 122342
Next I get to the final construction stage which I will be taking slowly with more subassemblies and touching up as I go.
View attachment 235227
View attachment 235228
View attachment 235229
View attachment 235230
View attachment 235231
View attachment 235232
View attachment 235233
Attachments

A bit more progress....
View attachment 122565
I had a problem with some pipework, a piece snapped off and got gobbled by the carpet monster so out comes the lead wire....
View attachment 122566
You can see the lead wire coming from the fuse to the bend just before it turns out to the top port wing.... I will paint it tonight.
View attachment 122567
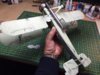
The wings are starting to come together. Had some issues with fit despite successful dry runs previously......
View attachment 235456
View attachment 235457
View attachment 235458
View attachment 122565
I had a problem with some pipework, a piece snapped off and got gobbled by the carpet monster so out comes the lead wire....
View attachment 122566
You can see the lead wire coming from the fuse to the bend just before it turns out to the top port wing.... I will paint it tonight.
View attachment 122567
The wings are starting to come together. Had some issues with fit despite successful dry runs previously......
View attachment 235456
View attachment 235457
View attachment 235458
Attachments

Its been a while since I last posted an update. Its been very slow going.
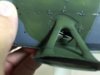
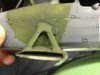
I spent a long time over several evenings building up the wings, joining them and getting the p.e. rigging into place. One part I just could not fit - a cross piece that is supposed to fit parallel to the fuselage sitting on some 'crosswires'.... I spent hours trying to fit just one wing, I tried making jig and stands and in the end just gave up.... life is not long enough. To get these pieces into place you need to glue the edge into the very springy cross bars... you have to hold them in place without applying any downward pressure with a completely still hand. I am sure someone can do it but without perfect vision, a perfectly still hand and the ability to judge that perfect pressure it was beyond me. I am not decided what to do about that yet, I may just leave it... The pic shows the p.e. piece and the cross wires where it is supposed to fit.
View attachment 123075
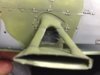
Anyway I then went on to join the wings, one at a time to the fuselage. They needed some work to get them into position including some filing and scraping. While fitting - the p.e. rigging kept pinging and bits fell off....
View attachment 123076
View attachment 123077
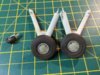
Once the wings were in place I fitted the undercarraige - it fits very well though the pins needed a bit of a trim.
View attachment 123079
here she is up on her wheels...
View attachment 123078
I now need to spend an evening repairing the damage, adding the final parts and then another evening or two touching up the paintwork.
View attachment 235966
View attachment 235967
View attachment 235968
View attachment 235969
View attachment 235970
I spent a long time over several evenings building up the wings, joining them and getting the p.e. rigging into place. One part I just could not fit - a cross piece that is supposed to fit parallel to the fuselage sitting on some 'crosswires'.... I spent hours trying to fit just one wing, I tried making jig and stands and in the end just gave up.... life is not long enough. To get these pieces into place you need to glue the edge into the very springy cross bars... you have to hold them in place without applying any downward pressure with a completely still hand. I am sure someone can do it but without perfect vision, a perfectly still hand and the ability to judge that perfect pressure it was beyond me. I am not decided what to do about that yet, I may just leave it... The pic shows the p.e. piece and the cross wires where it is supposed to fit.
View attachment 123075
Anyway I then went on to join the wings, one at a time to the fuselage. They needed some work to get them into position including some filing and scraping. While fitting - the p.e. rigging kept pinging and bits fell off....
View attachment 123076
View attachment 123077
Once the wings were in place I fitted the undercarraige - it fits very well though the pins needed a bit of a trim.
View attachment 123079
here she is up on her wheels...
View attachment 123078
I now need to spend an evening repairing the damage, adding the final parts and then another evening or two touching up the paintwork.
View attachment 235966
View attachment 235967
View attachment 235968
View attachment 235969
View attachment 235970
Attachments
I would not describe it as a nightmare Vaughan as such, but if I were to build another one I would re-think the riggingand build sequence and avoid most of the p.e. I really cannot figure out what best to do about those cross pieces, it does frustrate me to leavge them off. I will look at some pics of the real aircraft in that area and see they provide inspiration.
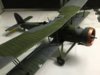
Well it is done but i have a line to add to the aerial and may add the control lines to the tail plane. I have not done them yet because of practical considerations as it would be problematical picking the plane up without breaking off a line. Even now handling the model risks rigging pinging off. Every time my cleaner picks the model up to dust the shelf I am sure it will need a repair. Therefore I decided to leave them off but every time I look at the model I get thinking......
Anyway the final stages did take a long time and it was quite painful doing the pe rigging but mind you I hate pe anyway. I am not completely happy with the rigging and would rethink my approach if I do another one. That said it is a good kit but not one for beginners.
One thing - this has put me off the idea of getting a WingNut wings WW1 model with the rigging issues involved there!!!
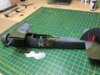
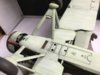
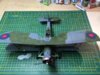
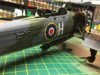
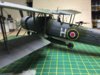
Anyway her are some pics of my 825 squadron Swordfish from February 1942, operation Fuller.
View attachment 123712
View attachment 123713
View attachment 123714
View attachment 123715
View attachment 123718
View attachment 123719
View attachment 123720
View attachment 123716
View attachment 123717
I am rather pleased with how the torpedo turned out and also the weathering. It is only the rigging that I am less than happy with. It does build to a large and impressive model.
View attachment 236603
View attachment 236604
View attachment 236605
View attachment 236606
View attachment 236607
View attachment 236608
View attachment 236609
View attachment 236610
View attachment 236611
Anyway the final stages did take a long time and it was quite painful doing the pe rigging but mind you I hate pe anyway. I am not completely happy with the rigging and would rethink my approach if I do another one. That said it is a good kit but not one for beginners.
One thing - this has put me off the idea of getting a WingNut wings WW1 model with the rigging issues involved there!!!
Anyway her are some pics of my 825 squadron Swordfish from February 1942, operation Fuller.
View attachment 123712
View attachment 123713
View attachment 123714
View attachment 123715
View attachment 123718
View attachment 123719
View attachment 123720
View attachment 123716
View attachment 123717
I am rather pleased with how the torpedo turned out and also the weathering. It is only the rigging that I am less than happy with. It does build to a large and impressive model.
View attachment 236603
View attachment 236604
View attachment 236605
View attachment 236606
View attachment 236607
View attachment 236608
View attachment 236609
View attachment 236610
View attachment 236611
Attachments

- Status
- Not open for further replies.
Legal Notice
scalemodelling.co.uk is a privately operated online discussion forum. All content posted by members reflects their own views and opinions and does not necessarily represent those of the forum owners or administrators. While reasonable efforts are made to moderate content, no responsibility is accepted for user-generated material. By using this site, you agree to comply with UK law and the forum rules.