Theme editor

Scale Model Shop

Valeron's 1/35 ICM KHD S3000/SS M Maultier

I would do as Tim suggests. Just make sure when you drill the holes they are nice and straoght. I would also use 2 part epoxy to glue in the wires. You can buy 2 part epoxy that cures in 5 mins.
 
Same, my first thought too was to drill out the pieces and superglue in a length of metal wire.
 
Thread owner
Thank you everybody for the advice.

With my drill, a paperclip, some wire cutters and superglue. I've fixed the first one. Just a bit of touch up required.

What would I do without this site and its amazing people.

20221031_160046.jpg20221031_160524.jpg20221031_161718.jpg20221031_191456.jpg
 
Thread owner
I have been working on the cargo bed for the last few days and had my first taste of using a chipping solution.

I primed using Vallejo Red Brown, left it overnight, painted it with Vallejo natural wood colour, left this about 6 hours, applied the Vallejo chipping solution, left this for a few hours, then painted about 3 coats of the final colour. This was left for about 5 hours.

All the above was done using a brush as I don't have an airbrush.

Then I chipped with a a combination of damp toothbrush, cotton bud, paint brush and cocktail stick.

I'm reasonably happy with the results as this was a first attempt but I have gone down to the primer and even plastic in few places. Maybe I should have left things to dry for longer before moving onto the next stage.

Anyone else have experience of using this chipping method?


View attachment 466432

View attachment 466433
 

Attachments

  • 20221102_172503.jpg
    20221102_172503.jpg
    5.6 KB · Views: 0
  • 20221102_172512.jpg
    20221102_172512.jpg
    5 KB · Views: 0
Thread owner
A bit more progress. Its coming together now. I've also started work on the cabin but will focus on the tracks next.

Fitting the container on the back was so difficult. I just couldn't get some of the middle pins on so in the end cut them off.


View attachment 466564

View attachment 466563
 

Attachments

  • 20221104_171952.jpg
    20221104_171952.jpg
    4.4 KB · Views: 0
  • 20221104_172019.jpg
    20221104_172019.jpg
    4.8 KB · Views: 0
Coming on nicely Mike.
. I just couldn't get some of the middle pins on so in the end cut them off.
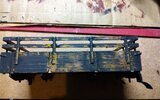
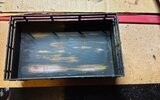
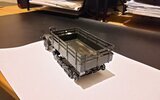
That's quite a common problem. Sometimes it's the kit itself and sometimes the previous construction it a fraction of a mm out.

I find the secret with chipping fluid is not to let things get too wet and to chip slowly and steadily.
 
Mike,

Just had a catch-up. It's coming on very nicely indeed and great save on the suspension!

ATB.

Andrew
 
Great work so far Mike. Breaking axles is part of the fun and you've made a great fix. Looking at the last 2 pics, one doesn't know if it's an Opel Blitz or one of the other Maultier's they had. I'm following this closely so when I build mine, I have a good idea what probs to look out for. Nice chipping too!!!

Prost
Allen
 
Thread owner
Painted the tracks and was starting to install them when I noticed I made a mistake previously. I can't believe this one got past me. Oh well, deep breath and take a few steps bacwards

Sometimes this hobby can be so frustrating. I was on such a roll and even ordered some pigments today for the tracks, little realising I'd made such a basic mistake by just not reading the instructions which were very clear.

I'm still enjoying it though

20221107_144722.jpg
20221107_144727.jpg
 
We've all done that, Mike, or at least something similar. I'll bet if we started a thread entitled "Oh bugger!!" for silly errors it would soon fill up.
Hopefully not hard to fix.
 
Back
Top