Theme editor

Scale Model Shop

Valeron's Airfix 1:72 Mitsubishi A6M2b Zero

Yep Tim's method is also a good one :thumb2: ,.....ALTHOUGH I'd recommend using "white tac" rather than "blu tac",....... because it doesn't leave a greasy residue behind,which "blu tac" often does ;).
 
Nice start mike , looks like a hard demarcation on the camo so id go for the masking tape method, cheers tony
 
Thread owner
It took a couple of goes with sanding in between but the main aircraft has now been primed using a rattle can of Army Painter white Primer.

I start brush painting the underneath of the aircraft tomorrow.

I've also started brush painting the cockpit canopy. I haven't masked amd did it free hand and have started the task of gently cleaning it up with a cocktail stuck. So far so good.

20230710_214812.jpg

20230710_214822.jpg

20230710_215046.jpg
 
If you are brush painting I would suggest that you have a practice a few times then just go for it. I cant brush paint a straight line if my life depended on it. Wiggly ones... no problem. lol.
 
Looking good Mike. The primer and your sanding look to have given a nice finish to paint on.
 
Thread owner
Underneath brush painted with 3 thin coats of the light grey green and the engine hood a 50/50 mix of the dark blue and black.

Both seem to have gone nicely. I'll let this cure properly before starting on the top colour.

Also started on a few other parts.

It's going together quite nicely. I'm a bit busy for the next few days but I'm hopeful to have the full aircraft and assembled and painted by the end of the weekend. I'll then move to the next stages.

I won't be putting a pilot I'm the cockpit. As as also been reported by a few others on here and elsewhere, he doesn't fit without surgery so I'm not bothering.

20230711_144352.jpg

20230711_144429.jpg

20230711_144443.jpg

20230711_144409.jpg
 
Underneath brush painted with 3 thin coats of the light grey green and the engine hood a 50/50 mix of the dark blue and black.

Both seem to have gone nicely. I'll let this cure properly before starting on the top colour.

Also started on a few other parts.

It's going together quite nicely. I'm a bit busy for the next few days but I'm hopeful to have the full aircraft and assembled and painted by the end of the weekend. I'll then move to the next stages.

I won't be putting a pilot I'm the cockpit. As as also been reported by a few others on here and elsewhere, he doesn't fit without surgery so I'm not bothering.


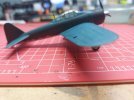
Nice, smooth paint job there Mike, really liking that shade of Grey on the underside :cool: , looking forward to the next update :thumb2:
 
Thread owner
First off, my apologies to Andy for stalling on this build. I am well past the end date but, I've started so I'll finish.

I've now painted the top of the aircraft and after a bit of touch up then varnish it and move onto decals.

The wavy camo was a nightmare for me to brush paint amd keep tidy and caused me to put this aside for a while and do other things. I'm over that now so hopefully I'll get this one done before Christmas.

20231201_093149.jpg

20231201_093144.jpg
 

Attachments

  • 20231201_093137.jpg
    20231201_093137.jpg
    4.8 KB · Views: 0
Thread owner
I've added the decals. They all went on well apart from one Roundel under the wing which would just not play ball and ended up being torn. I've touched it up (not very well) with paint and am hoping a bit of weathering will reduce the difference. Here's hoping anyway.

A gloss cost to follow then washes etc.

20231207_173711.jpg

20231207_173659.jpg
20231207_173652.jpg
 
Thread owner
I'm calling this one done.

I've just noticed that my last updated was added accidently to another one of my completely unrelated threads.

Anyway here is the latest update. I'll create a completed section shortly.

Mike

20231211_195108.jpg


20231211_195051.jpg


20231211_195143.jpg
 
Back
Top