Theme editor

Scale Model Shop

Valerons Airfix 1/72 Mosquito B.XVI

Thread owner
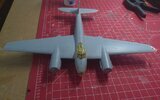
Holidays are over so I'm back on the Mossie.

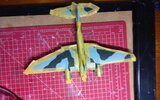
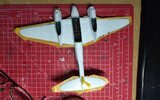
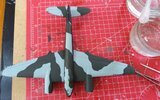
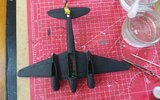
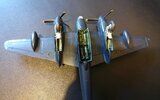
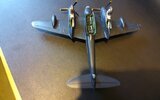
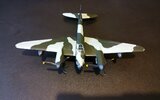
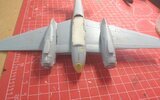
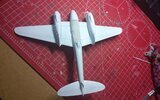
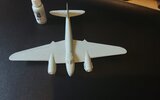
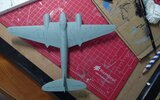
The beast is now ready for priming which I'll be doing from a rattle can.

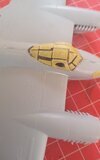
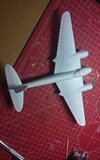
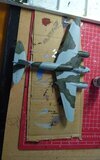
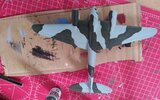
I've had loads of frustrating fun masking it today. It's my first time ever at masking a cockpit and it was difficult. I used a purchased mask and some liquid mask in parts. I don't know how people make there own masks but maybe I'll try it soon.

I am 99% convinced then when I remove the mask on the cockpit side windows, they will both come out.

And thanks to Jim's blog on some parts of the masking. I couldn't quite work it out but simply referred to his photos.

Priming will be tomorrow as I'm going for a pub lunch now and I don't trust myself with a rattle can after few pints.

Mike

View attachment 462092

View attachment 462093

View attachment 462094
 

Attachments

  • 20220902_115007.jpg
    20220902_115007.jpg
    3.3 KB · Views: 0
  • 20220902_114504.jpg
    20220902_114504.jpg
    4.4 KB · Views: 0
  • 20220902_114514.jpg
    20220902_114514.jpg
    4.9 KB · Views: 0
Thread owner
Aircraft primed but loads more seamlines than I was hoping for. So back for a bit of filler and more sanding. Disappointing that they weren't so obvious to be beforehand.
View attachment 462173

View attachment 462172
 

Attachments

  • 20220903_144824.jpg
    20220903_144824.jpg
    5.1 KB · Views: 0
  • 20220903_144834.jpg
    20220903_144834.jpg
    5.5 KB · Views: 0
Priming certainly highlights those bits you’ve missed but better now than during the first top coat keep up the good work
 
There's often a few issues shown up with the primer. Easily sorted. When removing the masks pulling sideways across the part puts less stress on the glue than pulling directly away from the model.
 
Thread owner
After more putty and sanding, I brush painted 3 thin coats of the base colour for the top. I'll let this cure and then mark out and paint the green camouflage colour.

View attachment 462451
 

Attachments

  • 20220906_170955.jpg
    20220906_170955.jpg
    2.8 KB · Views: 0
Thread owner

Attachments

  • 20220908_101458.jpg
    20220908_101458.jpg
    5.7 KB · Views: 0
  • 20220908_102805.jpg
    20220908_102805.jpg
    5.5 KB · Views: 0
  • 20220908_103956.jpg
    20220908_103956.jpg
    6.2 KB · Views: 0
  • 20220908_160440.jpg
    20220908_160440.jpg
    6.2 KB · Views: 0
Yep,
I gotta agree with the guys on this one... Looking very good Mike, coming along at a pace now :)
Definitely nearing the finish line eh?!
 
Thread owner
A bit of touching up needed but I'm reasonably happy with this. It's my first proper attempt at masking. The leakage around the edges of the wings is mainly from my clumsy attempt to hold the aircraft whilst brushing. I found that very difficult and had paint on my hands, was pulling up masking and touching parts of the aircraft I shouldn't.

The black colour was 75% flat black with 25% light blue added.

Any tips on handling a model whilst painting would be appreciated.


View attachment 462918

View attachment 462917


View attachment 462915

View attachment 462916
 

Attachments

  • 20220913_171037.jpg
    20220913_171037.jpg
    6 KB · Views: 0
  • 20220913_171046.jpg
    20220913_171046.jpg
    5.8 KB · Views: 0
  • 20220914_084706.jpg
    20220914_084706.jpg
    6.4 KB · Views: 0
  • 20220914_084720.jpg
    20220914_084720.jpg
    5.9 KB · Views: 0
Nice job Mike :thumb2:

I think adding blue to the black has helped get a more realistic appearance to the underside.

Geoff.
 
Nothing wrong with that paint job Mike. I totally agree about the black, pure black rarely looks right on models.
 
Thread owner
Since the last update, I've removed masking, and completed the assembly and painting. I've applied a clear satin finish and will move to the decals next.

I'm getting good at touching up but could really do with getting better so I don't need to touch up as much.

I struggled with the masking. I'd left the paint long enough to cure so that removing masking didn't remove paint but I seemed to have quite a lot of seepage under the masking. I obviously didn't apply it tight enough, especially on the props.

I also pushed all 3 of the round circular clear parts into the body of the aircraft when removing the masking. Instead I filled this holes with Micro Krystal clear, which seems to have works.

The above side, I'm very happy with results so far and am still enjoying the build.

View attachment 463380

View attachment 463379

View attachment 463377

View attachment 463378
 

Attachments

  • 20220920_163507.jpg
    20220920_163507.jpg
    3.6 KB · Views: 0
  • 20220920_163526.jpg
    20220920_163526.jpg
    4 KB · Views: 0
  • 20220920_163531.jpg
    20220920_163531.jpg
    3.7 KB · Views: 0
  • 20220920_163443.jpg
    20220920_163443.jpg
    3.7 KB · Views: 0
Back
Top