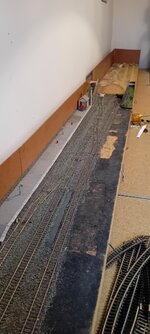
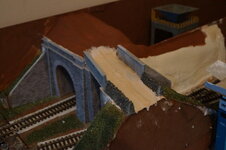
My current build is reworking a OO gauge model railway, originally built many years ago, used as a 'branch line' on my nephew's model railway, but dismantled when my parents moved house, it was in their loft. A bit of work done to make it fit in my model room & lay some new track, but retaining most of the original. The first photo is just as it had been made to fit it's new home, the second after a bit of scenery had been built.

You are using an out of date browser. It may not display this or other websites correctly.
You should upgrade or use an alternative browser.
You should upgrade or use an alternative browser.
What's on the Bench 2025
- Thread starter Graeme C.
- Start date
Had a major mojo loss recently.....mainly due to stress and a few health worries.....just not felt like it but im going to have a crack at this one
Kits from mid 70s but its one ive not done before
Not sure how far im going with it


Kits from mid 70s but its one ive not done before
Not sure how far im going with it
Dust, layers of dust! Suffer with a lack of mojo, decorating and working which has hampered any want to build but underneath all that dust is still Hellers Massey Ferguson... one day I might finish it!
I need to get back on track with my group build dust approaching!
I need to get back on track with my group build dust approaching!


Been wrestling on and off for nearly a year on an old Italeri (ex Protar) 1/9 Paris Dakar Yamaha which started out as an exercise in attempting to respoke the wheels but is now finally starting to come together.....


Nick
Nick
1/3
Slowly working the V3000S up. Basic paint now on, decals on, and weathering underway. Going for a dusty finish on this one….

Truck body started, inside and final side work will be done when assembled so it matches the cab end.

Doors just need glass, final window dust and interior finish …..


Cab pretty far along now. Not sure about the windscreen sweep, it looks a little “Lightning McQueen” at the moment. Possibly needs a final over all dust shot to tone down the starkness between clean and dirty….or perhaps cleaning off and redone slightly lighter?
I’ve used dilute Tamiya buff for the basic dust and then used ground pastels and Mig pigments to give it a little variation, if anyone is interested. Starting to look like a heavily used vehicle in summer though….
Truck body started, inside and final side work will be done when assembled so it matches the cab end.
Doors just need glass, final window dust and interior finish …..
Cab pretty far along now. Not sure about the windscreen sweep, it looks a little “Lightning McQueen” at the moment. Possibly needs a final over all dust shot to tone down the starkness between clean and dirty….or perhaps cleaning off and redone slightly lighter?
I’ve used dilute Tamiya buff for the basic dust and then used ground pastels and Mig pigments to give it a little variation, if anyone is interested. Starting to look like a heavily used vehicle in summer though….
1/3
Yep, I’d agree with thatI would make the windshield no dirtier than the surrounding sheet metal.
 . Mind you, in this case that’s what it got
  . I just think it’s far more visible on clear plastic than it is on the body colour so I’ve overdone it. I’ve still got to do the side windows as well so it isn’t any hardship.
 I’m also going to re do it because I’m not that happy with the shape of the arc either. It should end before it gets to the windscreen rubbers. It’s not hard to redo, the buff colour comes off easily with a wipe of Windex.
1/3
That's looking great, Tim.
Nick
Thanks Nick, that’s very kind of you.

1/3
still working on the trumpeter titanic 
The dust effects are really good. Agree about the windscreen. Dust is maybe a bit heavy and the arcs are not positioned quite right. Worth redoing I think.
 getting there slowly
the driver figure came with the kit....passenger is from spares box.....think hes a driver from a jeep
Next i want to try misting on some dirt round the lower half.....add wheels and some bits n bobs.... and call it quits
- Joined
- Apr 27, 2018
- Messages
- 15,119
1/3
Paul coming on very nicely.
Legal Notice
scalemodelling.co.uk is a privately operated online discussion forum. All content posted by members reflects their own views and opinions and does not necessarily represent those of the forum owners or administrators. While reasonable efforts are made to moderate content, no responsibility is accepted for user-generated material. By using this site, you agree to comply with UK law and the forum rules.
Currently on our website
Threads
37,633
Messages
710,257
Members
2,678
Latest member
sprues_and_spitfires