Theme editor

Scale Model Shop

The Road to Singapore: Malaya 1941-42

Thread owner
Nice job on the base coat.......unusual characteristics in those paints to cause "chalking" when dry. Is it acrylic, lacquer or enamel base Tim? Rick H.
Rick, they are definitely water-based acrylics, because Hataka have a separate lacquer range. I was also using the dedicated Hataka thinner.

So who knows? All I can say is that I won't be rushing to use them again... Which is a shame, because I believe the colours are accurate.
 
Thread owner
Tim,
Are those tow cables on the rear engine plate? This is coming along very nicely, I've never considered a Japanese tank before but you've piqued my interest! Thanks
Steve
Steve, they are indeed tow cables.

I too had little interest in Japanese armour until I went to Japan a couple of years ago and bought the original Fine Molds kit. They are, indeed, fascinating little tanks which do not deserve the bad reputation that they seem to attract when people compare them to later war opponents such as the Sherman.

When you bear in mind that the Commonwealth forces had no tanks in Malaya in 1941/42, they were certainly more than adequate!
 
Thread owner
OK, so the next stage was definitely the most daunting.

Hand-painting camouflage is something I don’t believe I have tried since I was about twelve… and that would have been either an Airfix plane or a Matchbox tank.

There are other ways, of course. The most popular these days seems to be to use ‘crazy putty’ to mask the different layers of camo one after the other and then apply the colours with a airbrush. Or you can try and mask each area with multiple layers of masking tape.

However, both of these involve a lot of pre-planning and, it seems to me, an awful lot of work before you even get to put paint on the model. Plus this was, after all, a 
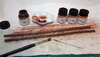
hand-painted pattern and I had a set of paints that were designed (apparently) for brush painting.

So who was I to argue?

That didn’t stop me from trying to be clever in other ways. Initially, I printed out some line drawings of the Ha-Go and started to map out the pattern on those with felt tip pens. But then I thought: “Just get on with it!” So I did…

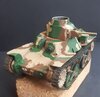
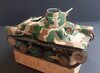
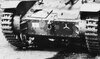
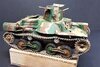
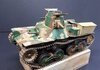
As I have said, the Type 95 I am depicting here must be one of the most comprehensively photographed examples of the Second World War, so at least I had something of a head start. However, the difficulties with old black and white photos are many and various. First off, we do not have a nice walk-around to show the tank from all angles. Secondly, even when we have what looks like a decent shot (like some of those above), the tricks of light and contrast simply make some of the tones simply disappear.

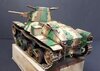
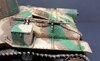
However, using the parts of the pattern which are visible - most notably the front of the hull, the turret side and the port side of the fighting compartment - I did my best to guess what else was going on. So I am certainly not suggesting that this is anything like 100% accurate…

View attachment 429946

View attachment 429947

View attachment 429948

View attachment 429949

View attachment 429950

View attachment 429951

View attachment 429952

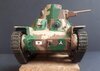
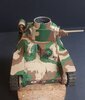
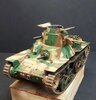
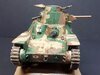
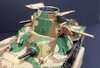
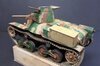
At this stage, with no washes or weathering, the results are a bit toy-like I admit. But then that is what the next stage is all about - making this look more like the real thing, albeit in miniature...
 

Attachments

  • 6fc8f4959baef6601ba38cc5972ac447915ccbed_2_516x500.jpg
    6fc8f4959baef6601ba38cc5972ac447915ccbed_2_516x500.jpg
    3.3 KB · Views: 0
  • fad7fad7adff47b8081cff872c1efedc9bbb7fad_2_690x421.jpg
    fad7fad7adff47b8081cff872c1efedc9bbb7fad_2_690x421.jpg
    2.4 KB · Views: 0
  • 84af0514b54eea34849c3ceab2eac4cd1f1dd375_2_485x500.jpg
    84af0514b54eea34849c3ceab2eac4cd1f1dd375_2_485x500.jpg
    3.1 KB · Views: 0
  • aec942dd1d95a5d4744540d630db52c0d9fac760_2_433x500.jpg
    aec942dd1d95a5d4744540d630db52c0d9fac760_2_433x500.jpg
    2.8 KB · Views: 0
  • f9f65e6b50df55a8b71ce800b5bbd819e4f83e3b_2_687x500.jpg
    f9f65e6b50df55a8b71ce800b5bbd819e4f83e3b_2_687x500.jpg
    2.7 KB · Views: 0
  • 988044b1005771149ba66a5d690d2644b6e8bfc3_2_690x488.jpg
    988044b1005771149ba66a5d690d2644b6e8bfc3_2_690x488.jpg
    2.4 KB · Views: 0
  • 8a6211db7807acbdd4dfcca62830bc9d6f26665f_2_422x499.jpg
    8a6211db7807acbdd4dfcca62830bc9d6f26665f_2_422x499.jpg
    2.8 KB · Views: 0
Nicely balanced pattern Tim. Should look the Dog's danglers once you have weathered it up. :thumb2: Rick H.
 
Thread owner
Thanks guys.

So here is the Ha-Go is chipped and weathered - but only up to a point. I am leaving the final dust wash and other details such as stowage until the diorama is further down the line…

View attachment 430548

View attachment 430549

View attachment 430550

View attachment 430551

View attachment 430552

View attachment 430553

View attachment 430554

View attachment 430555

The large stowage box, in particular, is only pre-shaded with oil washes at this stage and is going to need a lot more work to make it look more interesting. Here it is before I blended the paints…

View attachment 430556

The metal tracks were initially darkened with metal burnishing fluid, then speckled with various shades of Lifecolor rust tones (using an old paint brush and a toothpick to flick the paint on). I then built up the earth / dust layer using Wilder water-based washes. Finally I used sanding sticks and wire wool to buff up the metal and added the exposed linear surfaces on the inside (from where the wheels rub against the track runs and guide horns) with a graphite pencil.

View attachment 430557

Undoubtedly one of the finest aspects of the Dragon kits are the beautifully moulded machine guns.

View attachment 430558

The Type 97 heavy tank machine gun had some interesting modifications from the infantry version of the same weapon: a sighting telescope and a folding stock. The latter pivoted vertically and faced in the opposite direction (from 9 to 3 o'clock) when not required. Presumably it was most useful when the gun was used in the AA mount or dismounted. Given the very limited amount of space in the Ha-Go’s turret, it would seem most likely that the stock would be folded away when in this position. On the model this was achieved by carefully slicing off the stock at the mounting point and rotating it into the stowed position. Once painted up you can appreciate the exquisite detail on this slide-moulded piece.

View attachment 430559

Looking at the exterior you will also notice that the MG ball mounts themselves are painted black (actually a dark grey - black rarely works as a surface shade in this scale). I read somewhere that this was standard practice for Japanese tanks of the era - perhaps because the internal mounts were manufactured elsewhere from the tanks themselves.

Finally, there are the markings. This is another puzzling aspect of the kits, both of which claim to supply schemes for the Malayan campaign. The Dragon kit (at least the one I have) has neither of the markings needed for this particular tank. The Fine Molds kit does at least have the Imperial Japanese flag emblem. Yet neither have the inverted ‘Y’ which is prominent in the photos from the Bhakri battle. So I had to resort to some old-fashioned brush painting…

View attachment 430560

The white star on the rear plate actually came from an old 1/76 Allied decal sheet in my spares box. This was because both kits supplied a decal that attempted to reproduce the entire black surface of the plate, complete with the tank number. Instead I simply painted the entire plate black and then added the star. Interestingly, the number itself was written in Arabic numerals… presumably even the Japanese had to accept that, beautiful as their script may appear, it was not designed to be read at a distance! So, if anyone has a suggestion for the actual number I should apply to this tank, I will be very interested to hear it…
 

Attachments

  • 00860cf21b1b8bf1eb253948f4f8e030f7fd3e4c.jpg
    00860cf21b1b8bf1eb253948f4f8e030f7fd3e4c.jpg
    2.8 KB · Views: 0
  • 9dac6ce7b5278f15313e29cf47aa5d2c5ea936c8_2_439x500.jpg
    9dac6ce7b5278f15313e29cf47aa5d2c5ea936c8_2_439x500.jpg
    2 KB · Views: 0
  • bba11b6de142bf31716898c54d06bc6e3222c59c_2_690x322.jpg
    bba11b6de142bf31716898c54d06bc6e3222c59c_2_690x322.jpg
    1.7 KB · Views: 0
  • 47196eeea93ced9a5e03b1c2f51475dd6f681e22_2_477x500.jpg
    47196eeea93ced9a5e03b1c2f51475dd6f681e22_2_477x500.jpg
    3.4 KB · Views: 0
  • 43f07a2d88838a67a4672d2aa85f5dd3bbfafcff_2_668x500.jpg
    43f07a2d88838a67a4672d2aa85f5dd3bbfafcff_2_668x500.jpg
    2.7 KB · Views: 0
  • 01814fb6e4a0f630eb26cb2b1e63979f2750f25f_2_690x462.jpg
    01814fb6e4a0f630eb26cb2b1e63979f2750f25f_2_690x462.jpg
    3 KB · Views: 0
  • cad98a22886e2fd8f59e2343688c8f8bb72ef999_2_690x487.jpg
    cad98a22886e2fd8f59e2343688c8f8bb72ef999_2_690x487.jpg
    2.9 KB · Views: 0
  • 9f16767874dd00820784a748589a69b1354cebea_2_690x464.jpg
    9f16767874dd00820784a748589a69b1354cebea_2_690x464.jpg
    3 KB · Views: 0
  • d2525c48d44ad37fa6fa539945f299c3a24c5836_2_690x453.jpg
    d2525c48d44ad37fa6fa539945f299c3a24c5836_2_690x453.jpg
    2.7 KB · Views: 0
  • 43fbd89ca7c7e7059b8cedf50c0e398cc31405e2_2_690x482.jpg
    43fbd89ca7c7e7059b8cedf50c0e398cc31405e2_2_690x482.jpg
    2.8 KB · Views: 0
  • a223c0861577a27b903c2a7ba6b6add17e77aaa7_2_690x417.jpg
    a223c0861577a27b903c2a7ba6b6add17e77aaa7_2_690x417.jpg
    2.6 KB · Views: 0
  • 6aec74e09c22aa3751c49bb556e2527793d58876_2_690x388.jpg
    6aec74e09c22aa3751c49bb556e2527793d58876_2_690x388.jpg
    2.8 KB · Views: 0
  • bb8178514a5486cea037213025a0e6a59238472f_2_690x388.jpg
    bb8178514a5486cea037213025a0e6a59238472f_2_690x388.jpg
    2.6 KB · Views: 0
Looking sweet Tim.........liking the way you staggered the cammo on the road wheels. Rick H. :thumb2:
 
Tim,

That's turned out beautifully. A top, top job. Very well done.

That Life Color rust and dust set is brilliant too. It regularly comes out on my builds.

Again, well done.

Andrew
 
Thread owner
Looking sweet Tim.........liking the way you staggered the cammo on the road wheels. Rick H. :thumb2:
Thanks Rick.

Given the angle and quality of the available photos, it's impossible to know whether this is strictly accurate - but if the Japanese guys who painted these tanks were going to take so much trouble over the rest of the tank then I figured they would go for something interesting on the wheels...
 
Thread owner
Tim,

That's turned out beautifully. A top, top job. Very well done.

That Life Color rust and dust set is brilliant too. It regularly comes out on my builds.

Again, well done.

Andrew
Thanks Andrew.

I love those Lifecolor rust sets too. The dust is yet to come!
 
Thread owner
Looking great now Tim. Research is excellent as well.
Thanks Tim. This is a little celebrated corner of the Second World War in modelling circles, but I'm hoping to stimulate some interest!
 
Thread owner
 

Attachments

  • 55dc51461db34f28b4b9df0f9bfcef3b60865773_2_574x500.jpg
    55dc51461db34f28b4b9df0f9bfcef3b60865773_2_574x500.jpg
    2.8 KB · Views: 0
  • 7e683407d51a252e110bdcea6b1ef21cd1b67a3e_2_575x500.jpg
    7e683407d51a252e110bdcea6b1ef21cd1b67a3e_2_575x500.jpg
    3.5 KB · Views: 0
  • 325d19f477caa2032410e5ab6c37bd6bb0bec699_2_378x500.jpg
    325d19f477caa2032410e5ab6c37bd6bb0bec699_2_378x500.jpg
    3.1 KB · Views: 0
  • 12bce8610955ba4f1e5ecbff3d3a9a65d9dbe3ca_2_622x500.jpg
    12bce8610955ba4f1e5ecbff3d3a9a65d9dbe3ca_2_622x500.jpg
    3.1 KB · Views: 0
  • 34dbed6d000b011735de7157b736302d40ce3f78_2_628x499.jpg
    34dbed6d000b011735de7157b736302d40ce3f78_2_628x499.jpg
    3.3 KB · Views: 0
  • b7fdb001f8de0c230444919ebe4a31cc1475558b_2_642x499.jpg
    b7fdb001f8de0c230444919ebe4a31cc1475558b_2_642x499.jpg
    3.4 KB · Views: 0
  • f68ba472fcb7e368451808b6c21b1c7079785797_2_662x500.jpg
    f68ba472fcb7e368451808b6c21b1c7079785797_2_662x500.jpg
    3.3 KB · Views: 0
  • f3e030322ee65c23a72a05233572c102cfc4a9d9_2_529x500.jpg
    f3e030322ee65c23a72a05233572c102cfc4a9d9_2_529x500.jpg
    3.5 KB · Views: 0
  • 7842b3ebcba05b76ffda2705ef645e5919eca5e8_2_601x500.jpg
    7842b3ebcba05b76ffda2705ef645e5919eca5e8_2_601x500.jpg
    3.4 KB · Views: 0
  • cecfc2dd4e5d734d8c963b320f1c1cd7bf0981bd_2_690x478.jpg
    cecfc2dd4e5d734d8c963b320f1c1cd7bf0981bd_2_690x478.jpg
    3.6 KB · Views: 0
  • 874fe0784588d017ab9ec85cd3c68cd199ea50d9_2_592x500.jpg
    874fe0784588d017ab9ec85cd3c68cd199ea50d9_2_592x500.jpg
    3.9 KB · Views: 0
  • cdd54e4372435386b9e6bff3f61d8ee7297b6834_2_641x500.jpg
    cdd54e4372435386b9e6bff3f61d8ee7297b6834_2_641x500.jpg
    3.7 KB · Views: 0
  • 6f158f44aacc54ff68a36658993e23bd1290884c_2_323x500.jpg
    6f158f44aacc54ff68a36658993e23bd1290884c_2_323x500.jpg
    3 KB · Views: 0
  • 87d79332a7bc9f707bbbfd0ce7a009f90033198a_2_340x500.jpg
    87d79332a7bc9f707bbbfd0ce7a009f90033198a_2_340x500.jpg
    3.2 KB · Views: 0
  • dabca1225142a4e5985f4ee90d2373084623949e_2_690x454.jpg
    dabca1225142a4e5985f4ee90d2373084623949e_2_690x454.jpg
    3.3 KB · Views: 0
  • 14abadbd9398d5feb9a78cf3754ba8041ee70b23_2_650x499.jpg
    14abadbd9398d5feb9a78cf3754ba8041ee70b23_2_650x499.jpg
    4 KB · Views: 0
  • dfe8f0aa840f894b4204235a0f6eab7470fe3af1_2_625x500.jpg
    dfe8f0aa840f894b4204235a0f6eab7470fe3af1_2_625x500.jpg
    3.9 KB · Views: 0
Very well done Tim. That's a fine jungle on the perimeters of a rubber estate. Not many can get it right...you did it.

Cheers,
Richard
 
Really like the way you laid in the dead undergrowth and then brought in the top foliage to cover it all......top marks to you and your horticultural abilities! :thumb2: Rick H.
 
Back
Top