Theme editor

Scale Model Shop

The Road to Singapore: Malaya 1941-42

Thread owner
Very well done Tim. That's a fine jungle on the perimeters of a rubber estate. Not many can get it right...you did it. Cheers, Richard

Thanks Richard. It was pretty much a leap into the unknown, but I'm very happy with the way it turned out...
 
Thread owner
Really like the way you laid in the dead undergrowth and then brought in the top foliage to cover it all......top marks to you and your horticultural abilities! :thumb2: Rick H.

Thanks Rick. I will soon give a bit more detail of the trials and tribulations involved...
 
Thread owner
OK, so I’m giving myself a challenge.

IPMS Scale Model World at Telford is ON!! As I type the calendar says 56 days to go. I can do it, right?

It was 2 years ago (the last SMW due to you know what) that I took along my Italy, Liberation 1944 dio (my first since I was 16) and managed to bag a Silver medal. I imagine that the competition will be very lively this year, given that everyone has been bottled up for so long, so I’m taking nothing for granted, but it’s worth a shot. Anyway, it will be great just to be there with everyone else.

So that’s a deadline and I intend to meet it…

First, let me give a quick recap on all that vegetation. This will mostly be pictures, but it will give an idea of the amount of work that was involved.

The big lesson that I learnt here is this: THERE IS NEVER ENOUGH OF THE STUFF!

I started with a selection of laser cut paper ferns, etc.


View attachment 433999

These are beautifully detailed, but also very time-consuming. Of course, if I had been building a small vignette for a figure they would have served me just fine, but even after I had cut out and assembled quite a few of them, it was clear that they just weren’t going to fill out the area I had to cover.

So I had to look for alternatives.

View attachment 434000

View attachment 434001

View attachment 434002

These are bamboo. They come from China and most of them can be ordered on Amazon for only a few pounds. They come in three sizes and you get 100 pieces in a bag. The tallest ones actually have a thin strand of wire moulded inside to keep them erect, but the smaller ones tend to be a bit floppy.

Although they look a bit artificial at first, the detail is actually pretty impressive and with a bit of paint they can be made to look fairly convincing.

View attachment 434003

View attachment 434004

In order to help with painting I used cheap sanding blocks to keep them all in place, simply punching a hole and pushing in the plastic plant. I washed them first to get rid of any release agent. Everything was then given a generous spray of olive drab from a rattle can before they were sprayed and brush painted with various Vallejo acrylics.

And then there are others from the same source…

View attachment 434005

View attachment 434006

Now I am no botanist, so I have no idea if these are based on real plants and, even if they are, whether they are strictly appropriate for my Malayan jungle setting, but I always knew that they would end up surrounded by other foliage so, once they were painted, I hoped that they would look OK.

View attachment 434007

So once I had what I thought was a decent amount painted up I started to place them on the diorama. This was only a preliminary arrangement (they were just pushed into holes punched into the foamboard), but I soon realised that it wasn’t working. Everything just looked too sparse…

View attachment 434008

View attachment 434009

View attachment 434010
 

Attachments

  • 2fa16bcf64f1aa32771c0369956fff88fb0273f1_2_676x499.jpg
    2fa16bcf64f1aa32771c0369956fff88fb0273f1_2_676x499.jpg
    3.2 KB · Views: 0
  • 75ae788f1ce34c4bdbd467bc0d0e892d580bf0ae_2_281x500.jpg
    75ae788f1ce34c4bdbd467bc0d0e892d580bf0ae_2_281x500.jpg
    2.2 KB · Views: 0
  • fa10d0b89375784d9d7df8155c7954e7bb4b614d_2_690x388.jpg
    fa10d0b89375784d9d7df8155c7954e7bb4b614d_2_690x388.jpg
    1.8 KB · Views: 0
  • a275b4202200afebe448d8f608a772162bc88aaa_2_676x499.jpg
    a275b4202200afebe448d8f608a772162bc88aaa_2_676x499.jpg
    2.1 KB · Views: 0
  • 081cc731807d05f5e8e3dcfef5108908d19bf13a_2_281x500.jpg
    081cc731807d05f5e8e3dcfef5108908d19bf13a_2_281x500.jpg
    3.1 KB · Views: 0
  • 3eafb104855778519dd0368322eeb21c35fa281e_2_281x500.jpg
    3eafb104855778519dd0368322eeb21c35fa281e_2_281x500.jpg
    2.3 KB · Views: 0
  • 0b995e979b188a0c60aca96ffdd6f2f6f9387954_2_690x388.jpg
    0b995e979b188a0c60aca96ffdd6f2f6f9387954_2_690x388.jpg
    2.5 KB · Views: 0
  • 5ea10951b383218cd42b5fd52c9efc3ba03cbc1e_2_690x388.jpg
    5ea10951b383218cd42b5fd52c9efc3ba03cbc1e_2_690x388.jpg
    2.1 KB · Views: 0
  • b3f010269882050be7056230b0fa64afe767486f_2_690x388.jpg
    b3f010269882050be7056230b0fa64afe767486f_2_690x388.jpg
    2.4 KB · Views: 0
  • 6f2c3ce6afaf0c77027d5e399dcc39c57c6efb06_2_592x500.jpg
    6f2c3ce6afaf0c77027d5e399dcc39c57c6efb06_2_592x500.jpg
    3.9 KB · Views: 0
  • 434d260febd76ab0526062369cd2880888046c45_2_690x428.jpg
    434d260febd76ab0526062369cd2880888046c45_2_690x428.jpg
    2.9 KB · Views: 0
  • 3d572366899fed552d5488449ebf969f398a56ee_2_312x500.jpg
    3d572366899fed552d5488449ebf969f398a56ee_2_312x500.jpg
    3.1 KB · Views: 0
Hi Tim, you are obviously your worst and best critic in this case.........you are spot on about the sparseness of it all. You might try more plants in the foreground but with a much broader leaf design and a little more height. I don't envy you in this, as I think you have your work cut out for you. Suggestion, check Richards Dio. he did with the fruit vendor and a Honda motor scooter, don't recall the title.......he did some very interesting plant life that looked rather jungley to me.
Cheers, Rick H.
 
Tim, it was his (Richard's) dio chat thread on "Tropical Groundwork Scene" hope this helps. Rick H. :thumb2:
 
Thread owner
Thanks Rick,

Yes I remember Richard's dio and think he may have posted above.

As you will see, I found a fix of my own in the end.

Right at the start I had used some plant lining material in an attempt to add some root texture to the base - simply gluing it in place and then ripping it off to leave a sort of ‘hairy’ surface. The problem was that, by the time it had been painted, it hardly showed at all.

So I decided to go for a material which I haven’t used in years and which, I suppose, is very old school: rubberised horsehair.

View attachment 434049

View attachment 434050

This was something of a game changer. It’s also very cheap and quick and easy to apply. Most importantly, it gave me some texture and volume beneath the actual foliage. I have no idea if this is really true to nature, but to me it did the trick.

You will also see how in these images how I put the grass in place along the side of the road. This was a mixture of static grass (applied with a simple metal sieve and battery applicator that I bought years ago from a model railway show) and grass tufts. It looks more convincing once it has all been painted.

Now, back to the other green stuff…

Realising that, even with the horsehair fix, I simply did not have enough plants, I ordered some more of the cheap Chinese ones. I also splashed out on a few slightly nicer ones (albeit still moulded in a rubber-like plastic). These came from Fields of Glory Models (fogmodels on ebay).

As before I gave them a blast of Olive Drab before adding some more colour variety with an airbrush.

View attachment 434051

I tried to vary the shades of green - some are definitely more blue than yellow - and I also reminded myself that some plants are not green at all … for example here are a couple I saw just wondering around my area of northwest London:

View attachment 434052

View attachment 434053

So a few of them have gone down the purple/rust-coloured root.

In the end when I assembled my cast of characters it was quite an impressive sight…

View attachment 434054
 

Attachments

  • 02ac8c26d6c528b36177133a964c31a3b2cf0ac4_2_281x500.jpg
    02ac8c26d6c528b36177133a964c31a3b2cf0ac4_2_281x500.jpg
    3 KB · Views: 0
  • 22b389d6cc60f3f9d422bf3d15270ad81d599f31_2_690x395.jpg
    22b389d6cc60f3f9d422bf3d15270ad81d599f31_2_690x395.jpg
    2.5 KB · Views: 0
  • a32e617720a52d01d2ea1f81b75380ba07616623_2_281x500.jpg
    a32e617720a52d01d2ea1f81b75380ba07616623_2_281x500.jpg
    2.9 KB · Views: 0
  • ba1d5a4d9114ac208fd1a4d4946033938349de3e_2_676x499.jpg
    ba1d5a4d9114ac208fd1a4d4946033938349de3e_2_676x499.jpg
    2.7 KB · Views: 0
  • 61866765fba1483807ba09c2f45b891b57ec1f86_2_690x388.jpg
    61866765fba1483807ba09c2f45b891b57ec1f86_2_690x388.jpg
    2.4 KB · Views: 0
  • 983b114fa5a195781bcf2e3b7d980968fea4fc65_2_690x452.jpg
    983b114fa5a195781bcf2e3b7d980968fea4fc65_2_690x452.jpg
    2.9 KB · Views: 0
Thread owner

Attachments

  • 297314a1a4d0070013d2c70283a162b0e782375a.jpg
    297314a1a4d0070013d2c70283a162b0e782375a.jpg
    2.9 KB · Views: 0
  • 8cc03819e214da26bb2e5caf1ab529bcb7874dad.jpg
    8cc03819e214da26bb2e5caf1ab529bcb7874dad.jpg
    2.8 KB · Views: 0
  • 207d94e0a97bfb2731c6757a74605a48255a96f5.jpg
    207d94e0a97bfb2731c6757a74605a48255a96f5.jpg
    4.1 KB · Views: 0
  • 10f2bd031940037aea15562dbe2ff4aec1270d8c.jpg
    10f2bd031940037aea15562dbe2ff4aec1270d8c.jpg
    3 KB · Views: 0
  • bb06e5a7b300100ee6927adda82c0f062cc46da7.jpg
    bb06e5a7b300100ee6927adda82c0f062cc46da7.jpg
    2.8 KB · Views: 0
Thread owner
Thanks so much guys.

It’s certainly going to be a while before I plan any more jungle dios - too much greenery. Italy was a doddle by comparison. In fact, my next stop is probably going to be the Ardennes Offensive - so at least it will be Europe in the winter!

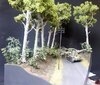
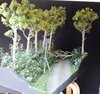
As a little aside, here is how I went about the telegraph pole. This is an important part of the scene, because it features prominently in the photographs of Parsons’ 2 pounder.

The poles along the Bakri road were quite distinctive. As well as being very tall, they had a thicker base with a high band of white paint to mark the sides of the road (where there appears to have been a slight ditch). They also had an uneven number of insulators - six on the road side, four on other.

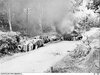
The best view comes from the shots of the burning Ha-Gos further up the road:

View attachment 434469

I am assuming that the wires were brought down when the trees were cut down just after the battle, although it’s impossible to be sure. I suppose it might just as easily have been part of a desperate ‘scorched earth’ policy by the retreating Commonwealth troops who would have wanted to ensure that the advancing Japanese had no means of intercepting the telephone network behind the rapidly diminishing lines.

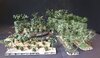
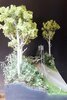
Anyway, the basis for my telegraph pole was the venerable Miniart set, although I used a wooden dowel for the pole and made the thicker base from a sleeve of plastic tube. I then added the cross pieces and insulators from the Miniart set and added some brackets from plastic strip, plus some suitable bolt heads.

View attachment 434470

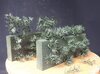
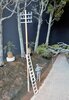
The ladder, which also features prominently in the most famous photo, was scratch built from lengths of square U-shaped plastic rod with added brass.

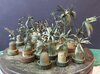
The pole assembly was then painted with Vallejo acrylics…

View attachment 434471

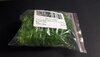
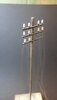
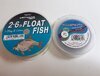
So far so good. But then I had to work out how to make the sagging wires and attach them to the insulators. After a bit of online research I came across two options: fishing line (0.14mm) and fine gauge wire (0.15mm / 34 gauge).

View attachment 434472

These are not only very cheap, but also come in very long reels - so enough for the rest of my life time I suspect!

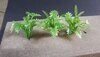
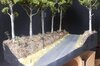
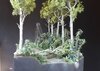
The image two steps above shows the first attempt with fishing line. As you can see, it sags quite nicely, but it’s the wrong colour. It’s also not prone to sharp bends, so it had a tendency to stick out either side of the insulators before it sagged.

Then I tried the wire, which has a realistic gun metal finish and will take sharp bends - but I found it too stiff to achieve a realistic sag.

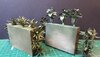
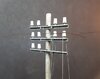
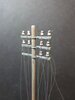
So in the end I compromised by using the fishing line, which I sprayed with a gun metal colour, for the actual telephone lines and the wire to tie the fishing line to the insulators. This was tricky, because I had to create a loop of the wire to ‘lasso’ the fishing line in place (temporarily fixed with fast drying super glue). I then used slow-drying black super glue to flood the metal wire and, when it was dry, I snipped the excess away.

View attachment 434473

View attachment 434474

This did, however, have he desired effect - and was also more realistic, since the real wires are often tied to the ceramic pots in a very similar way.

The fact that the wires are now painted in a dark metal colour means that they are almost invisible to the naked eye unless they catch the light or stand out in silhouette - just like the real thing… Job done!
 

Attachments

  • fa6a4277bc360d5873b871ec15f5ac06b6935eef.jpg
    fa6a4277bc360d5873b871ec15f5ac06b6935eef.jpg
    2.9 KB · Views: 0
  • 785fd74a6ca3dbc3139d074890fcf65ee8b5295c_2_345x500.jpg
    785fd74a6ca3dbc3139d074890fcf65ee8b5295c_2_345x500.jpg
    3.1 KB · Views: 0
  • cae06048dae35d99ac609697c4ed3f0253866147_2_281x500.jpg
    cae06048dae35d99ac609697c4ed3f0253866147_2_281x500.jpg
    1.4 KB · Views: 0
  • 381415499a604bc8924312c750b955e141c873e9_2_666x500.jpg
    381415499a604bc8924312c750b955e141c873e9_2_666x500.jpg
    2.6 KB · Views: 0
  • 407abe5a439580f7618e8b7d4bd2f40fbecfe1b4_2_634x500.jpg
    407abe5a439580f7618e8b7d4bd2f40fbecfe1b4_2_634x500.jpg
    1.9 KB · Views: 0
  • ccdc8cdb7d5781915ee4543bfa7b7f86efcff53d_2_375x500.jpg
    ccdc8cdb7d5781915ee4543bfa7b7f86efcff53d_2_375x500.jpg
    1.8 KB · Views: 0
Tim

Just had a quick catch-up. The road looks brilliant!!

I've found fishing line works really well for wire too. As an occasional fisherman, having been obsessed by it my youth, I have several different breaking strength lines and diameters to choose from. As you say it will last you a lifetime. In my case I just brush painted it with Vallejo's black primer.

Keep up the great work.

ATB.

Andrew
 
Back
Top