
You are using an out of date browser. It may not display this or other websites correctly.
You should upgrade or use an alternative browser.
You should upgrade or use an alternative browser.
Dave W's 1/24 Spitfire Vb
- Thread starter Dave W
- Start date
- Status
- Not open for further replies.
Thanks Steve.Im at work at the moment,So couldn't have a proper look\ said:There is. Images 29 and 30, with the seat removed (if I've counted right). 29 is the best showing the trim wheels and , because the seat is removed, the electrical panel/fuse box.Cheers
Steve
Found it.No cables ,But a few black panels to make\ said:There is. Images 29 and 30, with the seat removed (if I've counted right). 29 is the best showing the trim wheels and , because the seat is removed, the electrical panel/fuse box.Cheers
Steve
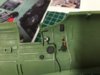
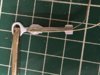
Had another go at the Spitfire today.There isn't a lot of detail on the cockpit sidewalls.So I've had a go at scratch building some using wire and scrap plastic.Ive not done much scratch building before and am finding this fun.It is time consuming though.
View attachment 98233
View attachment 98234
View attachment 98235
View attachment 211256
View attachment 211257
View attachment 211258
View attachment 98233
View attachment 98234
View attachment 98235
View attachment 211256
View attachment 211257
View attachment 211258
Attachments
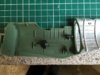
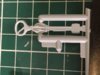
Got some more done this evening.Seat belts painted and fitted to seat after cutting slots in the seat and bulkhead to thread them through.Instrument panel and seat bulkhead glued to fuselage halves.Ive decided not to do any more scratch building in the cockpit.Even in this scale most of it can't be seen.Ive also glued the engine side cowlings to the fuselage halves and glued a few more bits together.I need some mesh for the under wing radiator.Thought I had something suitable in the spares box but can't find it at the moment.
View attachment 98828
View attachment 98829
View attachment 98830
View attachment 98831
View attachment 211851
View attachment 211852
View attachment 211853
View attachment 211854
View attachment 98828
View attachment 98829
View attachment 98830
View attachment 98831
View attachment 211851
View attachment 211852
View attachment 211853
View attachment 211854
Attachments


I've put some plastic card on the inside of the engine cowling cut outs so I've got something to glue the exhausts to .\ said:Looks nice Dave. So, what are your plans for the exhaust manifolds ? Will the engine still be in place even if not visible ? ( I have one of these to build in the future)
View attachment 99069
View attachment 99070
View attachment 99072
View attachment 99073
View attachment 99074
View attachment 99075
View attachment 99076
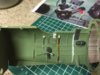
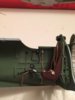
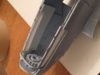
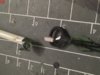
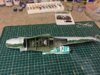
I've added some detail to the control column.There should be 3 pipes down the aft side.Ive added these using fuse wire.Airfix don't include a button on the spade grip for firing the guns.Ive used a piece of scrap plastic for this.Its probably over scale,but the real thing was quite big anyway.The kit supplied compass is too small and not very convincing.So I made one from sprue and plastic card.Then I applied a decal from the instrument panel decal set to it before attaching it to the instrument panel.Then I glued the fuselage halves together and attached the top cowling panel.This panel has not been moulded properly and has a sunken area which Ive applied some filler to.Next job is to mask the cockpit opening and then sand down all the rivets on the fuselage.View attachment 212092
View attachment 212093
View attachment 212095
View attachment 212096
View attachment 212097
View attachment 212098
View attachment 212099
View attachment 99070
View attachment 99072
View attachment 99073
View attachment 99074
View attachment 99075
View attachment 99076
I've added some detail to the control column.There should be 3 pipes down the aft side.Ive added these using fuse wire.Airfix don't include a button on the spade grip for firing the guns.Ive used a piece of scrap plastic for this.Its probably over scale,but the real thing was quite big anyway.The kit supplied compass is too small and not very convincing.So I made one from sprue and plastic card.Then I applied a decal from the instrument panel decal set to it before attaching it to the instrument panel.Then I glued the fuselage halves together and attached the top cowling panel.This panel has not been moulded properly and has a sunken area which Ive applied some filler to.Next job is to mask the cockpit opening and then sand down all the rivets on the fuselage.View attachment 212092
View attachment 212093
View attachment 212095
View attachment 212096
View attachment 212097
View attachment 212098
View attachment 212099
Attachments
It's a crap kit Alan.But I have this strange desire to try to improve it and build something half decent.It will soon be time to tackle that wing dihedral problem.\ said:Awsome stuff dave , it's not a nice kit really is it but your doing a great job")
I agree mate and your doing a great job so far , I really want to see that dihedral problem and how you go about it , I found the the underside of the wings was pretty much right but the top pushed them down due to how thin the plastic is on the underside
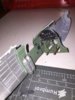
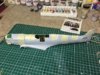
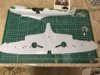
My idea is to fix the lower wing section to a base and support the wing tips.Then build a spar from plastic card probably about 10 mm back from the leading edge.That should stop the wing flexing when the fuselage and upper wings are fitted.We shall see....\ said:I agree mate and your doing a great job so far , I really want to see that dihedral problem and how you go about it , I found the the underside of the wings was pretty much right but the top pushed them down due to how thin the plastic is on the underside
View attachment 99164
View attachment 99165
View attachment 99166
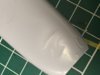
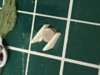
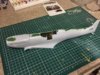
I've spent two hours this evening sanding down rivets and joins on the fuselage.Then I applied some filler to the joins.More sanding tomorrow.Ive also glued the gun hatches to the lower wing after sanding them to fit.I will start building a wing spar soon.View attachment 212187
View attachment 212188
View attachment 212189
View attachment 99165
View attachment 99166
I've spent two hours this evening sanding down rivets and joins on the fuselage.Then I applied some filler to the joins.More sanding tomorrow.Ive also glued the gun hatches to the lower wing after sanding them to fit.I will start building a wing spar soon.View attachment 212187
View attachment 212188
View attachment 212189
Attachments
- Status
- Not open for further replies.
Legal Notice
scalemodelling.co.uk is a privately operated online discussion forum. All content posted by members reflects their own views and opinions and does not necessarily represent those of the forum owners or administrators. While reasonable efforts are made to moderate content, no responsibility is accepted for user-generated material. By using this site, you agree to comply with UK law and the forum rules.