Theme editor

Scale Model Shop

Jim R's Eduard Fw 190-8/R2

Thread owner
Thanks guys for your support.

As Tony (Yak Face) says this is a great kit. Fiddly but the fit is superb. It almost clicks together like Lego :D
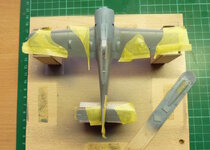
I am now ready for primer. I have built a simple jig to hold it and used the spare rear canopy rather than fit and mask the one I'm going to use. The kit provides a clear part for open canopy and for closed. I'll use the closed to 'mask' the cockpit as I'll actually use the open version.
Click image for larger version  Name:	P1070899.jpg Views:	0 Size:	100.7 KB ID:	1248301

Click image for larger version  Name:	P1070900.jpg Views:	0 Size:	98.2 KB ID:	1248302

The drop tank fits perfectly but you need 3 hands to fit it!

Click image for larger version  Name:	P1070901.jpg Views:	0 Size:	108.6 KB ID:	1248303

The undercarriage is very fiddly to put together correctly. I didn't use a PE part but I did drill out the plastic part.
Click image for larger version  Name:	P1070899.jpg Views:	0 Size:	100.7 KB ID:	1248301

Click image for larger version  Name:	P1070899.jpg Views:	0 Size:	100.7 KB ID:	1248301
Thanks again.
 
Excellent progress Jim , I did the same with the canopy . I also did the same with the scissor links , the PE replacement looked too thin and cutting off the moulded ones would have been a pain .cheers tony
 
Thread owner
I've got some paint on. All MRP.
Masked up (sorry about the strange colour - camera setting was wrong :()
Click image for larger version  Name:	P1070915.jpg Views:	0 Size:	125.3 KB ID:	1249205

Masked remove and no touch ups needed :)
Click image for larger version  Name:	P1070916.jpg Views:	0 Size:	116.2 KB ID:	1249204
Still a way to go as there are the dreaded mottles and having seen how well others have done I'm rather nervous. Also there is a black front end with a zig-zag edge to it with a white line!!
 

Attachments

  • P1070915.jpg
    P1070915.jpg
    125.3 KB · Views: 0
It's coming on well Jim. I'm sure a man of your skills will make a good job of the mottling. Just take your time.
 
Hope the rest of your masking goes as well as it did for the camo Jim. Good luck with the mottling.

Nick
 
Thread owner
Thanks for all the nice posts. Helps boost the mojo :)

Making progress. Mottles done and the armour plating below the cockpit painted.

Then there came the fun bit. There is a zig-zag black area below the cockpit/just above the wing. A decal is supplied but it only includes the top zig-zag part and so the rest of the black has to be painted. To my mind that would never work - matching black paint to the decal black.
This is the decal. Difficult to see but there is also a thin white line along the top.
P1070919.jpg

So by tracing the decal and transferring the zig-zag to masking tape and then masking the rest I ended up with this.
P1070918.jpg
Looks a bit of a mess but the edges were burnished down well with a Q-tip thingy and fingers were crossed and prayers were said!

To be honest I'm dead chuffed with the result :D
P1070920.jpg

P1070921.jpg

Now to figure out how to paint the thin white line along the top edge.

My usual glacial rate of progress will slow even more as I'm away for three weeks. I'll have no bench time but I'll be able to enjoy all your wonderful builds.
 
Excellent bit of masking Jim. Good luck with the white bit.....

Nick
 
Hi Jim,
Apologise for not being here at the beginning and have read and seen the progress so far. My episode on Christmas eve pales compared to what you went through. good to know your good wife's leg is mending well.
In the meantime your build is looking great and very neat. It's always a pleasure when the kit fits like Lego. Love the paint work and mottling, masking decision turned out well and canopy idea, brilliant. If only other brands gave extra canopies to help with the masking. For the white dash, you only need four pieces of masking tape and you're done.
Happy holidays.

Cheers,
Wabble
 
Back
Top