
You are using an out of date browser. It may not display this or other websites correctly.
You should upgrade or use an alternative browser.
You should upgrade or use an alternative browser.
Revell 1/32 Arado 196A-3
- Thread starter Vaughan
- Start date
- Status
- Not open for further replies.
I've been away this last few days or so, so I have missed the progress on you model Vaughan. It's looking really good, the level of detail is outstanding and I'm sure you will make a great job of it......
Cheers,
Ron
Cheers,
Ron
Hi All
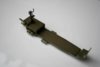
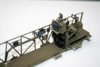
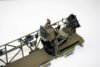
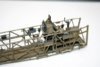
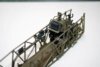
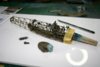
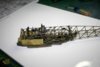
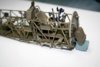
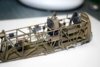
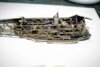
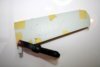
Have spent most of today completing the fuselage internal framework. Here are some images of the various stages. All went together well with no hiccups. It all started off looking and feeling very flimsy but it is surprising how strong it has became now that it is complete. I have pre threaded the fishing line through the lower fuselage plate in readiness for it to be attached to the frame work and then ultimately to the fuselage it's self. The next challenging bit will be inclosing it within the fuselage.
Vaughan
View attachment 39886
View attachment 39887
View attachment 39888
View attachment 39889
View attachment 39890
View attachment 39891
View attachment 39892
View attachment 39893
View attachment 39894
View attachment 39895
View attachment 39896
View attachment 39897
View attachment 39898
View attachment 39899
View attachment 39900
View attachment 39901
View attachment 152912
View attachment 152913
View attachment 152914
View attachment 152915
View attachment 152916
View attachment 152917
View attachment 152918
View attachment 152919
View attachment 152920
View attachment 152921
View attachment 152922
View attachment 152923
View attachment 152924
View attachment 152925
View attachment 152926
View attachment 152927
Attachments
-
 _MG_0001.jpg4.6 KB · Views: 0
 -
 _MG_0004.jpg5.5 KB · Views: 0
 -
 _MG_0005.jpg5.4 KB · Views: 0
 -
 _MG_0006.jpg5.5 KB · Views: 0
 -
 _MG_0007.jpg5.4 KB · Views: 0
 -
 _MG_0008.jpg5.3 KB · Views: 0
 -
 _MG_0016.jpg5.4 KB · Views: 0
 -
 _MG_0017.jpg5.2 KB · Views: 0
 -
 _MG_0029.jpg5.6 KB · Views: 0
 -
 _MG_0032.jpg5.3 KB · Views: 0
 -
 _MG_0033.jpg5.4 KB · Views: 0
 -
 _MG_0035.jpg5.6 KB · Views: 0
 -
 _MG_0036.jpg5.7 KB · Views: 0
 -
 _MG_0037.jpg5.5 KB · Views: 0
 -
 _MG_0038.jpg5.4 KB · Views: 0
 -
 _MG_0039.jpg5.3 KB · Views: 0
Fantastic vaughan!! This really is a lovely looking kit, and the painting and dry brushing in the cockpit is excellent. cheers tony
G
Guest
Guest
This is a hugely impressive build, looking forward to the finished model
Hi Dave
The leather effect on the gunners seat is a bit of a hit or miss affair. I started off by brushing on Modelair Dark Earth. Modelair is not meant to be brushed as it doesn't cover very well. But I take advantage of this as it goes on quite streaky and dries quickly and by building up the layers you get quite a good effect. I then finish off by adding a drop or two of modelair black to a small cup of water. This will give you a really dilute wash. This is also brushed on once the dark earth is dry. Once dry I then apply some more. I think the trick is not to be too neat when brushing it and almost taking it off and then reapplying it. I hope that makes sense.
Vaughan
Help!!!!
Hi All
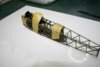
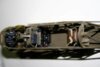
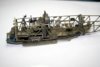
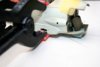
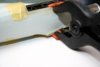
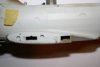
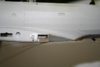
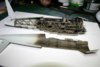
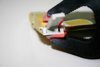
Well after the completion of the internal fuselage with no problems thing seem to have gone down hill. The dry fit of the fuselage is going to be a bit of a challenge see images. The halves fit nicely together but there seems to be an issue with the lower fuselage mating around the wing roots. It seems that the fuselage is narrower than the lower section and needs considerable pressure to splay it out. I have tried putting clamps on and this seems to work although the fuselage is under a lot of pressure. I think I'm going to have to go down the route of using extra thin liquid poly cement, relying on the capillary action to flow around the wing roots, as I think I'm going to have clamp it first. I've never used this type of cement before so any hints and tips on how to use it would be greatly appreciate.
Vaughan
View attachment 40004
View attachment 40005
View attachment 40006
View attachment 40007
View attachment 153030
View attachment 153031
View attachment 153032
View attachment 153033
Hi All
Well after the completion of the internal fuselage with no problems thing seem to have gone down hill. The dry fit of the fuselage is going to be a bit of a challenge see images. The halves fit nicely together but there seems to be an issue with the lower fuselage mating around the wing roots. It seems that the fuselage is narrower than the lower section and needs considerable pressure to splay it out. I have tried putting clamps on and this seems to work although the fuselage is under a lot of pressure. I think I'm going to have to go down the route of using extra thin liquid poly cement, relying on the capillary action to flow around the wing roots, as I think I'm going to have clamp it first. I've never used this type of cement before so any hints and tips on how to use it would be greatly appreciate.
Vaughan
View attachment 40004
View attachment 40005
View attachment 40006
View attachment 40007
View attachment 153030
View attachment 153031
View attachment 153032
View attachment 153033
Attachments
G
Guest
Guest
Vaughan, an excellent build thread with some great detailing. The seat texture and colour looks superb. Look forward to seeing more : )
Hi Vaughan. Your work is up to it's usual very high standards so far.
I've heard of folks using all sorts of glues to fix the kind of problem you've got. Trouble is, the pressure caused by the fuselage trying to return to it's 'natural' narrow profile could pull the joint apart or distort it in some way. Is there no room for some sort of spacer between the two sides? An off-cut of sprue perhaps wedged between the sides would help relieve the pressure on the joint.
Gern
Vaughan looking back to the last set of pictures you posted ( no16 ) it looks like the wire you fitted is just lifting the frame work up a little this could be causing the fit problem is there a way of you checking
Hi Dave
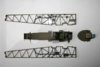
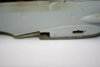
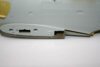
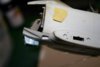
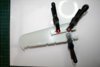
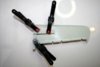
Thanks for your advice and Ian for your observations. The No16 photo was taken before I had glued the framework to the lower fuselage so that gap was closed up. Dave that was a good idea but I had a rethink. I went down to my local model shop and bought some plastic weld. Looking at the problem again and what I should have done in the first place was glue one half of the fuselage and then follow up with the second half. Using the plastic weld and taking advantage of the capillary action I squeezed the wing root so it was in the right position and then applied the plastic weld with a brush. I didn't have to hold it very long before it set. I then went through the same process in front of the wing root and behind which I think you call the fillet and then that just left the underside where it buts up to the rest of the fuselage. A small amount of filler was required on the fillet and underside. I'm pleased with the result. Next was joining the two halves. Firstly I glued the forward facing machine gun again using the plastic weld. Once this had set I concentrated on the wing root using the same method as before. A little filler was required again. That just left the join in front of the cockpit again using the plastic weld. All that remains is to join the spine top and bottom and the tail fin. Fingers crossed that will work out ok.
Vaughan
View attachment 40020
View attachment 40021
View attachment 40022
View attachment 40023
View attachment 40024
View attachment 40025
View attachment 40026
View attachment 40027
View attachment 40028
View attachment 153046
View attachment 153047
View attachment 153048
View attachment 153049
View attachment 153050
View attachment 153051
View attachment 153052
View attachment 153053
View attachment 153054
Attachments


Hi All
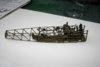
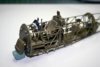
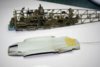
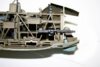
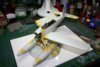
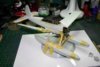
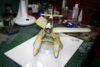
Well I think I'm going to give the fuselage a bit of a rest at the moment although I've yet to fit the radial engine. It will most probably be easier to leave it off until some of the painting is done. Anyway I thought I would make a start with the wings one being folded the other being in the flight position. Revell have made it easy in the fact you have quite substantial wing locating pegs which also enable you to paint the wings prior to attaching them. The folded wing locating peg was a bit of a pig to get lined up correctly, even though there are guide slots, so I had to dry fit the wing halves together to ensure a perfect fit. While the wings were taped together I thought I might as well try a dry fit and attach the fuselage to the floats add the tail plane and rudder and also pop the wings on just to get an idea of what she will look like. She is going to look quite impressive especially on the stand. This isn't a small model although having one folded wing will help it not taking up too much room on the shelf.
Vaughan
View attachment 40157
View attachment 40158
View attachment 40159
View attachment 40160
View attachment 40161
View attachment 40162
View attachment 40163
View attachment 153183
View attachment 153184
View attachment 153185
View attachment 153186
View attachment 153187
View attachment 153188
View attachment 153189
Attachments
You know Vaughan, I know we know how much work has gone into this build, and this must have been said so many times, but such a shame to cover it all up with the fuselage sides, even temporarly.
Still a good looking build though.
Keep up the good work.
Tony.
Still a good looking build though.
Keep up the good work.
Tony.
- Status
- Not open for further replies.
Legal Notice
scalemodelling.co.uk is a privately operated online discussion forum. All content posted by members reflects their own views and opinions and does not necessarily represent those of the forum owners or administrators. While reasonable efforts are made to moderate content, no responsibility is accepted for user-generated material. By using this site, you agree to comply with UK law and the forum rules.