
You are using an out of date browser. It may not display this or other websites correctly.
You should upgrade or use an alternative browser.
You should upgrade or use an alternative browser.
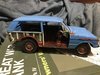
SimonT - 4x4 1/24 Esci Range Rover
- Thread starter SimonT
- Start date
Hi Simon
Building looks great.
Jim
Building looks great.
Shame that Tamiya and others don't make bigger bottles of common colours.Took two of their stupid little bottles - the old large bottles were much more useful!
Jim
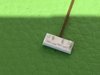
Ian / Fernando - thanks both. The tap is based on one I saw somewhere - brass tap piped up with blue plastic pipe rather than copper. It will give a nice splash of colour
Jim - thanks, I'm quite chuffed with how it is going so far but it would have been better if I had come up with a method of making the roof removable for painting! The 10ml Tamiya pots are far too small - the old 23ml ones were a much better size from the modellers perspective. I suppose from Tamiyas side it means they sell a lot more small ones :thinking:
View attachment 315903
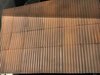
sneaked half an hour when I got home from work to make a start on the roof - splotchy spray of brown followed by the brown mixed with red followed by some rusty pigment mixed with X20a thinner
It will get a few more rust shades of pigment then a coat of AK worn effects. The galvanised steel top coat will be light grey/white splotchy. Once that is done the fun part can be carried out - scratching it off again
I will have to be careful though as the corrugated roof is only made from thin cardboard so won't take too much punishment
View attachment 315900
test fitted the wheels and tyres - by swapping them around between axles I found a permutation that allows all four to sit on the ground :thumb2:
View attachment 315902
View attachment 315901
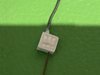
I also made a two way consumer unit with incoming cable and outgoing conduit to a two gang switched metalclad socket outlet - may have to redo them as they look a bit shabby. 2/10 must try harder
Jim - thanks, I'm quite chuffed with how it is going so far but it would have been better if I had come up with a method of making the roof removable for painting! The 10ml Tamiya pots are far too small - the old 23ml ones were a much better size from the modellers perspective. I suppose from Tamiyas side it means they sell a lot more small ones :thinking:
View attachment 315903
sneaked half an hour when I got home from work to make a start on the roof - splotchy spray of brown followed by the brown mixed with red followed by some rusty pigment mixed with X20a thinner
It will get a few more rust shades of pigment then a coat of AK worn effects. The galvanised steel top coat will be light grey/white splotchy. Once that is done the fun part can be carried out - scratching it off again
I will have to be careful though as the corrugated roof is only made from thin cardboard so won't take too much punishment
View attachment 315900
test fitted the wheels and tyres - by swapping them around between axles I found a permutation that allows all four to sit on the ground :thumb2:
View attachment 315902
View attachment 315901
I also made a two way consumer unit with incoming cable and outgoing conduit to a two gang switched metalclad socket outlet - may have to redo them as they look a bit shabby. 2/10 must try harder
Attachments
- Joined
- Apr 27, 2018
- Messages
- 15,123
1/3
Simon,
Great work on the consumer unit and roof.
Great work on the consumer unit and roof.
Great stuff. It's good to see your mojo flag flying. You seem really stoked with this effort. PaulE
Oooh Paul, careful now...he'll get so stoked that he might just start on another project or build. I'm happy that this is seeing the light. :smiling6::tears-of-joy:
Cheers,
Richard
Paul - yes, I have been enjoying this one
Scottie - ta. Consumer unit and socket could be better - they seem to be a bit on the wonky side looking at them now
Richard - there are always plenty of other builds waiting to start.......
Jim - thanks. Not convinced by the leccy stuff so may redo
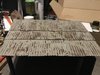
Managed not to fall asleep so did some more on the roof
Sprayed a good coat of AK Worn Effects then when that had dried a blotchy coat of Tamiya medium grey with an overspray of the lighter JA Grey
Wetting the surface to activate the peeling process caused the roof panels to start lifting, bending and generally going a bit wonky
View attachment 316116
as I suspected from previous use the AK fluid has removed all tonal variation from the base coat
I had various shades of red brown and orange brown at the start but now it all looks pretty much a uniform dark brown
Nevermind, it will get some more pigments which will hopefully lift the rust shades and make it less uniform
Scottie - ta. Consumer unit and socket could be better - they seem to be a bit on the wonky side looking at them now
Richard - there are always plenty of other builds waiting to start.......
Jim - thanks. Not convinced by the leccy stuff so may redo
Managed not to fall asleep so did some more on the roof
Sprayed a good coat of AK Worn Effects then when that had dried a blotchy coat of Tamiya medium grey with an overspray of the lighter JA Grey
Wetting the surface to activate the peeling process caused the roof panels to start lifting, bending and generally going a bit wonky
View attachment 316116
as I suspected from previous use the AK fluid has removed all tonal variation from the base coat
I had various shades of red brown and orange brown at the start but now it all looks pretty much a uniform dark brown
Nevermind, it will get some more pigments which will hopefully lift the rust shades and make it less uniform
Attachments
Nice work Simon pity about the tonal variation loss, ( I'm sure you'll get it back ), but I think the warping and lifting of the sheets as made them look better ( older looking ).
G
Guest
Guest
Simon.
Stand away from that roof ! Its perfection.
Nice touch with the 15mm cold pipe and tap.
Your defiantly enjoying this.
John.
Stand away from that roof ! Its perfection.
Nice touch with the 15mm cold pipe and tap.
Your defiantly enjoying this.
John.
Ian/Jim - I think you are right. The warped panels do look better :smiling:
Mick - thanks
John - sorry sir but I just couldn’t leave it alone it looked too one dimensional. Hope you approve of the next stages
View attachment 316229
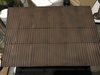
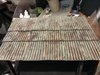
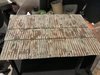
Last night (well about 2am this morning!) I propped the building up so the roof was level then gave it a wash of thinned Tamiya XF-1 so that it sat in the troughs of the sheets
View attachment 316230
This morning I have wet brushed (like dry brushing but with more paint) it with light grey back and forth across the peaks of the sheets and fixings then a dry brush with white in a few random places just to give a little variation in tone and bring out the wavyness of the corrugated sheets
I added a few patches of moss in joints - a mix of green pastel chalk, 1mm flock and VJ pigment fixer
Some of the rusty spots then got treated with Dieter Etzel Old rust FX (wonder where he ended up) to liven them up a bit
All the horizontal panel joints then got artificial shadows using black pastel chalk
I think it has turned out ok and it was good fun
Mick - thanks
John - sorry sir but I just couldn’t leave it alone it looked too one dimensional. Hope you approve of the next stages
View attachment 316229
Last night (well about 2am this morning!) I propped the building up so the roof was level then gave it a wash of thinned Tamiya XF-1 so that it sat in the troughs of the sheets
View attachment 316230
This morning I have wet brushed (like dry brushing but with more paint) it with light grey back and forth across the peaks of the sheets and fixings then a dry brush with white in a few random places just to give a little variation in tone and bring out the wavyness of the corrugated sheets
I added a few patches of moss in joints - a mix of green pastel chalk, 1mm flock and VJ pigment fixer
Some of the rusty spots then got treated with Dieter Etzel Old rust FX (wonder where he ended up) to liven them up a bit
All the horizontal panel joints then got artificial shadows using black pastel chalk
I think it has turned out ok and it was good fun
Attachments
More than OK and fun into the bargain. That's probably what the hobby is all about.I think it has turned out ok and it was good fun
Jim
Looking very good Simon. I was just thinking of Dieter the other day while working on my engineer battalion. His scratch WWII German pontoon bridge was my favorite part of his amazing dio, which IMHO, was a real masterwork. PaulE
I think he spelled it Diether, if so, he's alive & kicking in South Africa. His picture on News 24 looks like him. He posted some riot photos there recently. PaulE
Legal Notice
scalemodelling.co.uk is a privately operated online discussion forum. All content posted by members reflects their own views and opinions and does not necessarily represent those of the forum owners or administrators. While reasonable efforts are made to moderate content, no responsibility is accepted for user-generated material. By using this site, you agree to comply with UK law and the forum rules.