Theme editor

Scale Model Shop

SimonT - 4x4 1/24 Esci Range Rover

SimonT

New member
Joined
Apr 27, 2018
Messages
2,824
Reaction score
0
Points
0
1/3
Thread owner
View attachment 313456
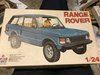
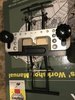
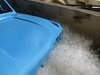
This has been sat in the stash for over thirty years (as can be seen in the condition of the box)

I think it is time to give it a go......

View attachment 313457
View attachment 313458
View attachment 313459
there should have been a shot of the black sprue but I appear to have accidentally deleted the picture

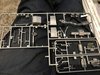
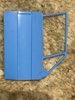
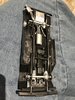
The black sprue mainly contains the chassis rails and door cards

The kit has no engine and some of the other areas are a bit simplified

View attachment 313461
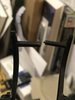
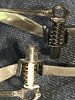
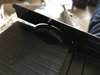
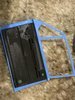
the many years in the stash being subjected to extremes of hot and cold have rather warped the chassis rails

View attachment 313460
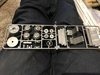
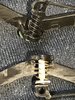
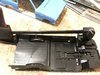
chassis rails , along with a lot of the other parts, suffer quite badly from sinkage even though when I purchased the kit it was a fairly new release

both chassis rails are now cleaned up and sink marks filled

I also cut out the solid plastic that tied the rails to the tie bars for moulding purposes

View attachment 313462
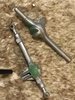
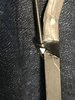
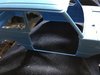
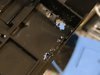
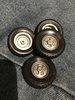
differentials cleaned up and sink marks filled

the horrible silver-grey plastic suffers the usual problem with this colour - mould lines never look to disappear even once sanded making cleaning up a bit of a chore

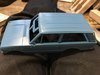
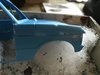
In addition to the above I have also joined the two halves of each front seat - the seats don't bear much resemblance to reality so will probably get a makeover

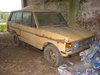
The finished vehicle, always assuming it does make it to the finish line, will be painted in Sand Glow a classic Leyland/Rover colour

I happened to have a mini in this colour for a short time and bought four spray cans - the car was broken for spares shortly after I bought it but I still have the paint

That's all for now folks
 

Attachments

  • rov-001_2018-9-7.jpg
    rov-001_2018-9-7.jpg
    4 KB · Views: 0
  • rov-002_2018-9-7.jpg
    rov-002_2018-9-7.jpg
    3.4 KB · Views: 0
  • rov-003_2018-9-7.jpg
    rov-003_2018-9-7.jpg
    4.1 KB · Views: 0
  • rov-004_2018-9-7.jpg
    rov-004_2018-9-7.jpg
    3.6 KB · Views: 0
  • rov-005_2018-9-7.jpg
    rov-005_2018-9-7.jpg
    3.9 KB · Views: 0
  • rov-006_2018-9-7.jpg
    rov-006_2018-9-7.jpg
    3.4 KB · Views: 0
  • rov-007_2018-9-7.jpg
    rov-007_2018-9-7.jpg
    4.1 KB · Views: 0
Wow...Simon, this is classic. If you think the kit suffered from the hot and cold storage, the real thing suffered in our climate especially the fittings and roof ceilings that melted and hung like deflated tents. With new material the newer models now don't suffer the same Salvador Dali effect. :tears-of-joy:

Cheers,
Richard
 
Will it be what it looks like now - covered in rust with gaping holes in the wing. Or will it be the factory look??

View attachment 313532

(For discussion purposes only)
 

Attachments

  • $_86.JPG
    $_86.JPG
    3.2 KB · Views: 0
Hi Simon
This is right up your street - a kit with plenty of problems. In the mid 1990s I owned a black Range Rover SE. When it was going it was wonderful except that you needed your own oil well as it's 3.9lt engine was so thirsty. It was however the most unreliable car I have ever owned!
Jim
 
Looks like fun! I remember that silver grey plastic from the tracks on the italeri blazer, spent ages cleaning them up as like you say they show marks that aren’t there! (an esci rebox?) ...
When I see you write things like ‘no engine’ and ‘oversimplified parts’....I get the feeling you may be tweaking:smiling4:
 
Thread owner
Richard, SteveO :thumb2:

SteveJ - hmmm, barn find does sound tempting. No holes in wings though as most of the outer panels are aluminium

View attachment 313655
bonnet, bumpers, tailgate, window frames, wheels are all steel and rust nicely

rest just fades and gets dirt streaked and moss etc

Jim - I hadn't realised they were so unreliable until I started reading up on them recently

Si - blazer is an old Esci kit. Hate silver plastic - airfix used to use it a lot on plane kits. No, not making an engine for this one. One or two tweaks though, see below

Ian - welcome


Morning all,

did a bit of work on this one last night

View attachment 313656
View attachment 313660
not very good phone photos but I have replaced to moulded springs

sawed, chiselled and ground off the solid moulded kit parts, added a lower spring seat from tubing, damper from two pieces of tubing and brass wire spring

View attachment 313657
View attachment 313658
more bad photos showing the added tie bar bushes, retaining nuts and studding which were completely missing from the brackets

View attachment 313659
chassis assembled with axles and bumpers - it had a rather horrendous twist to it so weighted it down, soaked joints with cement and am hoping that it will dry reasonably straight
 

Attachments

  • rov-012_2018-9-9.jpg
    rov-012_2018-9-9.jpg
    4.4 KB · Views: 0
  • rov-011_2018-9-9.jpg
    rov-011_2018-9-9.jpg
    4.1 KB · Views: 0
  • 3962464626_68df279acb.jpg
    3962464626_68df279acb.jpg
    3.6 KB · Views: 0
  • rov-008_2018-9-9.jpg
    rov-008_2018-9-9.jpg
    4.3 KB · Views: 0
  • rov-009_2018-9-9.jpg
    rov-009_2018-9-9.jpg
    3.3 KB · Views: 0
  • rov-010_2018-9-9.jpg
    rov-010_2018-9-9.jpg
    3.4 KB · Views: 0
Love the work on the shocks, looks great....a real lift to the standard.
Agree ref silver plastic. I’m Currently building a Honda 750 from Tamiya and some bits are in silver....exactly the same problem, seams don’t go with scraping and sanding, and it is quite hard to work as well....
 
Thread owner
Cheers Jim

Thanks Tim - it is definitely the worst plastic going yet manufacturers still keep using it. Is the Honda on here somewhere?

View attachment 313742
warp factor six Mr Sulu - this is the gap at the rear of the side panel when the front is held in place!

Barn find will be much more fun to build so that is the way this will be going

View attachment 313741
which is why the front footwell and sill now look like Swiss cheese

View attachment 313745
as does the side of the bonnet

View attachment 313746
bonnet also given a dent

View attachment 313744 cut the drivers door out
View attachment 313747
View attachment 313748
and chopped the interior side panel so that the door card could be fitted to the removed door

View attachment 313743
side trim plates installed on the floor pan - a bit of help required to overcome the warping

I removed the door speaker from the left door and opened out the hole

thinned the sides of the hole from the back to get a more scale thickness and drilled the four speaker mounting holes

I shall fit some wires and leave them dangling


Thanks for looking in
 

Attachments

  • rov-014_2018-9-10.jpg
    rov-014_2018-9-10.jpg
    3 KB · Views: 0
  • rov-015_2018-9-10.jpg
    rov-015_2018-9-10.jpg
    3.9 KB · Views: 0
  • rov-016_2018-9-10.jpg
    rov-016_2018-9-10.jpg
    3.2 KB · Views: 0
  • rov-017_2018-9-10.jpg
    rov-017_2018-9-10.jpg
    3.4 KB · Views: 0
  • rov-018_2018-9-10.jpg
    rov-018_2018-9-10.jpg
    2.9 KB · Views: 0
  • rov-019_2018-9-10.jpg
    rov-019_2018-9-10.jpg
    3.4 KB · Views: 0
  • rov-020_2018-9-10.jpg
    rov-020_2018-9-10.jpg
    3.8 KB · Views: 0
  • rov-013_2018-9-10.jpg
    rov-013_2018-9-10.jpg
    3 KB · Views: 0
Hi Simon, good move making it a barn find. Nothing is better than making a bad kit look worse :smiling4::tongue-out2: ...just kidding. The warped chassis and fitting can be attributed to a bad repair to an accident vehical. With your extra professional touch I think this will really look the abandoned beatened up icon of British 4x4s.

Cheers,
Richard
 
That's some nice progress, really like some of the barn find models that have been done recently do I'm sure this will be up there with them.
 
Hi Simon
This is coming along well now. Like the barn find idea as well. The warps and poor fitting panels are probably an accurate rendition of the original LOL. Sandglow is particularly horrible, but iconic of the time....
I learned to drive in a sand glow Austin Maxi, which had possibly the most awful gearbox ever made.....
The Honda is not on here yet, though I do have pictures. I haven’t made a bike before and wanted to be sure I would continue before starting to post. I have now completed a couple of sub assemblies so it will be coming to a forum near you soon...
Cheers
Tim
 
Hi Simon
I do like the idea of a neglected vehicle. Off to a great start.
Jim
 
Thread owner
Richard - I think you are probably right, bad kit made worse :smiling5:

Mick - don't hold your breath

Tim - :smiling: it is certainly warped. Sitting heavy objects on it has helped a little but the entire thing still has a horrible twist. May need to resort to the boiling water

Jim - ta

Ian - thanks


Managed a bit more.....

View attachment 313864
wheels cleaned up - about the only bits of the kit which are not warped or suffering sinkage

Could do with some better wheel nuts and a valve though

View attachment 313865
dash is provided with parts for left and right hand drive - nice touch

Pity they all suffer from a lot of sinkage

View attachment 313866
ground a few more holes in the floor pan - left front footwell and the rear load bed based on pictures of a 1:1 restoration

then stuck the chassis to the floor tub - needed some persuasion to stay put

View attachment 313867
after the clips came off - it still has a longitudinal twist so a dunk in boiling water could be imminent

View attachment 313868
some crusty damage added to the scuttle

missing screen rubber added from micro strip


Thanks for looking in
 

Attachments

  • rov-021_2018-9-11.jpg
    rov-021_2018-9-11.jpg
    3.7 KB · Views: 0
  • rov-022_2018-9-11.jpg
    rov-022_2018-9-11.jpg
    3.5 KB · Views: 0
  • rov-023_2018-9-11.jpg
    rov-023_2018-9-11.jpg
    3.9 KB · Views: 0
  • rov-024_2018-9-11.jpg
    rov-024_2018-9-11.jpg
    3.8 KB · Views: 0
  • rov-025_2018-9-11.jpg
    rov-025_2018-9-11.jpg
    3.3 KB · Views: 0
Back
Top