
You are using an out of date browser. It may not display this or other websites correctly.
You should upgrade or use an alternative browser.
You should upgrade or use an alternative browser.
SimonT - 4x4 1/24 Esci Range Rover
- Thread starter SimonT
- Start date

- Joined
- Apr 27, 2018
- Messages
- 15,123
1/3
Simon,
Not sure how I missed this up till now, but great work all round your modelling skills still impress me after all this time. Really like the breeze block stamp.
Not sure how I missed this up till now, but great work all round your modelling skills still impress me after all this time. Really like the breeze block stamp.
I decided that just a little bit of rust wouldn't look very dramatic so....
View attachment 314787
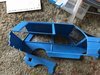
I decided to depict the restoration under way and so chopped off the rear quarter panel and tail light mounting panel
In order to give a reasonably stable base to work from I decided to glue the tub into the body
This will make painting interesting but there was no way I could build the mods and keep the shell separate
Even more interesting will be trying to fit the dash as I got carried away and forgot to fit it before joining body to tub!
View attachment 314785
View attachment 314786
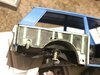
Based on pictures of a full size restoration I then started to add the internal panel detail
I also had to chop off the recently extended bumper and instead add the open box section to the ends of the chassis rails, again as per reference photos
The rotten panel flanges are made from a double layer of pewter sheet with the edge distressed with a blade - this will need further work once the CA sets
I also managed to trim down the short sections of wall and fit them to the building
View attachment 314787
I decided to depict the restoration under way and so chopped off the rear quarter panel and tail light mounting panel
In order to give a reasonably stable base to work from I decided to glue the tub into the body
This will make painting interesting but there was no way I could build the mods and keep the shell separate
Even more interesting will be trying to fit the dash as I got carried away and forgot to fit it before joining body to tub!
View attachment 314785
View attachment 314786
Based on pictures of a full size restoration I then started to add the internal panel detail
I also had to chop off the recently extended bumper and instead add the open box section to the ends of the chassis rails, again as per reference photos
The rotten panel flanges are made from a double layer of pewter sheet with the edge distressed with a blade - this will need further work once the CA sets
I also managed to trim down the short sections of wall and fit them to the building
Attachments


Hi Simon
You just can't leave well alone can you :smiling: It is a good idea though and looks well underway.
Jim
:tears-of-joy::tears-of-joy: ...just when I thought it was safe to visit the post. Simon's at it again.
Cheers,
Richard
Jim - well, might as well try and do a proper job on it :smiling4:
Ian - if all goes to plan it should actually look rather ropey
Richard - fairly safe now. I think the major cutting is done
Fernando - cheers. Still need to check out the dashboard :thinking:
Made a little more progress.....
View attachment 314884
holes
View attachment 314887
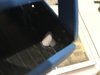
a lot of the parts are simplified including the fuel filler - there is a rectangular hole in the bodywork so that had to be patched and an arched opening cut in instead
Inside the load space the inside of the hole should be a curved profile - replicated this with a section of plastic tubing
View attachment 314886
on the outside the fuel filler pipe was added along with a few more holes around the base of the B post and over the wheelarch as per 1:1 references
View attachment 314885
roughly what it will look like
View attachment 314883
roof panels glued on
Ian - if all goes to plan it should actually look rather ropey
Richard - fairly safe now. I think the major cutting is done
Fernando - cheers. Still need to check out the dashboard :thinking:
Made a little more progress.....
View attachment 314884
holes
View attachment 314887
a lot of the parts are simplified including the fuel filler - there is a rectangular hole in the bodywork so that had to be patched and an arched opening cut in instead
Inside the load space the inside of the hole should be a curved profile - replicated this with a section of plastic tubing
View attachment 314886
on the outside the fuel filler pipe was added along with a few more holes around the base of the B post and over the wheelarch as per 1:1 references
View attachment 314885
roughly what it will look like
View attachment 314883
roof panels glued on
Attachments


Cheers Mick
View attachment 314919
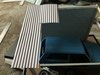
made an end wall for the right side - one side is blocks, the other, seen above, is rendered with VJ red oxide paste
I actually bought this stuff for adding rough rust to the chassis etc but it works well as rendering
Went and dropped the pot and got it on my work trousers - oops. Lots of water and scrubbing followed :rolling:
View attachment 314920
View attachment 314921
finished adding roof panels and sheeting fixings - all looks a little rough but once painted and weathered I think it will look the part
Thanks for looking in
View attachment 314919
made an end wall for the right side - one side is blocks, the other, seen above, is rendered with VJ red oxide paste
I actually bought this stuff for adding rough rust to the chassis etc but it works well as rendering
Went and dropped the pot and got it on my work trousers - oops. Lots of water and scrubbing followed :rolling:
View attachment 314920
View attachment 314921
finished adding roof panels and sheeting fixings - all looks a little rough but once painted and weathered I think it will look the part
Thanks for looking in
Attachments
- Joined
- Apr 27, 2018
- Messages
- 15,123
1/3
Simon,
Nice work as always.
Nice work as always.
G
Guest
Guest
Mr T .
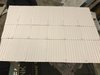
Sir , in ref to your roof.... May I humbly suggest some more roof fixing ! Another one in the middle would help prevent the wind from removing the sheets ! I enclose a fitting suggestion for your perusal.:smiling2:
View attachment 314998
Having seen the arrival of pewter, and more plastic removal I concur that this was indeed as I had thought several posts ago namely , you intended this to happen .
Yours J Race .
Corrugated Sheets R Us
Attachments
Mick, Tim, Ian, Scottie - ta :thumb2:
John - wouldn't want the sheets blowing off would we so a few more fixings it shall get :thumb2:
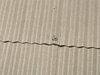
View attachment 315004
see this roof every day, snapped this on the phone on the walk home - ancient and patched many times during it's life by the look of it. Plenty of rust.
Looks like a good candidate for some AK Worn Effects when I get around to painting mine
John - wouldn't want the sheets blowing off would we so a few more fixings it shall get :thumb2:
View attachment 315004
see this roof every day, snapped this on the phone on the walk home - ancient and patched many times during it's life by the look of it. Plenty of rust.
Looks like a good candidate for some AK Worn Effects when I get around to painting mine
Attachments

Coming along very well Simon. This is an eye opener for me as i have seldom seen corrugated zinc roofs in any images of the UK. For a moment I thought you had shot a picture in S E Asia....interesting.
Cheers,
Richard
Cheers,
Richard
Legal Notice
scalemodelling.co.uk is a privately operated online discussion forum. All content posted by members reflects their own views and opinions and does not necessarily represent those of the forum owners or administrators. While reasonable efforts are made to moderate content, no responsibility is accepted for user-generated material. By using this site, you agree to comply with UK law and the forum rules.