Theme editor

Scale Model Shop

SimonT - 4x4 1/24 Esci Range Rover

Jim has said it Simon, you are a one off .
Nothing supprises me anymore when you pull one out of the hat.
That trolly jack is a prime example.
John.
 
Thread owner
Thanks Rick

Tim - cheers

Jim - glad you like them

Graeme - :smiling:

John - just a matter of build what you see

Pete - well spotted :thumb2: very similar to one I have


A bit of paint.....

View attachment 322992
just needs the details picking out now

View attachment 322993
made a start on the surrounding earth

View attachment 322994
tidied the breeze blocks and started on the steelwork

View attachment 322988
View attachment 322989
the shelf

View attachment 322990
another box assembled and painted

View attachment 322991
car got a black wash - I forgot how fragile VJ paints are, should have varnished it before starting on the weathering as the paint started lifting and I had to re-touch a couple of areas

Hopefully it will be ok once the wash has dried out
 

Attachments

  • rov-103_2018-12-15.jpg
    rov-103_2018-12-15.jpg
    3.4 KB · Views: 0
  • rov-109_2018-12-15.jpg
    rov-109_2018-12-15.jpg
    3.2 KB · Views: 0
  • rov-108_2018-12-15.jpg
    rov-108_2018-12-15.jpg
    4 KB · Views: 0
  • rov-107_2018-12-15.jpg
    rov-107_2018-12-15.jpg
    3.9 KB · Views: 0
  • rov-106_2018-12-15.jpg
    rov-106_2018-12-15.jpg
    3.5 KB · Views: 0
  • rov-105_2018-12-15.jpg
    rov-105_2018-12-15.jpg
    3.4 KB · Views: 0
  • rov-104_2018-12-15.jpg
    rov-104_2018-12-15.jpg
    3.6 KB · Views: 0
Great looking paint work on the Land Rover Simon.
But the tools are great looking miniatures in their own right, love the Mr T's Auto Parts label on the boxes.:thumb2::thumb2:
Looking forward to the next update.:smiling:
 
Thread owner
Fernando - thanks, the tools were good fun to build

Rick - :smiling: not sure about awesome, better at building than painting, but it is progressing......

View attachment 323105
View attachment 323107
View attachment 323093
steelwork wet brushed with red to make the red/brown more red

bottom few blocks of the wall dry brushed with green/yellow mix to try give that slight mossy damp look

grass brushed with green and yellow oil paint

View attachment 323094
View attachment 323095
View attachment 323097
started weathering the body panels by dotting water soluble oils all over it - white, yellow ochre and burnt umber

View attachment 323098
View attachment 323096
View attachment 323099
View attachment 323100
View attachment 323101
View attachment 323102
View attachment 323104
View attachment 323103
first layer brushed out with an AK streaking brush and a little Medea a/b cleaner

I found that the water oils were quite stubborn when it came to blending them in but I think the slightly blotchy pattern adds to the wear

when this lot has had some drying time it will get some more highlights to fade the paint more - if it works that is............
 

Attachments

  • rov-115_2018-12-17.jpg
    rov-115_2018-12-17.jpg
    4.2 KB · Views: 0
  • rov-114_2018-12-17.jpg
    rov-114_2018-12-17.jpg
    3.7 KB · Views: 0
  • rov-113_2018-12-17.jpg
    rov-113_2018-12-17.jpg
    4 KB · Views: 0
  • rov-112_2018-12-17.jpg
    rov-112_2018-12-17.jpg
    4.3 KB · Views: 0
  • rov-111_2018-12-17.jpg
    rov-111_2018-12-17.jpg
    3.2 KB · Views: 0
  • rov-116_2018-12-17.jpg
    rov-116_2018-12-17.jpg
    4.1 KB · Views: 0
  • rov-117_2018-12-17.jpg
    rov-117_2018-12-17.jpg
    4.4 KB · Views: 0
  • rov-118_2018-12-17.jpg
    rov-118_2018-12-17.jpg
    3.6 KB · Views: 0
  • rov-110_2018-12-17.jpg
    rov-110_2018-12-17.jpg
    3.3 KB · Views: 0
  • rov-123_2018-12-17.jpg
    rov-123_2018-12-17.jpg
    3.1 KB · Views: 0
  • rov-122_2018-12-17.jpg
    rov-122_2018-12-17.jpg
    3.7 KB · Views: 0
  • rov-121_2018-12-17.jpg
    rov-121_2018-12-17.jpg
    3.8 KB · Views: 0
  • rov-120_2018-12-17.jpg
    rov-120_2018-12-17.jpg
    3.7 KB · Views: 0
  • rov-119_2018-12-17.jpg
    rov-119_2018-12-17.jpg
    3.9 KB · Views: 0
Just caught up on this one Simon, and may I say some fantastic work, really liking the tools you've made.
 
Thread owner
Ian - you may, thank you

Quick update time

The good thing with the W&N water oils is that they are touch dry overnight so I got another layer on last night

A pale mix of yellow ochre and titanium white this time to fade the base colour out a bit more

View attachment 323187
View attachment 323186
View attachment 323188
once this is dry I will add a little more burnt umber to create a few more streaks and darken panel lines
 

Attachments

  • rov-126_2018-12-18.jpg
    rov-126_2018-12-18.jpg
    3.4 KB · Views: 0
  • rov-125_2018-12-18.jpg
    rov-125_2018-12-18.jpg
    4 KB · Views: 0
  • rov-124_2018-12-18.jpg
    rov-124_2018-12-18.jpg
    3.6 KB · Views: 0
Thread owner
Jim / Paul - thanks both :thumb2:

View attachment 323352
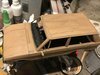
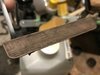
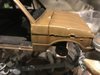
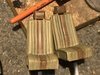
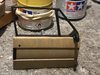
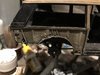
jack got the black bits painted in - hand grip, wheels, lifting plate

View attachment 323349
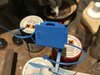
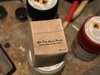
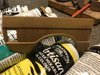
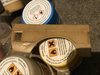
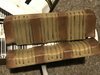
as did the welding set - end plates, handle, wires

View attachment 323347
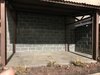
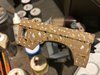
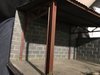
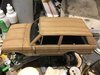
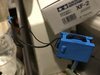
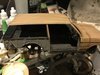
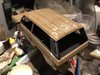
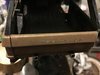
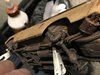
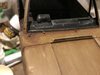
Realised this morning while looking for painting details that I had forgotten to add the front door locking bar so added that
Also noticed I had missed the rear wiper arm spindle and the tailgate gas strut mounting plates so they were added as well

View attachment 323348
View attachment 323350
View attachment 323351
View attachment 323355
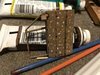
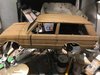
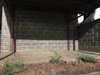
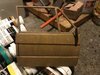
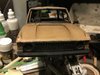
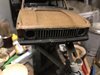
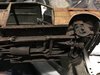
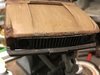
blacked in all the black bits of the bodywork - window frames, mirrors, front grille, sills, door locks, door handles

View attachment 323353
View attachment 323354
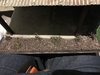
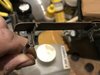
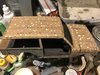
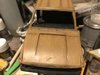
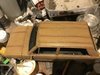
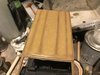
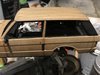
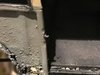
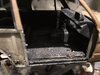
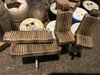
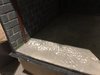
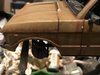
found a great website dedicated to the early Range Rovers which has copies of the sales brochures listing colours and trim - I had planned to do a black interior but according to the literature they came in tan with darker inserts regardless of the external body colour
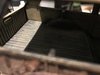
There was an option for a darker brown but photos generally seem to show cars with tan so I went with that - dry brushed over the black base coat to build up the colour
Still need work but its a start

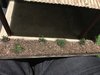
Will also need to paint the door cards with the same tan colour
 

Attachments

  • rov-135_2018-12-21.jpg
    rov-135_2018-12-21.jpg
    3.8 KB · Views: 0
  • rov-134_2018-12-21.jpg
    rov-134_2018-12-21.jpg
    3.9 KB · Views: 0
  • rov-133_2018-12-21.jpg
    rov-133_2018-12-21.jpg
    3.6 KB · Views: 0
  • rov-132_2018-12-21.jpg
    rov-132_2018-12-21.jpg
    3.2 KB · Views: 0
  • rov-131_2018-12-21.jpg
    rov-131_2018-12-21.jpg
    4 KB · Views: 0
  • rov-130_2018-12-21.jpg
    rov-130_2018-12-21.jpg
    3.8 KB · Views: 0
  • rov-129_2018-12-21.jpg
    rov-129_2018-12-21.jpg
    3.4 KB · Views: 0
  • rov-128_2018-12-21.jpg
    rov-128_2018-12-21.jpg
    3.8 KB · Views: 0
  • rov-127_2018-12-21.jpg
    rov-127_2018-12-21.jpg
    3 KB · Views: 0
I see now your attention to minute detail, no wonder that helmet caught your eye.

Jim:smiling4:
 
Wonderful paint job Mr T. The weathering is looking good. Look forward to seeing the rust work. The garage is so realistic, Its amazing. Top work as always sir:thumb2::thumb2:
 
Thread owner
Jim - thanks for dropping in for a look. I am quite good at playing those 'spot the difference' picture comparison games and Russian tanker helmets are rather distinctive :smiling4: :smiling:

Steve - ta very much, rust is getting nearer

View attachment 323509
View attachment 323503
had a go at adding some bird poo along the lines of that seen in some of the reference photos I'm using

View attachment 323504
and some more on the car itself

still need to add a bird nest in the roof but I have a plan for it

View attachment 323505
seats dry brushed then given a brown wash to give some wear

View attachment 323506
front grilles seem to go grey so it got a good dry brush as well

View attachment 323507
View attachment 323508
a bit of general dry brushing before the rust goes on......
 

Attachments

  • rov-141_2018-12-23.jpg
    rov-141_2018-12-23.jpg
    3.7 KB · Views: 0
  • rov-140_2018-12-23.jpg
    rov-140_2018-12-23.jpg
    3.7 KB · Views: 0
  • rov-139_2018-12-23.jpg
    rov-139_2018-12-23.jpg
    3.8 KB · Views: 0
  • rov-138_2018-12-23.jpg
    rov-138_2018-12-23.jpg
    4 KB · Views: 0
  • rov-137_2018-12-23.jpg
    rov-137_2018-12-23.jpg
    4.2 KB · Views: 0
  • rov-136_2018-12-23.jpg
    rov-136_2018-12-23.jpg
    3.1 KB · Views: 0
  • rov-142_2018-12-23.jpg
    rov-142_2018-12-23.jpg
    2.7 KB · Views: 0
Rust effects are just so. The car port finishes are spot on. The tools are perfection. Anxious to see how you compose it all. PaulE
 
Thread owner
Thanks Jim - many years of classic mini ownership so I've plenty of memories of rusty bodywork for reference :smiling:

Paul - thanks, it is starting to come together now. End of the GB is rapidly approaching though

Mick - not sure work of art describes it but thank you


Morning all - made a good start on the rusting yesterday

View attachment 323596
View attachment 323603
View attachment 323602
View attachment 323596
View attachment 323597
interior panels dry brushed to build up colour - tan sides and grey for the boot floor based on references

View attachment 323597
added the name decals to front and back

30+ years in the stash has not been kind to them and they fell apart once wet - the front lost an E to become RANG ROVER

if I had been doing this as a showroom fresh car then it would have been a major problem as the carrier film had also gone a bit milky in places but since it is a wreck I think it just adds to the worn out look

View attachment 323598
View attachment 323599
View attachment 323600
View attachment 323601
View attachment 323604
View attachment 323605
View attachment 323606
View attachment 323607
View attachment 323608
View attachment 323609
it then got the first round of rusting :thumb2:

started by going around all the crusty holes with german camo black brown

this was followed by a rust pigment wash to stain the paintwork and add a few rusty water streaks

the rusty pigment has settled nicely on the floor pan whereI used the red oxide paste to give a suitably crusty look

I now need to repeat the process with different shades to build up the rustiness - good fun this rusting
 

Attachments

  • rov-151_2018-12-24.jpg
    rov-151_2018-12-24.jpg
    3.5 KB · Views: 0
  • rov-145_2018-12-24.jpg
    rov-145_2018-12-24.jpg
    3 KB · Views: 0
  • rov-146_2018-12-24.jpg
    rov-146_2018-12-24.jpg
    3.3 KB · Views: 0
  • rov-152_2018-12-24.jpg
    rov-152_2018-12-24.jpg
    3.8 KB · Views: 0
  • rov-153_2018-12-24.jpg
    rov-153_2018-12-24.jpg
    3.4 KB · Views: 0
  • rov-156_2018-12-24.jpg
    rov-156_2018-12-24.jpg
    3.8 KB · Views: 0
  • rov-155_2018-12-24.jpg
    rov-155_2018-12-24.jpg
    4.1 KB · Views: 0
  • rov-154_2018-12-24.jpg
    rov-154_2018-12-24.jpg
    3.2 KB · Views: 0
  • rov-143_2018-12-24.jpg
    rov-143_2018-12-24.jpg
    3.6 KB · Views: 0
  • rov-144_2018-12-24.jpg
    rov-144_2018-12-24.jpg
    2.9 KB · Views: 0
  • rov-150_2018-12-24.jpg
    rov-150_2018-12-24.jpg
    3.9 KB · Views: 0
  • rov-149_2018-12-24.jpg
    rov-149_2018-12-24.jpg
    3.5 KB · Views: 0
  • rov-148_2018-12-24.jpg
    rov-148_2018-12-24.jpg
    2.6 KB · Views: 0
  • rov-147_2018-12-24.jpg
    rov-147_2018-12-24.jpg
    3.6 KB · Views: 0
The worn look is great Simon, with round 1 done looking forward to see how the end of the rusting will look like.:smiling:

Merry Christmas!
 
Back
Top