Theme editor

Scale Model Shop

SimonT - 4x4 1/24 Esci Range Rover

Thread owner
Cheers Rick

Thanks Fernando - Round 2, pigments coming up so read on........

View attachment 323854
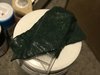
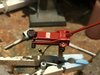
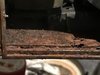
jack got a bit more paint - silver bolts, lifting plate and wheels scuffed and lightly rusted, warning notice added

View attachment 323855
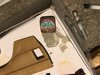
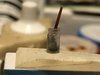
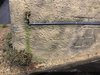
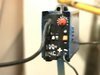
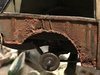
welder detailed - sorry for the fuzzy pic it looked ok on phone!

Pity I can't paint text very well - will have to hide it with the wires

View attachment 323856
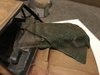
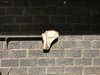
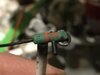
angle grinder painted as well

View attachment 323851
View attachment 323853
View attachment 323857
View attachment 323858
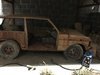
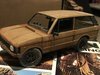
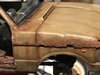
added to the general crustiness with some pigments

it looked a bit bright when I'd finished so then added some thinned camo black brown in random places to vary the tones a bit

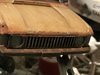
unfortunately I caught the front grille as well so that will now need tidying up as they are plastic

Have I overdone it? Possibly - I got a bit carried away, I was enjoying myself :rolling:

View attachment 323852
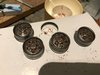
lastly the wheels were painted in steel and then given the pigment treatment as well

once this dries I need to paint in the wheel nuts blac, pick out the valve and the balance weights

fast running out of time before the GB end but at least I have progressed as little

Thanks for looking in
 

Attachments

  • rov-159_2018-12-27.jpg
    rov-159_2018-12-27.jpg
    3.6 KB · Views: 0
  • rov-160_2018-12-27.jpg
    rov-160_2018-12-27.jpg
    3.5 KB · Views: 0
  • rov-161_2018-12-27.jpg
    rov-161_2018-12-27.jpg
    3.4 KB · Views: 0
  • rov-162_2018-12-27.jpg
    rov-162_2018-12-27.jpg
    3.9 KB · Views: 0
  • rov-163_2018-12-27.jpg
    rov-163_2018-12-27.jpg
    3.2 KB · Views: 0
  • rov-164_2018-12-27.jpg
    rov-164_2018-12-27.jpg
    2.8 KB · Views: 0
  • rov-157_2018-12-27.jpg
    rov-157_2018-12-27.jpg
    3.8 KB · Views: 0
  • rov-158_2018-12-27.jpg
    rov-158_2018-12-27.jpg
    3.2 KB · Views: 0
Thread owner
Thanks Rick - nearly there now

Just done a test fit of the main components on the base

View attachment 323903

I have decided to leave the windscreen out as the fit is rubbish - never thought to test fit it at build stage as I expected it to be suitable for the hole in the body. Wrong! Ho hum.

Front and rear lights still to sort and one or two smaller details but nearly there

Broke one of the feet off the welder removing it from the sprue handle so that needs rectifying so it sits level

Next post will probably be completion unless anyone can think of anything else or spot any glaring errors that could still be corrected......
 

Attachments

  • 48E1B00A-1AA5-400A-8E66-372107075D1D.jpeg
    48E1B00A-1AA5-400A-8E66-372107075D1D.jpeg
    3.1 KB · Views: 0
Fantastic bit of work. even the test fit is remarkable. Windshields...who needs 'em.
Cheers, Rick H.
 
SIP welder, Bosch angle grinder... Have you been in my garage?

Pete
 
Mr T. Far be it for me to interfere in one of you masterpieces but would the windscreen look okay laid on top of the bonnet half in half out of the cab with the rubber seals hanging out??
 
Hi Simon
This is impressive even by your standards of mogglin' detail.
Jim
 
Thread owner
Thanks Rick

Pete - sounds like we have similar items of 1:1 workshop equipment :smiling:

Steve - great suggestion. I was just going to pile it against the wall but have now wrapped it up and plonked it on the bonnet

Jim - thanks, getting there now

Paul - thank you


I know I said the next post would be completion but that hasn't quite happened yet

View attachment 324031
thanks our host John turning round my SMS paint order mega quickly the clear Tamiya paints arrived yesterday afternoon so I could paint the light lenses

the funny looking white blob down the front is a chunk of rag to sit on the shelf on the back wall - made from a dollop of leftover Duro putty with VJ sandy paste for texture

View attachment 324030
said shelf attached to rear wall. The white mess at the right side is where the Duro pulled the paint off the foam wall :sad-face:

Rear bumper and rear wash wipe reservoir also attached to base

Socket and consumer unit have been installed at the left

View attachment 324027
based around Steves suggestion I stuck the windows together then wrapped them in a Duro blanket

after a couple of hours I carefully prised the whole lot away from the car and washed the vaseline off with zippo lighter fluid

it was then stippled with VJ sandy paste for texture and painted dark green - paint still wet in pic

View attachment 324028
View attachment 324029
wheels got the nuts and valves painted black and the balance weights I added to the rims were picked out in grey

tyres were treated to some pigment and thinners

I swapped wheels around between axles until I got all four tyres sitting on the deck and then CA'd them in place

View attachment 324032
old tin of paint for the shelf - just needs handle refitting

View attachment 324033
every workshop should have an old biscuit tin for storing odds and ends - I know the painting is a bit pants (pity I didn't inherit my Grandmas painting gene - she was a proper water colour artist) but it will hardly be seen on the shelf

Definitely getting nearer to completion now.......
 

Attachments

  • rov-170_2018-12-29.jpg
    rov-170_2018-12-29.jpg
    2.7 KB · Views: 0
  • rov-166_2018-12-29.jpg
    rov-166_2018-12-29.jpg
    3.4 KB · Views: 0
  • rov-171_2018-12-29.jpg
    rov-171_2018-12-29.jpg
    3.6 KB · Views: 0
  • rov-172_2018-12-29.jpg
    rov-172_2018-12-29.jpg
    3.8 KB · Views: 0
  • rov-169_2018-12-29.jpg
    rov-169_2018-12-29.jpg
    3.8 KB · Views: 0
  • rov-168_2018-12-29.jpg
    rov-168_2018-12-29.jpg
    3.9 KB · Views: 0
  • rov-167_2018-12-29.jpg
    rov-167_2018-12-29.jpg
    3.2 KB · Views: 0
The paint pot and biscuit tin are inspired additions.

Looking forward to seeing all the jam jars filled with screws, nuts and bolts in the biscuit tin:smiling2::smiling3:
 
Thread owner
Cheers Steve

Jam jars, your wish is my command........

View attachment 324188
jar full of screws - well, ok, bits of brass and steel wire was nearest I could get

View attachment 324189
also did the compulsory hard paintbrush in dirty turps :smiling:

View attachment 324190
the wrapped glass on the bonnet

View attachment 324191
bedsheet for use as cleaning rags

View attachment 324192
tap and a bit of damp painted in

I think that is all the component pieces done now - just need to bring all the bits together now............
 

Attachments

  • rov-173_2018-12-30.jpg
    rov-173_2018-12-30.jpg
    3.4 KB · Views: 0
  • rov-174_2018-12-30.jpg
    rov-174_2018-12-30.jpg
    2.9 KB · Views: 0
  • rov-175_2018-12-30.jpg
    rov-175_2018-12-30.jpg
    3.3 KB · Views: 0
  • rov-176_2018-12-30.jpg
    rov-176_2018-12-30.jpg
    3.1 KB · Views: 0
  • rov-177_2018-12-30.jpg
    rov-177_2018-12-30.jpg
    3.6 KB · Views: 0
Morning Mr T,
It seems I’ve missed pretty much every update since the beginning of December....even though I flick through the site most days and it’s on my watch list!
Anyway.....Wow! Some most excellent touches, bring the whole scene to life.
Observing and reproducing all the bits us blokes keep in our garages/sheds was a great idea. I think yours is still too tidy though.... I’ve seen some garages, floor to ceiling junk, or ‘projects’ as they are better known :smiling5:
Loving it:thumb2:
 
Thread owner
Morning Si - I know exactly what you mean :smiling4: but I have run out of GB time to keep adding stuff so completion beckons
 
What next? I can't bear to look...perhaps some loose pocket change on the floor boards or the car keys in the ignition? Hmmmmm. This is a good show no matter what the price of admission. Cheers, Rick H.:thumb2:
 
Thread owner
Thanks Rick - don't think anything else will be added now :thinking:

All the bits are now in place and glued down

I managed to smack the roof into my airbrush extract cabinet and with it being made of thin cardboard rather than plastic it suffered a bit of damage - the paint chipped off. I wasn't too pleased at that point but only myself to blame

There will be a little touching up of paint required but it is essentially now complete

Photos will follow in due course
 
What can be said Simon !
Only
:thumb2::thumb2::thumb2::thumb2::thumb2::thumb2::thumb2::thumb2::thumb2::thumb2:
John
 
Simon,
I have missed this and just had a good catch up. Inspired work and a great imagination, top work. have a happy new year from my home to yours.
 
You've brought another beauty home brother. Have a Happy New Year Simon. PaulE
 
All the components look great:thumb2::thumb2:, hope to see them together soon.:hungry:
Oh and have a happy New Year Simon.
 
Back
Top