
You are using an out of date browser. It may not display this or other websites correctly.
You should upgrade or use an alternative browser.
You should upgrade or use an alternative browser.
The Border Models 1/32 Lancaster BI/III
- Thread starter BarryW
- Start date
I saw lots of Lancasters at Telford.Some stunning 32nd ones with props working.Never cease to be amazed at the standard of models around at shows and on forums.I was tempted to buy an Airfix 72nd Tiger force boxing to do a postwar version.Was a bargain at 22 pounds.Seen them on e.bay for double that.
Richard
Richard
Well my son returns here tomorrow, just for a week. So I won’t be at the bench again for a week. After that he is back to his normal life again, as will I.
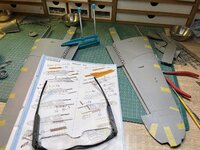
Progress this week has been good, working on the inner wings. Still a fair way to go on these but here are a few photos. Fit has been superb I have to say. I decided to have flaps up as it would be quite fragile and vulnerable down. That needed some surgery to kit parts.


Progress this week has been good, working on the inner wings. Still a fair way to go on these but here are a few photos. Fit has been superb I have to say. I decided to have flaps up as it would be quite fragile and vulnerable down. That needed some surgery to kit parts.
Time for an update. No real drama to report. No fit issues but the awful instructions are a problem for identifying exactly how some parts fit. Got there on the end, first with the undercarriage.

the mid-upper and rear turrets are well under way.


i am also working on the outer wing sections.

the mid-upper and rear turrets are well under way.
i am also working on the outer wing sections.
Attachments


I have been plugging on with the outer wings. No fit issues though some filler was used here and there.
as previously mentioned am building her with closed panels and therefore leaving out the engines for which engine blanks are provided.
I put together all four engine blanks and the inner ones fitted to the wing perfectly.
However, on the outer wings I found the lower location tabs not fitting. Below you can see the inner wing with its perfect fit.
Note: I have been driven up the wall on my phone trying to insert photos into place where I want them. For some reason it keeps putting the photos at the top or, if I manage to get one where I want, I cannot move down to do some text under it. I have tried it all sort of ways but have now given up. The photos are therefore added all together without the associated text. Anyone else prefer the old forum software, certainly do, far better than this one. New isn’t always better.
anyway…
I also show a picture of how clearly the pins and location tabs don’t line up. Another how it looks at an odd angle and finally with the pins cut off looking just right (panel test dit confirms this is right).
My conclusion is that this is an instructions problem and if this kit was produced by Wingnut Wings they would have covered this in the instructions.
Attachments


Well I now have come to a grinding halt and I have no idea about how to move forward.
The outer wing sections simply don’t fit to the inner wing and it’s as if they are not meant to.
I have tried a dry fit but there are substantial moulded in strengthening beams right in the way where the wing spars are mean to fit. I certainly did not see this coming!!! I cannot get in to cut those beams away either without forcing apart the wings
giving rise to all sorts of issues. I have checked and double checked to see if I missed something in the build, in the instructions, but no I have not. It’s like two different models. It is not just something a bit of sanding can resolve either and it’s not just one place.
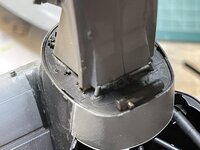
it is difficult to see in the photo but you need all the space for the spar, plus some more and also have two vertically moulded in spars , on the inside, that block the way….
i need to think about this before making a rash decision. This is really puzzling.

The outer wing sections simply don’t fit to the inner wing and it’s as if they are not meant to.
I have tried a dry fit but there are substantial moulded in strengthening beams right in the way where the wing spars are mean to fit. I certainly did not see this coming!!! I cannot get in to cut those beams away either without forcing apart the wings
giving rise to all sorts of issues. I have checked and double checked to see if I missed something in the build, in the instructions, but no I have not. It’s like two different models. It is not just something a bit of sanding can resolve either and it’s not just one place.
it is difficult to see in the photo but you need all the space for the spar, plus some more and also have two vertically moulded in spars , on the inside, that block the way….
i need to think about this before making a rash decision. This is really puzzling.
Further to the above.
The caliper is set to the amount of plastic that would need to be removed from the wing spar to get a fit. This is a full quarter of an inch, with the spar a full inch wide. That’s a lot. Even then it might not work as taking off so much of it would affect the structural integrity of the wing join. Remember these outer wing sections are
meant to be removable. There might be ways to restore the integrity of the spar though r
I am not sure I want to undertake that as it would be a bit hit and miss, take a lot of time and may not really work very well.
I don’t know how much time I have (hopefully years!) and even then how much of that time I will be able to model. Is it worth taking time to sort this, something won’t enjoy doing. Or should I just say to hell with it, dump the model and move to another in my stash. I need to think this through.
Last edited:

That's not great. Any other build blogs online that encounter the same issue?
I found one the comment was simply that it took a lot of work to fit the inner and outer wings. No photos or any real information.


Just had a watch of a youtube build, and although the guy doesn't mention it at all, he has definitely cut out the wing spar.
That’s not the problem area. It is the inner wing to outer wing. My inner wings fit the fuselage quite well.
Legal Notice
scalemodelling.co.uk is a privately operated online discussion forum. All content posted by members reflects their own views and opinions and does not necessarily represent those of the forum owners or administrators. While reasonable efforts are made to moderate content, no responsibility is accepted for user-generated material. By using this site, you agree to comply with UK law and the forum rules.