
You are using an out of date browser. It may not display this or other websites correctly.
You should upgrade or use an alternative browser.
You should upgrade or use an alternative browser.
The Road to Singapore: Malaya 1941-42
- Thread starter TIM FORSTER
- Start date
- Joined
- Apr 27, 2018
- Messages
- 15,122
1/3
Tim,
Lovely work on the turret.
Lovely work on the turret.
Hi Tim.
Love the work on the type 95 and the diorama sounds really, really interesting as this is a chapter of the war seldom modelled.
I look forward to seeing the tank amongst the vegetation and in the Malayan setting.
Cracking stuff
Paul
Love the work on the type 95 and the diorama sounds really, really interesting as this is a chapter of the war seldom modelled.
I look forward to seeing the tank amongst the vegetation and in the Malayan setting.
Cracking stuff
Paul
")
Brilliantly done Tim. :thumb2: If it looks anything near enough should be fine and once painted and closed up, no expert is going to have a measuring tape small enough to try to be funny as long if wrong alignment and glue marks are kept to the minimum. :smiling2: If an argument arises...ask them if they peerd into a knocked out Ha-Go before in their lifetime... obviously there will be distortions from heat and amunition igniting. I'll be proud of that scratchwork and I know the feeling when done from nothing.
This is going to be a good one just like the one in the Italian campaign.
Cheers,
Richard
This is going to be a good one just like the one in the Italian campaign.
Cheers,
Richard
Thankyou all - although Rick, you need to get her out of your head... no bella donnas on this one!
The next part of the turret interior I had to tackle was the ball mounted MG.
During its service life the Ha-Go was equipped with two types of machine gun: the 6.5 mm and the 7.7 mm Model 97. The FineMolds kit gives you both options - but all you get are the ball mounts and the external armoured shrouds. Once again, I regretted not starting with the Dragon kit, which provides two beautifully moulded complete guns - even though the one in the hull cannot be seen.
I looked online for even the infantry equivalent in 1/35 and drew a blank. I was about to start trying to modify a Bren, but then I discovered that the Japanese Model 97 was actually a near copy of the Czech ZB 26 (which was, itself, the forerunner of the Bren). The most obvious differences between ther ZB and the Bren are the cooling ribs on the barrel and the square magazine on the former.
View attachment 381991
Even finding a ZB in 1/35 wasn't easy, which surprised me - it was a popular gun amongst the Germans in WW2. After all, they acquired a bunch of them when they annexed Czechoslovakia (along with all those 35 and 38(t) tanks). Eventually Tank came to the rescue (although I suspect these are OOP).
View attachment 381992
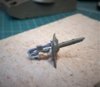
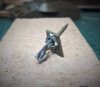
There was still quite a bit of work required to convert the ZB to the tank variant of the Model 97: in particular the addition of the folding stock and the sight. The former is one aspect of the MG that Dragon get wrong, because the whole point of having a folding stock was to allow it to be hinged out of the way when being used from within the vehicle (the Russian tank MGs had a very similar system). I also added some (rough) detail to the ball mount to replicate the internal cradle.
View attachment 381993
View attachment 381994
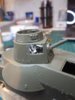
It's not perfect, but I think it will do. As you can see from the overhead shots, the MG adds to an already crowded interior. There's no way I could have left those large cupola hatches open without the machine gun on display. I am also going to have the side hatch open to better show off all my hard work!
View attachment 381995
View attachment 381996
View attachment 381997
The next part of the turret interior I had to tackle was the ball mounted MG.
During its service life the Ha-Go was equipped with two types of machine gun: the 6.5 mm and the 7.7 mm Model 97. The FineMolds kit gives you both options - but all you get are the ball mounts and the external armoured shrouds. Once again, I regretted not starting with the Dragon kit, which provides two beautifully moulded complete guns - even though the one in the hull cannot be seen.
I looked online for even the infantry equivalent in 1/35 and drew a blank. I was about to start trying to modify a Bren, but then I discovered that the Japanese Model 97 was actually a near copy of the Czech ZB 26 (which was, itself, the forerunner of the Bren). The most obvious differences between ther ZB and the Bren are the cooling ribs on the barrel and the square magazine on the former.
View attachment 381991
Even finding a ZB in 1/35 wasn't easy, which surprised me - it was a popular gun amongst the Germans in WW2. After all, they acquired a bunch of them when they annexed Czechoslovakia (along with all those 35 and 38(t) tanks). Eventually Tank came to the rescue (although I suspect these are OOP).
View attachment 381992
There was still quite a bit of work required to convert the ZB to the tank variant of the Model 97: in particular the addition of the folding stock and the sight. The former is one aspect of the MG that Dragon get wrong, because the whole point of having a folding stock was to allow it to be hinged out of the way when being used from within the vehicle (the Russian tank MGs had a very similar system). I also added some (rough) detail to the ball mount to replicate the internal cradle.
View attachment 381993
View attachment 381994
It's not perfect, but I think it will do. As you can see from the overhead shots, the MG adds to an already crowded interior. There's no way I could have left those large cupola hatches open without the machine gun on display. I am also going to have the side hatch open to better show off all my hard work!
View attachment 381995
View attachment 381996
View attachment 381997
Attachments
I suppose you are right Tim, but she was such a "honey". Speaking of honeies, that MG turned out really nice! I suspect that to be a Jap tanker one would have to be an accomplished contortionist! :smiling2: Rick H.
Hi Tim, beautifully done.:thumb2: Dragon has the Model97 gun I think in their Japanese figures for Peleliu and Tarawa. Looks nice and snug in the turret.
Cheers,
Richard
Cheers,
Richard
Thanks guys.
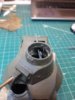
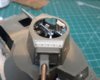
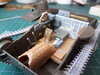
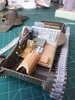
Now I have been having a little more fun with interior detail...
View attachment 390635
View attachment 390636
This is all loosely based on some interior shots I have of the real thing - but there's a fair amount of artistic licence going on. Basically I have used anything I could find in my spares box that looked even remotely right. Just enough to supply some shapes in the gloom beneath the turret or beyond the open driver's hatch.
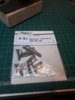
I also used Archer's rivet decals for the first time. These are a really neat idea - tiny resin rivets that come as slide transfers. You just have to cut out a strip, soak it in water for about 30 seconds and then slide it onto the model.
View attachment 390637
Here I have used them in the turret. The asbestos panels (a fairly unique feature of Japanese tanks) were made from plastic strip and tea bags!
Now I have been having a little more fun with interior detail...
View attachment 390635
View attachment 390636
This is all loosely based on some interior shots I have of the real thing - but there's a fair amount of artistic licence going on. Basically I have used anything I could find in my spares box that looked even remotely right. Just enough to supply some shapes in the gloom beneath the turret or beyond the open driver's hatch.
I also used Archer's rivet decals for the first time. These are a really neat idea - tiny resin rivets that come as slide transfers. You just have to cut out a strip, soak it in water for about 30 seconds and then slide it onto the model.
View attachment 390637
Here I have used them in the turret. The asbestos panels (a fairly unique feature of Japanese tanks) were made from plastic strip and tea bags!
Attachments
Greatly enhanced Tim...it's more than enough to appear like the real thing once closed up and in the gloom. Reminds me of the scratched mock up models for the Starwars movies all made up from bits and bobs of several kits. :thumb2:
Cheers,
Richard
Cheers,
Richard
Some nice scratching Tim :thumb2:
Don't know why you bothered buying that Tank MG though - for the amount you actually used you could have easily scratched that
The 'creative gizmology' ,as Shep Paine called it, will definitely provide enough of a suggestion of internal detail
Are those a couple of cylinder heads on the right and rear?
- Joined
- Apr 27, 2018
- Messages
- 15,122
1/3
Lovely work Tim it will look excellent when painted.
Thanks guys.
Star Wars? Shep Paine? Are you kidding?! I wish...
Yes, maybe I should have just stuck with adapting a Bren gun in the end - but the straight magazine is a little hard to re-create. As for the bits an bobs, yes Simon they may be cylinder heads for all I know - they came from a T-34 interior.
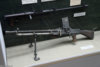
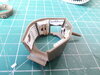
So here is the beginning of the diorama. The jungle scene is certainly going to be a challenge - but hey, that's half the fun!
The starting point for the base is insulation board rescued from a nearby building site (it came in bits, hence the odd gaps). This was glued to the baseboard and then carved and sanded to the desired contours. Then I added a frame from hardboard.
From the photos of the Maur River action, the road is actually quite wide. There is also quite a wide band of scrub before the treeline. However, artistic license (and limited space) has forced me to contract everything.


The 2 Pounder shown here is the Sovereign 2000 resin kit. However, in the end I have decided to go for the Vulcan version which, to my eye, is more true to scale.
The 'trees' are simply twigs inserted to give me an idea of the height and number required. Even though these are already shorter than true Rubber trees in this scale, I think I can get away with making them considerably shorter still.
For the trees themselves I am going to be using the wire technique, best demonstrated by the 'tree master' Gordon Gravett...

Star Wars? Shep Paine? Are you kidding?! I wish...
Yes, maybe I should have just stuck with adapting a Bren gun in the end - but the straight magazine is a little hard to re-create. As for the bits an bobs, yes Simon they may be cylinder heads for all I know - they came from a T-34 interior.
So here is the beginning of the diorama. The jungle scene is certainly going to be a challenge - but hey, that's half the fun!
The starting point for the base is insulation board rescued from a nearby building site (it came in bits, hence the odd gaps). This was glued to the baseboard and then carved and sanded to the desired contours. Then I added a frame from hardboard.
From the photos of the Maur River action, the road is actually quite wide. There is also quite a wide band of scrub before the treeline. However, artistic license (and limited space) has forced me to contract everything.
The 2 Pounder shown here is the Sovereign 2000 resin kit. However, in the end I have decided to go for the Vulcan version which, to my eye, is more true to scale.
The 'trees' are simply twigs inserted to give me an idea of the height and number required. Even though these are already shorter than true Rubber trees in this scale, I think I can get away with making them considerably shorter still.
For the trees themselves I am going to be using the wire technique, best demonstrated by the 'tree master' Gordon Gravett...
Terrific progress Tim, I agree with you on the tree height.......best thing for me has always been to hunker down as close to ground level as permits, then look up as if you were the same height as the scale you are modeling in......gives a whole different perspective. Rick H.:thumb2:
Legal Notice
scalemodelling.co.uk is a privately operated online discussion forum. All content posted by members reflects their own views and opinions and does not necessarily represent those of the forum owners or administrators. While reasonable efforts are made to moderate content, no responsibility is accepted for user-generated material. By using this site, you agree to comply with UK law and the forum rules.
Currently on our website
Threads
37,648
Messages
710,308
Members
2,679
Latest member
Professor Challenger