Theme editor

Scale Model Shop

The Road to Singapore: Malaya 1941-42

Eh Andrew...you got me confused with Tim I think.

Tim, great work on the pole, insulators and wire. You may need to bevel the outer tube to the pole as it was a one piece mold I think. Not sure if the base was white or silver as in the '70s it was painted silver.

Cheers,
Richard
 
Eh Andrew...you got me confused with Tim I think.

Tim, great work on the pole, insulators and wire. You may need to bevel the outer tube to the pole as it was a one piece mold I think. Not sure if the base was white or silver as in the '70s it was painted silver.

Cheers,
Richard
Oops.... Very embarrassing.... Now corrected.....
 
Thread owner
Eh Andrew...you got me confused with Tim I think.

Tim, great work on the pole, insulators and wire. You may need to bevel the outer tube to the pole as it was a one piece mold I think. Not sure if the base was white or silver as in the '70s it was painted silver.

Cheers,
Richard

Thanks Richard.

Now that's very interesting. The pole behind the gun in the famous shot of Parsons' gun does look a bit like it has silver paint - but I had assumed that was just solarization from the old photo. Oh well, I may decide to touch it up - but perhaps not for now.

I did bevel the lower part in to the upper in the end - some later photos will hopefully show that. But when you say "one piece mould" are you suggesting that these poles were actually made from something other than wood? If so, I'm afraid that I simply cannot face building the whole thing again!
 
Thread owner
Tim

Just had a quick catch-up. The road looks brilliant!!

I've found fishing line works really well for wire too. As an occasional fisherman, having been obsessed by it my youth, I have several different breaking strength lines and diameters to choose from. As you say it will last you a lifetime. In my case I just brush painted it with Vallejo's black primer.

Keep up the great work.

ATB.

Andrew

Thanks Andrew.

I'm afraid my only fishing adventures have been sea angling in Devon on Stag weekends. So this has been my first fishing purchase and may very well be my last!
 
Thread owner
Thanks everyone.

More to come...

OK, so here is where I am with one of the most important elements of the diorama: the 2 Pounder gun.

I might start a standalone thread for this build, but the long and the short of it is that I ended up going with the Vulcan plastic kit after I found that the Sovereign 2000 resin version was over-scale and inaccurate.

The Vulcan kit actually builds into a really nice piece with only a few parts (e.g. the open sight) needing refinement.

The biggest challenge, however, was to scratch build the side shields which were used on the 2 pounders in Malaya - and, it seems, almost nowhere else. If anyone has any images of them being deployed in combat elsewhere (e.g. France in 1940, North Africa) then I for one would love to see them!

Luckily I was alerted to some images of one of these guns preserved in Russia with the shields fitted - which does suggest that they were used on the Eastern front at the very least.

View attachment 434529

These images helped me with some of the details, although I am glad to say that I had already managed to work out most of these from the Bakri shots of Parsons’ gun. As a reminder here he is with the crew in front of the gun with its distinctive shields…

View attachment 434530

Here are the unpainted sub assemblies and other views of the completed but unpainted model. You will note that I Ieft off the gunner’s seat and the handwheels at this stage because I was still working out how to fit the figure in place.

View attachment 434531

View attachment 434532

View attachment 434533

View attachment 434534

View attachment 434535

One other modification was to leave the onboard ammo locker lid open. I used the tops of the ammo boxes which came with the kit (with the holes drilled out more) to make the racks inside, although I have yet to find any images of the inside of this locker to know whether this is accurate.

To make the various rivets on the shields I used a technique that was new to me, but which is absolutely brilliant. You put a small drill bit back to front in a pin vice and then use it to punch into a thin pewter sheet sitting on top of a pencil eraser (not the cork block sen here). As you push through the sheet, this makes perfectly shaped domed rivets which you can then pick out of the surface of the eraser with a sharp knife and glue in place with black (slow-drying) super glue. Any excess can then be cleaned up with debonder and a brush.

View attachment 434536

You can see the results here…

View attachment 434537


View attachment 434538

View attachment 434539
 

Attachments

  • e9e4f7e5ddf47ddd45f3d19b9cc8f4f009ff5ccc_2_666x500.jpg
    e9e4f7e5ddf47ddd45f3d19b9cc8f4f009ff5ccc_2_666x500.jpg
    2.8 KB · Views: 0
  • edc35c1b28dcdf50ec38de2c14dac551c36fcb79_2_690x388.jpg
    edc35c1b28dcdf50ec38de2c14dac551c36fcb79_2_690x388.jpg
    1.4 KB · Views: 0
  • adae550cac411459e0ac0ed6e4bacf98f7464074_2_690x388.jpg
    adae550cac411459e0ac0ed6e4bacf98f7464074_2_690x388.jpg
    2.3 KB · Views: 0
  • c752d21ee60f0d00d183ee394bd550516287ad75_2_690x388.jpg
    c752d21ee60f0d00d183ee394bd550516287ad75_2_690x388.jpg
    1.5 KB · Views: 0
  • 7c0e839a2506dff142094b3f6ede3f1d0e6cc674_2_690x388.jpg
    7c0e839a2506dff142094b3f6ede3f1d0e6cc674_2_690x388.jpg
    1.6 KB · Views: 0
  • d6dd754c8d90b1e5f9cc1a7a6f44583f08619cf9_2_690x388.jpg
    d6dd754c8d90b1e5f9cc1a7a6f44583f08619cf9_2_690x388.jpg
    1.7 KB · Views: 0
  • 371237c164c8c79ff015d8ba7a1420e9fd87a0bd_2_690x388.jpg
    371237c164c8c79ff015d8ba7a1420e9fd87a0bd_2_690x388.jpg
    1.6 KB · Views: 0
  • ffc77aa0e92377762f3ba8e00f6bb6d9308dfd60_2_690x388.jpg
    ffc77aa0e92377762f3ba8e00f6bb6d9308dfd60_2_690x388.jpg
    1.9 KB · Views: 0
  • 07f8ffe33a76fcb8ed00d62b9758938190e2c70f.jpg
    07f8ffe33a76fcb8ed00d62b9758938190e2c70f.jpg
    2.7 KB · Views: 0
  • b32da1689d3fc1726d3cb62132f99c593f97d83a_2_690x388.jpg
    b32da1689d3fc1726d3cb62132f99c593f97d83a_2_690x388.jpg
    1.4 KB · Views: 0
  • 9ab8f425a288b698f193ec6fbc3b76710abb837a_2_690x388.jpg
    9ab8f425a288b698f193ec6fbc3b76710abb837a_2_690x388.jpg
    1.4 KB · Views: 0
Lovely work Tim. Great to see the old rubber sheet rivet technique in use. Haven’t seen that for years. It should work with plastic card as well…..though lead sheet, rather than dense rubber, was recommended for that. sometimes it pays to grind the drill end flat to get a cleaner cut.
 
Thanks Richard.

Now that's very interesting. The pole behind the gun in the famous shot of Parsons' gun does look a bit like it has silver paint - but I had assumed that was just solarization from the old photo. Oh well, I may decide to touch it up - but perhaps not for now.

I did bevel the lower part in to the upper in the end - some later photos will hopefully show that. But when you say "one piece mould" are you suggesting that these poles were actually made from something other than wood? If so, I'm afraid that I simply cannot face building the whole thing again!
Hi Tim,
Doesn't matter if it's white or silver. Most photos in B/W look white and no one is alive to even remember a pole on the side of the road. The material is definitely metal...perhaps pressed into shape when rolled out as it is extruded. The other type of pole was in concrete mostly found in little towns. If you check out some of the pictures of the Baling Peace talks you'd see one of these.

Cheers,
Richard
 
"So I decided to go for a material which I haven’t used in years and which, I suppose, is very old school: rubberised horsehair."

Hi Tim, using the horse hair techique is correct. Now, the underbrush along roads in the tropics is unlike those in countries that have four seasons where the underbrush lose their leaves in autumn and are dead or bare by winter then they regenerate during spring with new shoots or leaves. In the tropics the bushes grow 365 days and more. Fighting for the sunlight they basically grow over themselves creating empty dead ranches underneath and these look just like your horse hair. I use lichen or spagnum moss to build up underneath my bushes.

Kudos to you for thinking hard enough to solve the issue. I have rolls of dead roots which I will use for my stream dio.

The gun is wicked I must say with all them rivets and detai.

Cheers,
Richard
 
Thread owner
Thanks Richard. I really do value any advice, but especially from those 'on the ground'.

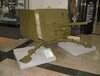
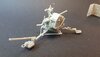
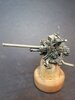
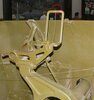
The Vulcan kit really is a little gem… apart from the shields and opening up the storage bin, the only things which really require extra attention are the open sights.

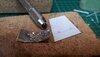
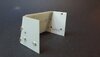
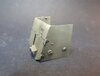
The rear sight is provided in the kit, but its just too clunky. So I replaced it with one made with fine wire shaped on a simple jig… and an even finer wire for the vertical cross-hair. The foresight and it’s hinged mount are missing completely - you can see it folded down in the image below - but this was easily added from wire and plastic card.

View attachment 435143

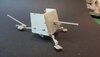
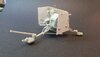
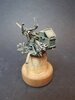
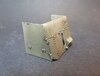
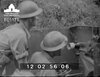
There is also a tensioning bar for the side shields which fits into brackets at the top of the starboard side (roughly midway from front to back) and half way down the port shield (nearer the front). It’s missing in the image above (although there is a wire in place), but easily spotted in the Bakri Road photos. It’s the rod which can be seen above the loader’s head…

View attachment 435144
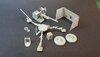
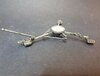
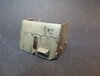
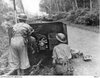
The other end can be seen running into the timing strip just above the traverse handwheel in this photo…

View attachment 435145

Because it actually runs at an angle between the shield and the main gun sight, it can’t be fitted until the shield is glued in place.

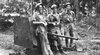
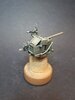
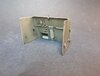
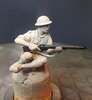
So here are some images of the gun nearing completion after base coat and initial weathering. The main shade is Mr Paint MRP-333 Khaki Green No.3/G3.

Now someone is probably going to tell me that this is the wrong colour, but I have done some research and, as far as I can tell, there is no firm evidence as to what you would expect for a gun manufactured in Australia and sent to Far East in 1941. The shade of the gun in the photos above certainly looks darker than the khaki drill uniforms of the crew and, after all, this was destined for the jungle, not the desert.

View attachment 435146

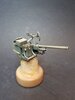
The MRP acrylic sprays beautifully from the airbrush without any need for thinner, but be warned (I learned the hard way) that this is a lacquer based paint and lacquer thinner - NOT WATER - needs to be used for cleaning! Eventually (after having to strip the first coat from the model) I used Mr Color 400 Levelling Thinner.

For highlights I added a little Tamiya Buff XF-57 (Tamiya paints mix fine), then added chips, scuffs and scratches with an even lighter mix of the above, infilled with the original base coat + dark grey and, where appropriate, steel. Details were picked out in various places with different shades - the breach block, for example, should be quite shiny, the leather strap for the spare ammo boxes, etc.

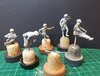
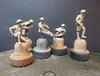
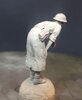
Please note that this is not the final weathering because I am waiting to have everything almost finished - tank, gun, figures and base - before going in for the final unifying dust coat.

View attachment 435147

View attachment 435148

View attachment 435149

View attachment 435150

View attachment 435151

View attachment 435152

View attachment 435153

View attachment 435154

View attachment 435155
 

Attachments

  • e0912c5c59d0ad404750fa1d3c8e548feabdc14c_2_375x500.jpg
    e0912c5c59d0ad404750fa1d3c8e548feabdc14c_2_375x500.jpg
    1.8 KB · Views: 0
  • f8c7e4374fead661abe93dd42465c5773a87dab6_2_375x500.jpg
    f8c7e4374fead661abe93dd42465c5773a87dab6_2_375x500.jpg
    1.9 KB · Views: 0
  • fd87e764ff7f5d33edac24671d6905a5ba4b54d7_2_375x500.jpg
    fd87e764ff7f5d33edac24671d6905a5ba4b54d7_2_375x500.jpg
    2 KB · Views: 0
  • 8a063a0371daae627fc593d62f20f59a45982d58_2_375x500.jpg
    8a063a0371daae627fc593d62f20f59a45982d58_2_375x500.jpg
    2 KB · Views: 0
  • a2246849b2587572d0427e033522aa9f7bdc3cb3_2_666x500.jpg
    a2246849b2587572d0427e033522aa9f7bdc3cb3_2_666x500.jpg
    1.8 KB · Views: 0
  • 511300bc434c385d3993b139ca488993fb7f60f3_2_666x500.jpg
    511300bc434c385d3993b139ca488993fb7f60f3_2_666x500.jpg
    1.7 KB · Views: 0
  • 20ed5b01a8a60912c58036214edc016511f9afb8_2_666x500.jpg
    20ed5b01a8a60912c58036214edc016511f9afb8_2_666x500.jpg
    1.7 KB · Views: 0
  • 72aee06c691ca2c46222808cb8bd24ca8235034b_2_666x500.jpg
    72aee06c691ca2c46222808cb8bd24ca8235034b_2_666x500.jpg
    1.8 KB · Views: 0
  • 1a90235122144dee3dfae6d5d807bd33bb390fa0_2_666x500.jpg
    1a90235122144dee3dfae6d5d807bd33bb390fa0_2_666x500.jpg
    1.7 KB · Views: 0
  • 6beaf7af402eb23d62a77db32625ddeb541e8b23.jpg
    6beaf7af402eb23d62a77db32625ddeb541e8b23.jpg
    4.1 KB · Views: 0
  • 48603a64f6d8f32fd65ea1cc86bdd54cf9f7a153_2_657x500.jpg
    48603a64f6d8f32fd65ea1cc86bdd54cf9f7a153_2_657x500.jpg
    2.7 KB · Views: 0
  • f49e0d7fa8e3a18efd86b1041e2ebbb76aeefc70.jpg
    f49e0d7fa8e3a18efd86b1041e2ebbb76aeefc70.jpg
    3 KB · Views: 0
  • 04912d44077e44066cfd1e90cd9f97f7e4f2b9e8_2_466x500.jpg
    04912d44077e44066cfd1e90cd9f97f7e4f2b9e8_2_466x500.jpg
    3.2 KB · Views: 0
I've actually seen the gun at AWM in Canberra when I visited but didn't pay much attention to it and now regretting. I think I may have some photos. Under the museum soft lights I couldn't make out the actual color. My funny comment was "Ah...it's the 2 pounder that was used at Bakri"...somebody should have slapped the back of my head to take more shots of it.

Cheers,
Richard
 
Hi Tim, I've only got these two shots and it didn't have the side shields. I think the actual guns were never brought back to Australia.

IMG-20151230-WA0000.jpgIMG-20151230-WA0009.jpg

Unfortunately not much help.

Cheers,
Richard
 
Thread owner
Thanks everyone - and especially Richard for the photos. I agree that it's very unlikely that any of the 2 pounders used in Malaya (or Singapore) ever made it back to Australia...

Now, on to the figures…

View attachment 436862

View attachment 436863

It has been two years since my last figures were being readied for my ‘Liberation, Italy 1944’ dio. In the end there were a whopping eleven in all - and I’m not making that mistake again any time soon… I admit that I have been nervous about doing it all again.

In the iconic photograph at the top of this blog there are four men: Sgt Parsons and two of the gun crew. There’s also a guy with a rifle just visible to the left. He may well be part of the 2 pounder crew as well, because in the cine film taken at around the same time there are four actually serving the gun. Obviously there would have been others in the immediate vicinity, but I feel these are enough to tell the story for now.

Finally, there is the Madras sapper, who I have already trailered above. I’m very glad to have him, because otherwise the figures would all be bunched up at the extreme left of the scene. He also adds scale to the Ha-Go and the trees and, just as importantly, helps to explain why the tree has been felled. I just know that some people looking at this diorama are going to be asking: "How come the tree has fallen behind the tank?!

So here are the figures in either their pre-painted state or after an airbrushed coat of Vallejo Medium Grey 987 (which I read somewhere was a good starting point for Khaki Drill). They are largely a mixture of Miniart, Masterbox and Dragon with heads from Hornet or Royal Models. Re-sculpted webbing is made from Tamiya masking tape, over-painted with Mr Surfacer and any gaps were filled first with Magic Sculpt and then Mr Dissolved Putty.

View attachment 436864

View attachment 436865

View attachment 436866

View attachment 436867

I took some time to rework the ‘Bombay bloomers’ worn by Sgt Parsons to give them more wrinkles and folds.

View attachment 436868

The gunner was the hardest figure of all, because he has to fit. He started out with shorts, but looking at the Bakri images at least one of the gunners had long trousers, so I decided to sculpt these - partly to hide all the surgery on his legs. The head on this guy (and the left hand) is from Royal Models - he has a fantastic ‘triumphant’ expression!

View attachment 436869

View attachment 436870
20211007_1819451920×2070 121 KB


View attachment 436871

View attachment 436872

View attachment 436873

View attachment 436874


View attachment 436875

So... let brush painting commence!
 

Attachments

  • caeb689ea3b9c14cde2b50258ef383d1663888d8_2_379x500.jpg
    caeb689ea3b9c14cde2b50258ef383d1663888d8_2_379x500.jpg
    2.2 KB · Views: 0
  • 88f5642525af25bb41af8bc6536e70f5d85d3673_2_666x500.jpg
    88f5642525af25bb41af8bc6536e70f5d85d3673_2_666x500.jpg
    3.1 KB · Views: 0
  • 64fa795c3acdf898202845a11bb73bb547078eab_2_666x500.jpg
    64fa795c3acdf898202845a11bb73bb547078eab_2_666x500.jpg
    2.7 KB · Views: 0
  • 72aa9ad2b86c5b5b542b6052b4f730cfb6500829_2_458x500.jpg
    72aa9ad2b86c5b5b542b6052b4f730cfb6500829_2_458x500.jpg
    2.6 KB · Views: 0
  • 8abc5b93e8d91722d5834eda3a3ad7bc028e5585_2_408x500.jpg
    8abc5b93e8d91722d5834eda3a3ad7bc028e5585_2_408x500.jpg
    2.1 KB · Views: 0
  • 2b94527efb0bc12248118916555de918631c6e6b_2_321x500.jpg
    2b94527efb0bc12248118916555de918631c6e6b_2_321x500.jpg
    2 KB · Views: 0
  • 6aec81b3e059673c8abbd789876d875684eee0fd_2_460x500.jpg
    6aec81b3e059673c8abbd789876d875684eee0fd_2_460x500.jpg
    2.5 KB · Views: 0
  • 3e8eabdce043e2164453ee19282c05dd3cc33493_2_443x500.jpg
    3e8eabdce043e2164453ee19282c05dd3cc33493_2_443x500.jpg
    2.3 KB · Views: 0
  • 065a0852e96f3be8bc94b4aeea46ffd9a6c21c32_2_375x500.jpg
    065a0852e96f3be8bc94b4aeea46ffd9a6c21c32_2_375x500.jpg
    2.3 KB · Views: 0
  • 125f520991088d7eea45baa47c7162307130c41a_2_463x500.jpg
    125f520991088d7eea45baa47c7162307130c41a_2_463x500.jpg
    2.3 KB · Views: 0
  • 5f5854da4a985d47ebc1c193bb90e88e01d8d5bb_2_374x500.jpg
    5f5854da4a985d47ebc1c193bb90e88e01d8d5bb_2_374x500.jpg
    2 KB · Views: 0
  • 03a74851d28c74b697fbd9ef2508ccb083ff5e83_2_357x500.jpg
    03a74851d28c74b697fbd9ef2508ccb083ff5e83_2_357x500.jpg
    2 KB · Views: 0
  • 48e274cde44ae4d16c1a5402b4c23184b7a83ed1_2_401x500.jpg
    48e274cde44ae4d16c1a5402b4c23184b7a83ed1_2_401x500.jpg
    2.1 KB · Views: 0
  • bd82170732d9f64d21373da2f19d669902a501eb_2_305x500.jpg
    bd82170732d9f64d21373da2f19d669902a501eb_2_305x500.jpg
    2 KB · Views: 0
Hi Tim, just got back around to this and the progress you have made is phenomenal! Keep it coming Sir. :thumb2: Rick H.
 
The figures are looking good Tim, like the odd Sikh Sapper.

Cheers,
Richard
 
Back
Top