Theme editor

Scale Model Shop

Tonys Italeri 1/48 Spitfire mk XVI

Thread owner
Thanks everyone , its picking up pace now .
The lower wing was fitted first so that I can get the wingroot gaps tighter when I fit the tops but before that theres the cannon bulges to sort . Because the tooling started life as a mk IX the bulges are on the inboard cannon location whereas the mk XVI had the cannon in the outboard one so the bulges are in the wrong place . The kit would have you cut out the cannon access panel and replace it with a different one but reviews Ive read say the replacements are too small . Easier ( to my mind anyway) to sand off the incorrect bulge and sand the replacement panel till ive just got the bulge then fit this in the correct place . It turned out fine and the wing tops are now on and drying with the standard spitfire wing dihedral jig ( tape across the wingtips !)
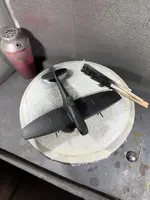
Its really starting to look like a spit now . IMG_6878.webpIMG_6869.webpIMG_6870.webpIMG_6872.webpIMG_6873.webpIMG_6875.webpIMG_6880.webp
 
Thread owner
Lovely work Tony, this is coming along nicely and quickly
Thanks joe , its not a shake n bake but I’m enjoying knocking it into shape , soon be ready for paint and then I’m undecided whether to go for the free french or belgian markings ?
 
Thread owner
Just getting the airframe ready for priming . The windscreen has been glued on and its had a general tidy up . While doing this I noticed the shell ejection ports on the outer wings - but no holes for the machine guns . Again this must be a throwback from when the moulds were for the mk IX . The wing on the mk IXc ( universal wing c suffix ) had a single cannon inboard and two .303 mgs on the outer wing . The later universal wings ( e suffix ) as fitted to the mk XVI didnt all have the outer machine guns just the cannon . Anyhoo the point is ive had to fill the shell ejection ports as I finally decided to do the Belgian scheme and all pics I can find of the Belgian mk XVI s dont show the outer machine guns . IMG_6885.webp
 
Great work. Your attention to detail, once again, is amazing.
 
Great job on the internals and sorting out that spinner alignment Tony.

Nick
 
Thread owner
After a last tidy up and masking the canopy its time for some paint. The yellow wing leading edges and propeller tips were first primed white then painted yellow . Once dry these were masked off and the prop and airframe have had a couple of coats of black primer .IMG_6900.webpIMG_6901.webp
 

Attachments

  • IMG_6901.webp
    IMG_6901.webp
    921.6 KB · Views: 1
Well certainly a few challenging issues. You've done a great job of sorting them out. Now you're at the painting stage things should hopefully go smoothly.
 
After a last tidy up and masking the canopy its time for some paint. The yellow wing leading edges and propeller tips were first primed white then painted yellow . Once dry these were masked off and the prop and airframe have had a couple of coats of black primer .View attachment 1282131View attachment 1282133


Looking good Tony.

Will have to try that 'two stage' priming trick for yellow leading edges in the future. Doing a lighter just for the yellow and them masking the yellow off ahead of the black primer seems like a good idea......I normally leave them until the end and then of course have to take my time to get decent coverage for the yellow over the main camo job. Thanks for the idea!!

ATB

Andrew
 
Blimey Tony, that’s a lot of progress since I lasted looked and it’s looking very nice too 👌

Geoff,
 
Back
Top