Theme editor

Scale Model Shop

Trumpeter 1/32 TMB-3 Avenger

Status
Not open for further replies.
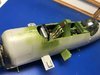
Looking good Barry, the cockpit looks great.
Wish Trumpy did a Devastator. Now I mention it, before that I'd like any manufacturer to do a Kate or Val in 1/32. Seems mad that there isn't a single kit!
Looking forward to the progress
Cheers
P
 
Looks fantastic so far.Like you i hate P.E with a vengeance.Drives me mad gluing the damn stuff.
Keep it up.
Richard
 
Thread owner
I have painted some more internals. I will do some weathering in my next session after I am back from a few days away.

The instructions say the bomb bay should be tan which I thought odd. Well I suppose Zinc Chromate, as below, might look a little like tan in poor light.

View attachment 312417
 

Attachments

  • 4C459A67-47A3-49FB-B6A1-5E7ECFDB764A.jpeg
    4C459A67-47A3-49FB-B6A1-5E7ECFDB764A.jpeg
    3.9 KB · Views: 0
Great work Barry , totally agree with you about the tiny impossible pieces of PE , how they expect you to glue something thats about 1mm long with a contact point about a tenth of a square mm is beyond me! Ive only really used PE for seatbelts and larger items , if ive ever had anything tiny like this Ive done what you did and either ignored it or used plastic instead . That said Ive got a tiny helicopter in the stash thats about 50% pe so i guess ive got to face my demons sometime! The bomb bay paint call out from trumpeter seems a bit off , all the pics ive seen of walkarounds of the TBM show it in a dark green same as your cockpit , heres a good one of an unrestored bomb bay http://www.usshornet-cv12.com/aircraft/TBM3E Avenger/slides/TBM_41.html cheers tony
 
Hi Barry
This is a great example of neat, skilled modelling. The results say it all. Cockpit looks excellent. A question if I may. Those Uschi metal powders. Do you treat them as pigments and sort of dry brush them into place? Do they need fixing in any way? They certainly look good.
Jim
 
Thread owner
Great work Barry , totally agree with you about the tiny impossible pieces of PE , how they expect you to glue something thats about 1mm long with a contact point about a tenth of a square mm is beyond me! Ive only really used PE for seatbelts and larger items , if ive ever had anything tiny like this Ive done what you did and either ignored it or used plastic instead . That said Ive got a tiny helicopter in the stash thats about 50% pe so i guess ive got to face my demons sometime! The bomb bay paint call out from trumpeter seems a bit off , all the pics ive seen of walkarounds of the TBM show it in a dark green same as your cockpit , heres a good one of an unrestored bomb bay http://www.usshornet-cv12.com/aircraft/TBM3E Avenger/slides/TBM_41.html cheers tony
Thanks for the link Tony. Looking at that, once I have done some washes it won’t be far off.
 
Thread owner
Hi Barry
This is a great example of neat, skilled modelling. The results say it all. Cockpit looks excellent. A question if I may. Those Uschi metal powders. Do you treat them as pigments and sort of dry brush them into place? Do they need fixing in any way? They certainly look good.
Jim
Hi Jim
They are very flexible and can be used in many different ways.

I do simply dry brush over matt black to depict an engine for instance. It can also work for gunmetal.

I also sometimes apply with a cotton bud, the extra small Tammy ones are good in some circumstances in small areas.

I also will use a cocktail stick to depict chipping.

You can just use a finger or a cotton bud to rub it in and polish the surface to do a natural metal finish. The result of the latter is influenced by the paint colour that you apply to.

Worth getting some and experimenting.
 
Looking good Barry. This kit has a lot of nice detail just waiting for you to enhance.
 
Thanks Barry for that info. Certainly worth buying judging by your results.
Jim
 
Thread owner

Attachments

  • 0DE99FC8-7AFB-41DD-9D4F-E9770B8FA237.jpeg
    0DE99FC8-7AFB-41DD-9D4F-E9770B8FA237.jpeg
    3.9 KB · Views: 0
  • 02090089-6F1F-4381-9F01-E0BBCCBEF99F.jpeg
    02090089-6F1F-4381-9F01-E0BBCCBEF99F.jpeg
    4.2 KB · Views: 0
  • 98E89093-3339-4E78-AED3-AB16AC999491.jpeg
    98E89093-3339-4E78-AED3-AB16AC999491.jpeg
    3.6 KB · Views: 0
  • F5D8FAD3-6EBD-4D61-9042-AC228EA3B2C4.jpeg
    F5D8FAD3-6EBD-4D61-9042-AC228EA3B2C4.jpeg
    2.9 KB · Views: 0
  • 46A36929-0780-42B2-83E4-8B603199E901.jpeg
    46A36929-0780-42B2-83E4-8B603199E901.jpeg
    3.4 KB · Views: 0
Thread owner

Attachments

  • 12C89140-C268-47A0-BF83-B7A1E243DAFC.jpeg
    12C89140-C268-47A0-BF83-B7A1E243DAFC.jpeg
    3.3 KB · Views: 0
  • 3E1B4E89-EC0E-4566-8DD0-90E0764EB777.jpeg
    3E1B4E89-EC0E-4566-8DD0-90E0764EB777.jpeg
    3.4 KB · Views: 0
  • 0538AAA9-DA7A-4182-9EC4-0DB3F3239D43.jpeg
    0538AAA9-DA7A-4182-9EC4-0DB3F3239D43.jpeg
    3.4 KB · Views: 0
  • A554D105-5409-403F-BACC-C71C30ED8217.jpeg
    A554D105-5409-403F-BACC-C71C30ED8217.jpeg
    3.9 KB · Views: 0
Thread owner
As you can see there is an awful lot of 'innards' to go in this model...
View attachment 313869
The good news is that it all fits perfectly. You do need to go slowly joining the fuselage halves though. Keep test fitting and checking to make sure everything is in place. If something does not fit quite right then it will not be the model, it will be you, so check it and work out what you did wrong and correct it before the final fit. In my case I found a small gap between the firewall and fuselage half on one side. I did not try to force it but razor sawed two engine mounts on one side, these are thick strong pieces. The thickness of the razor saw was enough and the engine sprang into place. I wanted to keep some play and did not cement the engine mounts back together as there is enough plastic to join the firewall to fuselage with a strong enough join to secure the structural integrity of the model. You can see the engine mounts between the firewall and bulkhead where they wont be seen, there are two on each side.

View attachment 313870
Abover, test fitted ready to 'tac' some Mr Cement S in places along the seam. I did find a need to hold the sides together more securly with a clamp however.
View attachment 313871
You can see a casualty of the repeated test fitting, a bomb got knocked off its mount. I will superglue that back in place tonight after I have removed the clamp and tape after which I will run Mr S Cement along all the seams before sanding.
 

Attachments

  • IMG_3911.jpg
    IMG_3911.jpg
    3.1 KB · Views: 0
  • IMG_3909 (002).jpg
    IMG_3909 (002).jpg
    3.3 KB · Views: 0
  • IMG_3910 (002).jpg
    IMG_3910 (002).jpg
    3.1 KB · Views: 0
That interior is really full....loads of detail in this one, hard to believe it’s a single engined plane....great work Barry
 
Thread owner
I removed the tape and ran Mr S Cement down the fuselage seam. Tonight I will be sanding and doing a little filling.
View attachment 313992

I then got on with the engine cowl with some p.e.
View attachment 313993
The tail rudder is made to be inserted before you join the fuselage halves. But it has a very prominent mast on top and if I did that it would not last 5 minutes.
View attachment 313994
The answer is simple, cut off the location 'swivel' pin from the bottom.
View attachment 313995
Then, later perhaps after painting, I will be able to simply glue the piece into place, mast intact...
Dry fitted to check...
View attachment 313996
I will be starting the wings tonight when I have finished working on the seam.

I am taking this slowly as this was an area that gave me issues on my last build of one of these.
The wing hinge mechanism is fragile and I will not use it. I will be cementing the wings open and I will need to make sure the wing join is strong. I anticipate the use of plastic card but I will need to do a fair bit of test fitting to get it right.
 

Attachments

  • IMG_3915.jpg
    IMG_3915.jpg
    2.3 KB · Views: 0
  • IMG_3916 (002).jpg
    IMG_3916 (002).jpg
    2.4 KB · Views: 0
  • IMG_4226 (002).jpg
    IMG_4226 (002).jpg
    2.6 KB · Views: 0
  • IMG_3914 (002).jpg
    IMG_3914 (002).jpg
    2.5 KB · Views: 0
  • IMG_3912 (002).jpg
    IMG_3912 (002).jpg
    2.9 KB · Views: 0
Thread owner

Attachments

  • IMG_4228 (002).jpg
    IMG_4228 (002).jpg
    2.5 KB · Views: 0
  • IMG_4229 (002).jpg
    IMG_4229 (002).jpg
    3.5 KB · Views: 0
  • IMG_4230 (002).jpg
    IMG_4230 (002).jpg
    2.9 KB · Views: 0
  • IMG_4231 (002).jpg
    IMG_4231 (002).jpg
    2.8 KB · Views: 0
  • IMG_4232 (002).jpg
    IMG_4232 (002).jpg
    2.9 KB · Views: 0
Thread owner
A few more progress shots.

The wing main structures are done apart from some surface treatments/sanding etc. I will also need to attach some pe detailing.
View attachment 314506
The main undercart assembly done, to be painted before finishing.
View attachment 314507
I have to say that this is a nice and strong assembly, no worries about fitting this.

Tailplanes
View attachment 314508

I am also getting on with some stores assembly, trimming and sanding. A fair bit more of that to do tonight.
View attachment 314509
 

Attachments

  • IMG_4233 (002).jpg
    IMG_4233 (002).jpg
    2.5 KB · Views: 0
  • IMG_4234 (002).jpg
    IMG_4234 (002).jpg
    2.3 KB · Views: 0
  • IMG_4235 (002).jpg
    IMG_4235 (002).jpg
    2.2 KB · Views: 0
  • IMG_4237 (002).jpg
    IMG_4237 (002).jpg
    2.6 KB · Views: 0
Barry

I am very impressed with your builds. I must say you were certainly part of my motivation to have a go at an aircraft myself. Watching carefully to pick up all the tips I can.

John
 
Status
Not open for further replies.
Back
Top