Theme editor

Scale Model Shop

Italeri 1:48 Wessex UH 5

Status
Not open for further replies.
Thread owner
Hot water is an old trick Joe, probably used by modelers since the dark ages (before internet).

So, a bit more progress.

View attachment 62493

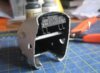
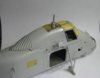
The nose has been sanded and stretched, a spreader bar slipped to keep it the correct width. The IP sits in the nose, which then has to line up with the cockpit later - a bit difficult - easy to knock those 'pedals' off.

View attachment 62494

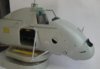
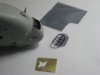
Some pieces of the kit supplied PE. I've only ever dealt with angled PE before so making curves has been interesting - the best tool I found for curving the PE was my glasses case, it's got curves of varying degrees all over it.

View attachment 62495

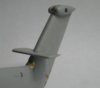
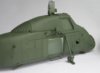
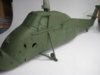
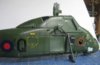
Hot off the press - I've just fitted the landing gear this morning, giving it all day to set whilst I spend the day in the garden. However, beware (if you're going to have a go of this kit) the instructions are wrong here. The longest part of the landing gear, needs to be swapped with the other side.

Right, I'm off to do some hanging baskets - it's sunny.........................

View attachment 63949

View attachment 63950

View attachment 63951

View attachment 176975

View attachment 176976

View attachment 176977
 

Attachments

  • Instrument panel.jpg
    Instrument panel.jpg
    2.9 KB · Views: 0
  • Landing gear.jpg
    Landing gear.jpg
    1.8 KB · Views: 0
  • PE.jpg
    PE.jpg
    1.3 KB · Views: 0
Hi Colin

This whirlybird seems to be shaping up very nicely. I've never built a helicopter kit but this does look cool. This is another one of those builds that makes me want to go out and buy a kit!

The Wessex has a very strong look - very British and, to my eye, really cool.

look forward to seeing the finished model

Cheers

P
 
This is looking very nice. I might just have to get me one of those. It looks just how a helicopter should look.

Ian M
 
Thread owner
It's a good looking kit gentlemen. Very nice detail, just tricky enough in places to test the builder !
 
Thread owner
June in three weeks time. I should be able to finish by then............................

So, a bit more has been done, not helped in the slightest by a brilliant Bank Holiday weekend. Right, big push now.

View attachment 62676

This nice bit of PE needed to be bent, or should that be shaped, in just about every plane going. I'm normally a sort of right angle type person. But the air intake mesh is actually plastic (kit supplied) and cuts / shapes very well.

View attachment 62677View attachment 62678

The PE in place, it was glued in bit by bit, slowly bending where needed. The cockpit glazing was also added and didn't fit to well. I wonder what primering will show up here later.

Anyway, it's now time for some tricky masking and hopefully a bit of primer later.

View attachment 64127

View attachment 64128

View attachment 64129

View attachment 177153

View attachment 177154

View attachment 177155
 

Attachments

  • Fuselage 2.jpg
    Fuselage 2.jpg
    1.9 KB · Views: 0
  • Fuselage 1.jpg
    Fuselage 1.jpg
    1.8 KB · Views: 0
  • Fuselage 3.jpg
    Fuselage 3.jpg
    1.7 KB · Views: 0
It's going to be a stunner when it's finished Colin. Cheers Derek
 
Looking good Colin.Im tempted to try a helicopter after watching your build.
 
Looking sweet Colin,really clean build ya got going. Eagerly awaiting the next update!
 
\ said:
Hi ColinThe Wessex has a very strong look - very British and, to my eye, really cool.

look forward to seeing the finished model

Cheers

P
Actually Paul as a matter of interest it is a Sikorsky Choctow which was taken by Westlands who turned it into a turbine powered helicopter with a number of other mods.

I built the Revell type 1/48 a few months back. Colins model has been by the look of it manufactured as a Wessex. Mine the Revell was the Sikorsky but with minor aqmendments. The wheel support on my Wessex had the three supports which is as the Sikorsky whilst the Wessex actually had only two supports as Colins model. Suppose you could term my model a Sickorsky.

Nice going Colin. You have the fun of the Decal on that front bulbous bit at the front. Put mine on with just water none of the other concoctions which proves you do not need them. Looks nice as a finished model as it has so many wire control links.

Laurie
 
Thread owner
Thanks for the above Laurie, however I have escaped the big decal at the front as this model will be X Q as was in the Falklands and so has no decal at the front. There's an interesting bit of history with this aircraft, more of that later.

Quick update. Preshading done (after primer which showed no problems) but I don't hold much hope for it, as the overall green finish is so dark, I'm sure I'll loose the preshading. No matter, as ever, post shading will come to the rescue.

View attachment 62885

I was hoping to get the top coat on today, but we have a beer festival in the village - a slight distraction.

View attachment 64277

View attachment 177303
 

Attachments

  • Preshade.jpg
    Preshade.jpg
    2.2 KB · Views: 0
That is sad I was relying on that to make it difficult Colin. No big decal.

Paul did not finish as I wanted on the Sikorsky. I agree I thought it was very British & very suprised to find it was an USA design just does not look American. It has a friendly look as opposed to the USA types which look aggresive.

Laurie
 
Hmm paint a helicopter 'V' beer fest No brainer really.

Ian M
 
Thread owner
So, I survived the beer festival (better than the wife did) and actually managed a bit of work as well. No, not on the same day.

View attachment 63001View attachment 63002

I'm actually a bit further on, it's all glossed and ready for decals. I used Vallejo gloss as I couldn't be bothered applying 2 or 3 coats of Klear - just lazy. The preshade is still there, well at least the black is, but the brown has gone, which I thought it might, but I wanted to see if it would work. It didn't.

Now, finding the colour has been a bit of a pain. Italeri quote all sort of equivalent paints for colours. But for for "RAF matt olive green" you're on your own. So I found this shade of green which Vallejo like to call "olive grey" No, I can't work it out either, maybe something got lost in translation.

Right, decals...................

View attachment 64369

View attachment 64370

View attachment 177395

View attachment 177396
 

Attachments

  • Paint stbd side.jpg
    Paint stbd side.jpg
    1.7 KB · Views: 0
  • Paint port side.jpg
    Paint port side.jpg
    2 KB · Views: 0
Good man Colin pure taste Vallejo gloss for Klear.

No contest then !

Laurie
 
Thread owner
The light at the end of the tunnel is bright now......

Model all nice and shiny, and decals in place. There's a chance I'll be finished tomorrow. OK not exactly first across the finish line, but I'm just happy to make the deadline.

Laurie, one coat of Vallejo was enough - I might be a convert, and sell all my Klear on ebay, then retire on the proceeds.

View attachment 63199

View attachment 64558

View attachment 177584
 

Attachments

  • Decals.jpg
    Decals.jpg
    2.3 KB · Views: 0
Status
Not open for further replies.
Back
Top