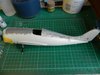
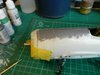
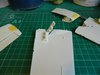
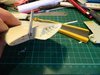
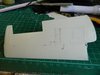
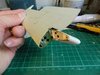
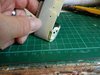
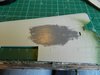
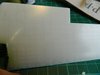
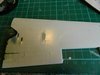
Fuselage is now together , now theres the problem of treating the seams without losing the raised detail. Ive done this in the past by carefully sanding up to the raised line and reinstating the rivets but this time I think im going to use a different approach (one ive also used before) . This second method involves sanding the seam as normal then using a sharp blade (not a scriber) marking the line back on . This creates a groove yes ,but it also raises the plastic either side and once painted gives the impression the raised line carries on over the seam. The rivets are also treated in the same way ,a sharp point being used to mark them which raises the plastic . The large screw heads on the engine cowling have been reinstated by using blobs of filler which will be sanded back a bit later . Heres the pics to show what i meanView attachment 296483View attachment 296484View attachment 296485

You are using an out of date browser. It may not display this or other websites correctly.
You should upgrade or use an alternative browser.
You should upgrade or use an alternative browser.
Revell 1/32 Grumman Martlet V
- Thread starter yak face
- Start date
- Status
- Not open for further replies.

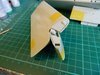
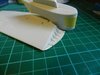
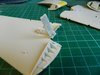
Little bit more progress on this yesterday. Ive sanded the bottom seam but still need to re-instate the rivets. I'm going have the wings folded on this one but obviously the working hinges and much simplified wing fold need attention. Thanks to some excellent walkarounds on the web ,pictures are plentiful so off I went drilling holes, chopping bits off and adding bits. I originally planned to use the kit hinges to get the right angle and thin them down and disguise them but they just looked rubbish so I had to think of something else. The mounting points for the kit hinges could be used to slot in a section of plastic strip attached to the outer wing,meaning I can leave off the wings for painting and just slot them on last off. I found a couple of suitably sized pylons in the spares box and cut them to size , but how to fasten them to the outer wing strongly enough? I resorted to screwing them with tiny screws which will be hidden once its assembled. Theres still the hinges plus a lot of cables ,rods etc to be added .Ive also cut off and edged the ailerons , when the wings were folded on the Wildcat the control cables tightened and deflected the ailerons upwards , so these will be portrayed as such , while I was at it with the wings Ive scribed the flap line -it was a raised line on the kit. heres some picsView attachment 297115View attachment 297116View attachment 297117View attachment 297118View attachment 297119View attachment 297120View attachment 297121View attachment 297122
Attachments
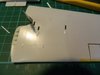
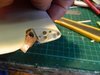
Bit more done today , the outer guns have been filled as the Mk V only had four , I also had to fill the ejector chutes and sand off the gun access panels and bulge. The rivet lineshave been re instated by pricking with a sharp pick. I cut out a section on each of the inner wing stubs and backed this with plastic card - this will be the access panel under which is the winding handle to unlock the wings . When the wings are folded this is left open and the handle hanging down , i'll be adding these details much later. The outer wings have been sanded to knock back the raised rivets a bit as the outer wings were flush riveted -unlike the rest of the airframe.View attachment 297166View attachment 297167View attachment 297168View attachment 297169View attachment 297170View attachment 297171View attachment 297172View attachment 297173
Attachments
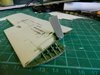
Bit more progress with the wing folds today. Ive made the hinges from styrene tube and fastened them to the outer sections . I had to add a little bit of plastic card in places to fill the voids and they both now fit together lovely while still being able to be removed so they can be painted easier and added at the last minute. They still need cables and pipes adding plus the conspicuous winding handles that release the locks however these hang down from the wings so will be one of the last things to go on. Next step is attaching the inner wing sections and tailplanes, heres a few poor picsView attachment 298491View attachment 298492
Attachments

hi Tony
Your making a fine job of this. Impressed with the scratched improvements you have made. Wing hinges look great. Your tips/method for reinstating the panel lines and rivets is something quite simple but works well.
Jim
Your making a fine job of this. Impressed with the scratched improvements you have made. Wing hinges look great. Your tips/method for reinstating the panel lines and rivets is something quite simple but works well.
Jim
G
Guest
Guest
Top notch. Watching this work closely.
Hi Tony,
Just read through the thread from the start. You're doing a fine job on this Martlet. :thumb2: I am a fan of rebuilding old dated kits as well...basically revitalising them with added detail. It is a challenge but fun.
I am enjoying this so far with the detail and interesting use of material around the house. I used the CD side portion for my Walrus internal walkway. If time permits I'll reblog the Walrus build.
Looking forward to more progress.
Cheers,
Richard
Great work, and well done on restoring lost detail. It's just taken me ages to fit the windscreen to a 1:48 P38, loosing any nearby detail in the process. And after that, I couldn't face even a small attempt at restoring any detail - lazy, yes.
Cheers guys , a few little bits of progress today. Ive put the lens and reflector on the gunsight using holographic confetti cut to shape (I know the gunsight wouldnt have been optically coated like a HUD but it just makes it a bit more visible if you use the holographic stuff )
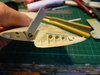
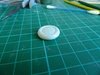
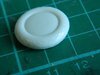
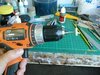
Ive also masked and fitted the windscreen . The wheels have also come in for a bit of attention, being tooled with a raised depiction of the diamond pattern . not only is most of this going to be lost during seam removal but its raised ,plus in all the pictures ive looked at of wartime martlets they all had smooth or circumferential tread (big word!ooh) So i set about how to achieve this by supergluing a cocktail stick into each wheel and mounting it in the drill . With the drill on full speed imitating a lathe ,I sanded off all the diamond pattern and using a razor saw cut some grooves . Hopefully theyll look ok when painted up. cheers tonyView attachment 300397View attachment 300398View attachment 300399View attachment 300400
Ive also masked and fitted the windscreen . The wheels have also come in for a bit of attention, being tooled with a raised depiction of the diamond pattern . not only is most of this going to be lost during seam removal but its raised ,plus in all the pictures ive looked at of wartime martlets they all had smooth or circumferential tread (big word!ooh) So i set about how to achieve this by supergluing a cocktail stick into each wheel and mounting it in the drill . With the drill on full speed imitating a lathe ,I sanded off all the diamond pattern and using a razor saw cut some grooves . Hopefully theyll look ok when painted up. cheers tonyView attachment 300397View attachment 300398View attachment 300399View attachment 300400
Attachments
Thanks Richard , looking forward to seeing the Walrus . If you like using odd bits ,check out the 'unconventional materials thread in the Tutorials and how tos' section http://www.scale-models.co.uk/threads/unconventional-modelling-materials-list.6491/ its a rolling reference for everyone to add their own bit of useful but not normally used for modelling stuff. cheers tonyI am enjoying this so far with the detail and interesting use of material around the house. I used the CD side portion for my Walrus internal walkway. If time permits I'll reblog the Walrus build.
1/3
Hi Tony
Just had a catch up read through of this blog. Really impressive stuff that is up there with the best in my opinion. Already looking forward to the next instalment.
Cheers
Tim
Just had a catch up read through of this blog. Really impressive stuff that is up there with the best in my opinion. Already looking forward to the next instalment.
Cheers
Tim
- Status
- Not open for further replies.
Legal Notice
scalemodelling.co.uk is a privately operated online discussion forum. All content posted by members reflects their own views and opinions and does not necessarily represent those of the forum owners or administrators. While reasonable efforts are made to moderate content, no responsibility is accepted for user-generated material. By using this site, you agree to comply with UK law and the forum rules.