
You are using an out of date browser. It may not display this or other websites correctly.
You should upgrade or use an alternative browser.
You should upgrade or use an alternative browser.
SimonT - 4x4 1/24 Esci Range Rover
- Thread starter SimonT
- Start date
G
Guest
Guest
Simon .
What a splendid example of old corrugated sheeting,. Just the job .
John.
What a splendid example of old corrugated sheeting,. Just the job .
John.
View attachment 315099View attachment 315100View attachment 315101View attachment 315102
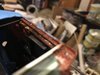
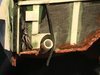
An initial bit of crustiness added using VJ red oxide paste to give a bit of texture to the surface
Chassis will get a little more tonight now that this first layer is dry
An initial bit of crustiness added using VJ red oxide paste to give a bit of texture to the surface
Chassis will get a little more tonight now that this first layer is dry
Attachments


G
Guest
Guest
Ooh :thumb2: nice eaten away detail. Simon.
John.
John.
Hi Simon
Very realistic rusting. As someone who once owned a Hillman Hunter I know about cars rusting :sad: Roof looks good. I have used that artist acrylic texture paint/paste and that works for rendering, sandy ground etc.
Jim
Very realistic rusting. As someone who once owned a Hillman Hunter I know about cars rusting :sad: Roof looks good. I have used that artist acrylic texture paint/paste and that works for rendering, sandy ground etc.
Jim
Goodness me Simon...looks like something I just merinated with fermented Chinese torfu for deep frying. :smiling6: That is some bad case of rusting commonly seen on Continental cars.

Cheers,
Richard
Cheers,
Richard
Thanks John
Jim - it was rather a design feature for cars of that era wasn't it :smiling: My minis were the same
Richard - deep fried Range Rover, yum
John - good to see you back again
Steve - I have at least six shades of pigment and three or four paints to go at. May not all get used though. The red paste is only red because it already is - it is not the finished surface. I just used it to get a rough finish
Have assembled the building onto the base and added a concrete floor - forgot to take a picture of the current state :rolling:
View attachment 315354View attachment 315355
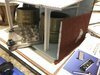
this is the current state of the shed
brown layer is the photo frame hardboard, next is a 1mm pvc foam board then 5mm blue styrofoam 'concrete' slab
the steel uprights were cut into the blue foam
this is the current state of the shed
brown layer is the photo frame hardboard, next is a 1mm pvc foam board then 5mm blue styrofoam 'concrete' slab
the steel uprights were cut into the blue foam
Attachments
View attachment 315685View attachment 315686
a few more sheeting fixings added to roof and some ground added around edges
The ground is Celluclay mixed with Gorilla wood glue and brown Humbrol weathering powder, sprinkled with real dirt and then some patchy bits of grass stuck on
Also added a tap and pipework to the outside of the end wall and rear brake disks to the Rover
Attachments

Jim - ta very much
Fernando - thanks. The rusty bits should be fun
Steve / Paul - ta. AK Worn effects on standby.....
View attachment 315721
tap and 15mm supply pipe
View attachment 315723
shelf for the shed
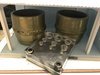
View attachment 315725
old paint tin for the shelf
View attachment 315718
both together - yes, shelf is a bit low down before some clever clogs says so
View attachment 315719
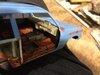
dashboard installed after filling and sanding all the sink marks
steering wheel removed and splined shaft added
View attachment 315722
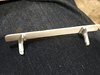
rainwater drain pipe added - this runs down the C pillar and seems to exit through the bottom of the wing
a bunch of wires and a bracket added to the left of the filler cap
View attachment 315724
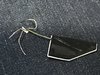
I also made this tank and pipework that sits inside the OSR wing - my best guess is that it is the water tank for the rear screen wash system
Anyway, with the car stripped as I have depicted it would have been removed so I needed one to sit on the base as if stripped out
Also added some wiring hanging out of the speaker hole in the passenger side door card - can't really see them though
Thanks for looking in
Fernando - thanks. The rusty bits should be fun
Steve / Paul - ta. AK Worn effects on standby.....
View attachment 315721
tap and 15mm supply pipe
View attachment 315723
shelf for the shed
View attachment 315725
old paint tin for the shelf
View attachment 315718
both together - yes, shelf is a bit low down before some clever clogs says so
View attachment 315719
dashboard installed after filling and sanding all the sink marks
steering wheel removed and splined shaft added
View attachment 315722
rainwater drain pipe added - this runs down the C pillar and seems to exit through the bottom of the wing
a bunch of wires and a bracket added to the left of the filler cap
View attachment 315724
I also made this tank and pipework that sits inside the OSR wing - my best guess is that it is the water tank for the rear screen wash system
Anyway, with the car stripped as I have depicted it would have been removed so I needed one to sit on the base as if stripped out
Also added some wiring hanging out of the speaker hole in the passenger side door card - can't really see them though
Thanks for looking in
Attachments


Hi Simon, quite scary looking rust, a bit like a mates Range Rover, he ended up cutting the back end off it!
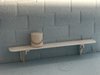
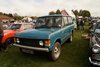
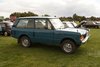
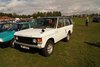
Looking good though. A couple of photos of rather lees rusty Range Rovers.
Looking good though. A couple of photos of rather lees rusty Range Rovers.
Attachments
- Joined
- Apr 27, 2018
- Messages
- 15,123
1/3
Simon,
Love all the details and the ground work keep it up.
Love all the details and the ground work keep it up.
Jim - I am having fun :smiling:
Graeme - a lot of rust but based on a 1:1 restoration
Scottie - thanks
View attachment 315799
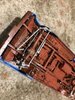
steering linkages added
View attachment 315800
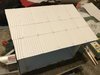
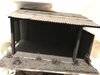
primed the building with foam friendly primer then gave the whole thing a coat of Tamiya black xf-1
Took two of their stupid little bottles - the old large bottles were much more useful!
Graeme - a lot of rust but based on a 1:1 restoration
Scottie - thanks
View attachment 315799
steering linkages added
View attachment 315800
primed the building with foam friendly primer then gave the whole thing a coat of Tamiya black xf-1
Took two of their stupid little bottles - the old large bottles were much more useful!
Attachments
Legal Notice
scalemodelling.co.uk is a privately operated online discussion forum. All content posted by members reflects their own views and opinions and does not necessarily represent those of the forum owners or administrators. While reasonable efforts are made to moderate content, no responsibility is accepted for user-generated material. By using this site, you agree to comply with UK law and the forum rules.